Synchronizing users with Entra ID
You can use Microsoft Entra ID to synchronize the list of users and groups in FormFlow.
Set up the synchronization on the tab.
Synchronization management
The Synchronization screen displays the list of all set up synchronizations.
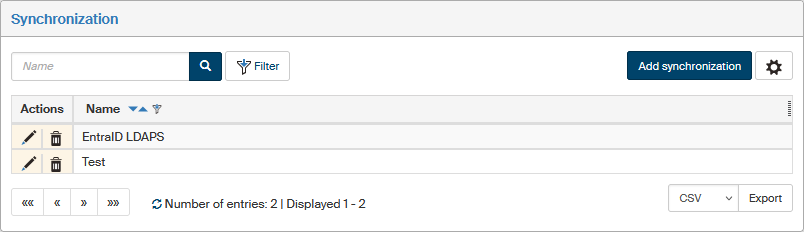
Each row in the table corresponds to one synchronization. Manage them using the following buttons in the Actions column:
-
 Edit synchronization – displays the synchronization detail where you can edit its parameters.
They are described in chapter Synchronization settings.
Edit synchronization – displays the synchronization detail where you can edit its parameters.
They are described in chapter Synchronization settings. -
 Delete synchronization – irrevocably deletes all synchronization settings.
The Add synchronization button opens a window where you can set up the properties of a new Entra ID synchronization.
Adding a new synchronization
Click Add synchronization in the Synchronization window to display a window to set up the basic properties of a synchronization.
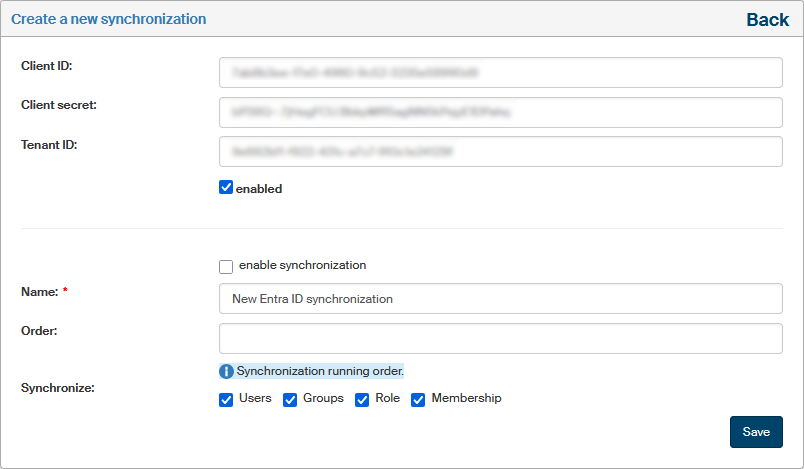
If there are Entra ID details (Client ID, Client secret and Tenant ID) specified in external authentication settings, they will be automatically filled in the new synchronization, but you can still change them as you need at this point.
Enter the mandatory Name field and then set up other details as you need. Their meaning is described in chapter Synchronization settings – the Main tab.
Confirm the entered details by clicking Save. After saving, the rest of the setting tabs become available. On these tabs, you can edit attribute mapping and membership in groups and roles.
Synchronization settings
The Main tab
The basic synchronization settings are available to fill in immediately when creating a new synchronization. Most of them can also be edited later: you will find them in the edit dialog on the Main tab.
-
Client ID, Client secret and Tenant ID – identification and authentication details for the Entra ID account. They cannot be edited after saving.
-
enabled – if checked, authentication using Microsoft oAuth2 is running, which means an authentication token is generated based on the Client ID, Client secret and Tenant ID, and login using Entra ID is available.
-
enable synchronization – if checked, the synchronization is used to synchronize users.
-
The Name field is mandatory and must be unique. This name is then displayed in the synchronization list.
-
Order – if there is more than one synchronization set up, they will be run following the order specified in this field.
-
Remote groups – the field displays a list of groups that exist in the Entra ID tenant. Select one or more groups from the list, whose members will be synchronized to FormFlow.
Members of subgroups will not be transferred. If a selected group contains subgroups, their members will not be automatically synchronized. Subgroups need to be added individually. -
In addition to Users, you can synchronize Groups, Roles and Memberships in groups and roles. Check the type of entries to include in the synchronization.
Mapping user attributes
Create the schema to map the details of synchronized users to user details in FormFlow on the Mapping user attributes tab.
-
Map users by attribute value – the values of this attribute will be compared to map users, e.g.
LOGON_USER. -
URL – the URL address of MS Graph API.
To create a user correctly, the following need to be mapped:
-
Notification e-mail – map to the Mail attribute.
-
Name – map to GivenName.
-
Surname – map to Surname.
The Extension attributes section offers fifteen additional optional user attributes for details that are not included in the previous details.
Mapping group attributes
Create the schema to map group properties on the Mapping group attributes tab. Select the entries from which to copy the "Group name" and "Group GID" attributes.
In Group URL and Role URL, enter the URL to MS Graph API, separately for groups and roles.
Mapping group memberships
Use the Mapping group memberships tab to map users from Entra ID groups to groups in FormFlow.
To add a new entry, click Add mapping. In the following dialog, select a FormFlow group in the Group field. Then in Remote groups, select one or more groups from Entra ID to synchronize to the selected FormFlow group.
Mapping role memberships
Use the Mapping role memberships tab to map users from Entra ID roles to roles in FormFlow.
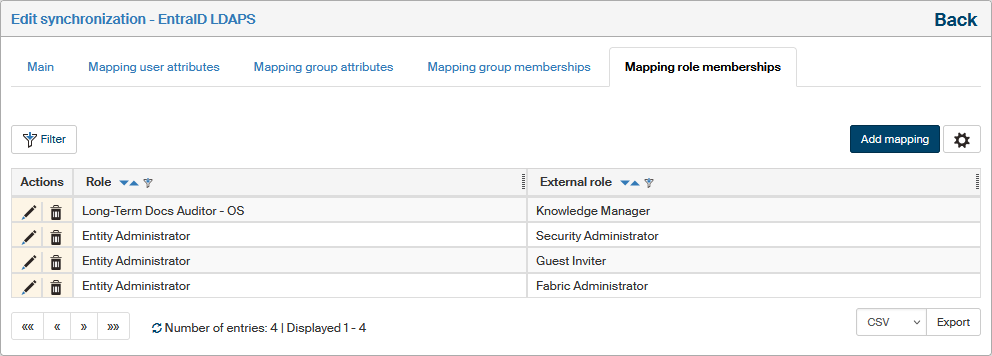
To add a new entry, click Add mapping. In the following dialog, select a FormFlow role in the Role field. Then in Remote roles, select one or more roles from Entra ID to synchronize to the selected FormFlow role.