Import
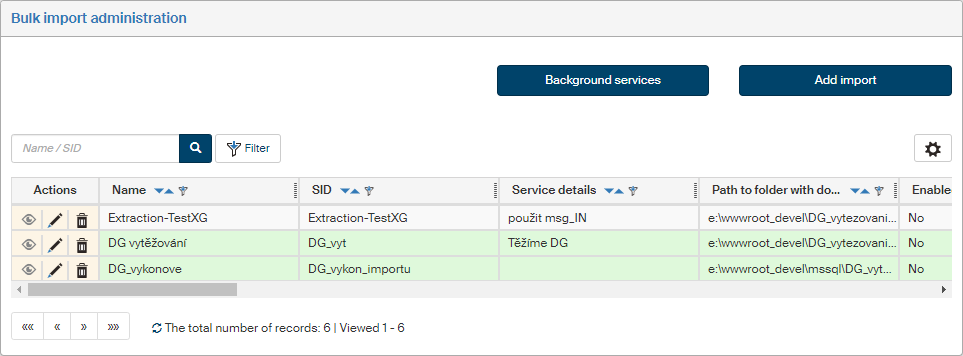
FormFlow can extract files and metadata in bulk from a prepared folder structure at the server to forms or DMS folders, making them available to users for further processing. Set up the import using the Bulk import administration screen ().
Switch to background service administration
The Background services button on the upper right displays a setting screen of the same name (available by going to ). Settings available in this screen are described in chapter List of background services.
Creating a new import
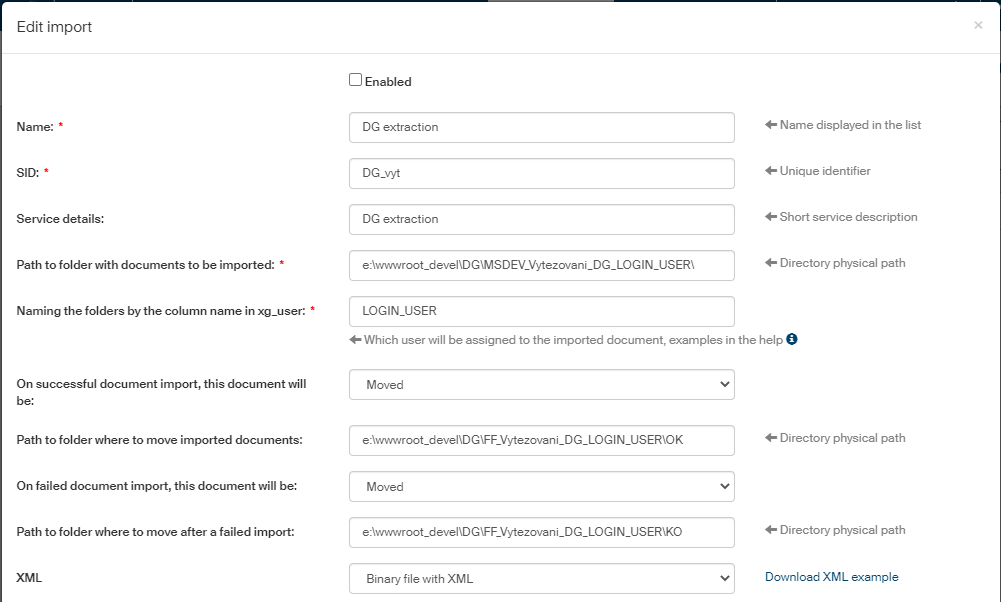
You can add a new import by clicking Add import in the upper right part of the screen. A window opens where you can set up all import parameters.
Start by configuring the import itself:
-
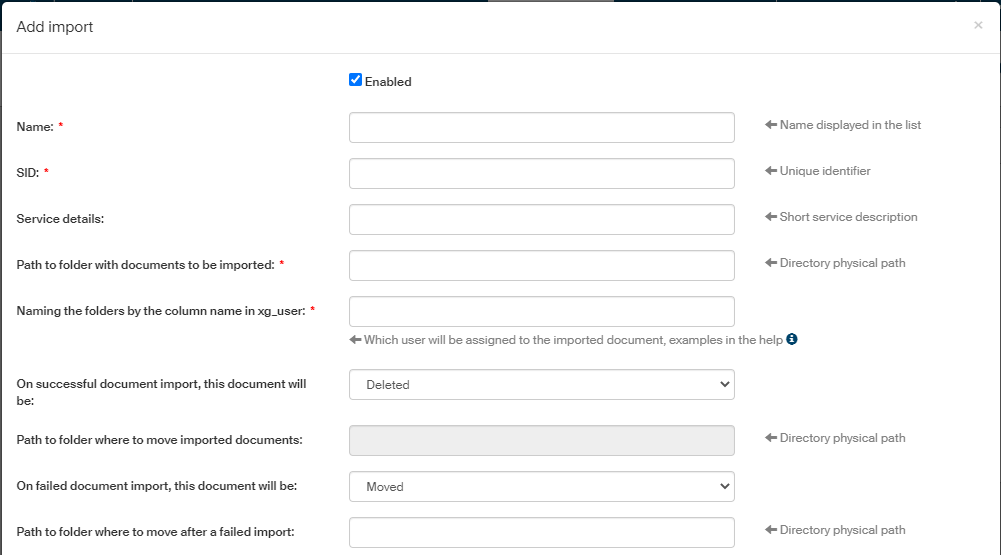
Enabled – if checked, this import setting will be available to be run.
-
Name – this name will be used in import lists. For clarity, you can use e.g. the launcher name.
-
SID – import identifier, matching the launcher (for form import form the process section, it is Extraction-XG; for document section, it is Extraction-DG).
-
Service details – description to better understand what the service does.
-
Path to folder with documents to be imported – path to the prepared folder structure, e.g.:
c:\wwwroot\FormFlow\data\ImportDG\
Create a subfolder structure in this folder, corresponding to the individual FormFlow users for whom the import is intended. Documents placed in each subfolder will be assigned to the given user (if it is a form, it will land on their desk, while DMS documents will be assigned to the user as the author only if this author is specified in the XML or if it is specified in the folder metadata).
When filling the author metadata, the following situations may arise:
-
The author is specified in DMS folder metadata and not in the XML. In this case, it will be automatically filled in based on DMS.
-
The author is specified neither in DMS folder metadata nor in the XML. In this case, the author metadata is not filled in.
-
The author is specified in both the DMS folder metadata and in the XML. In this case, the author metadata entry is filled in based on the XML value.
Use the following setting to select how to name the subfolders.
-
Naming the folders by the column name in xg_user – the subfolders determining which user will be assigned to the imported document must match user identification details as given in the user table. Click the Help icon to display the list of identification details you can use. They are the following:
-
Username: LOGIN_USER
-
First name: FIRST_NAME_USER
-
Surname: SURNAME_USER
-
UID: UID_USER
-
Job title: JOB_USER
-
Company: COMPANY_USER
-
Role: ROLE_USER
-
Domain and username: DOMAIN_AND_LOGIN_USER
-
Department: DEPARTMENT_USER
-
Section: SECTION_USER
You can combine the details in the folder name, either one directly after the other, or using a suitable separator.
-
-
On successful document import, this document will be – select whether to move a successfully imported document to another folder or simply delete it. If moving, select the path to the target folder in the following field.
-
Path to folder where to move imported documents – if document move is selected in the previous field, specify the target folder where to move a document on successful import.
-
On failed document import, this document will be – select whether to move a document that failed to import to another folder or simply delete it. If moving, select the path to the target folder in the following field.
-
Path to folder where to move after a failed import – if document move is selected in the previous field, specify the target folder where to move a document if it failed to import.
-
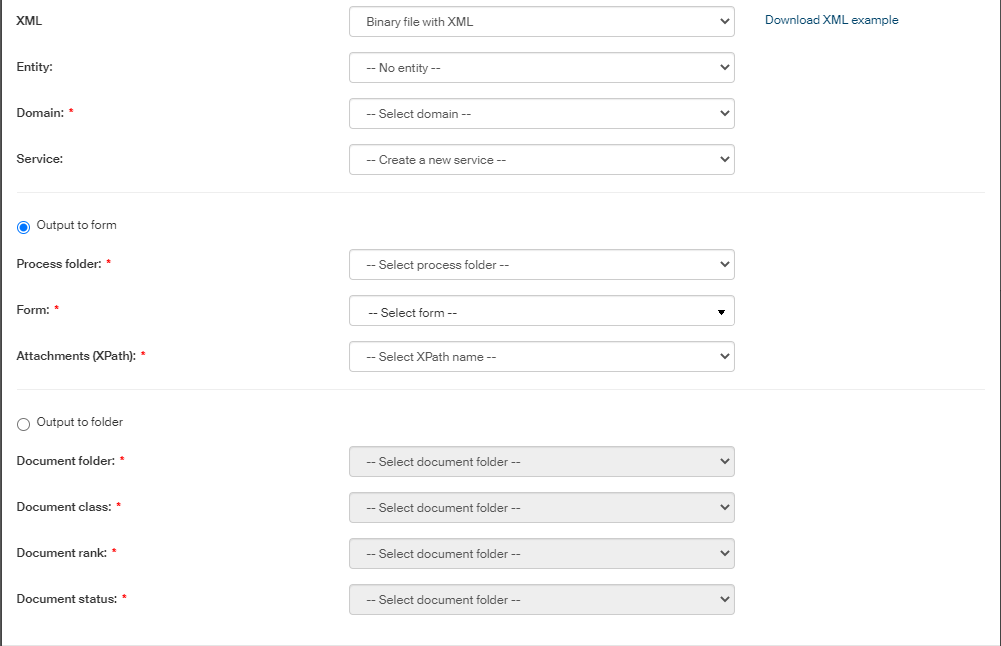
XML – specify the file types the import service will expect and process:
-
Binary file with XML – if selected, the import service expects an XML file along with the input file (the same file name but an .XML extension), containing the metadata for the DMS document. The metadata is then imported along with the file. You can view an example XML file under the “Download XML example” link.
-
Binary file without XML – if selected, the import service will only expect the document file.
-
Binary wile with document – if selected, the import service only expects documents in ISDOC or ISDOCX formats.
-
-
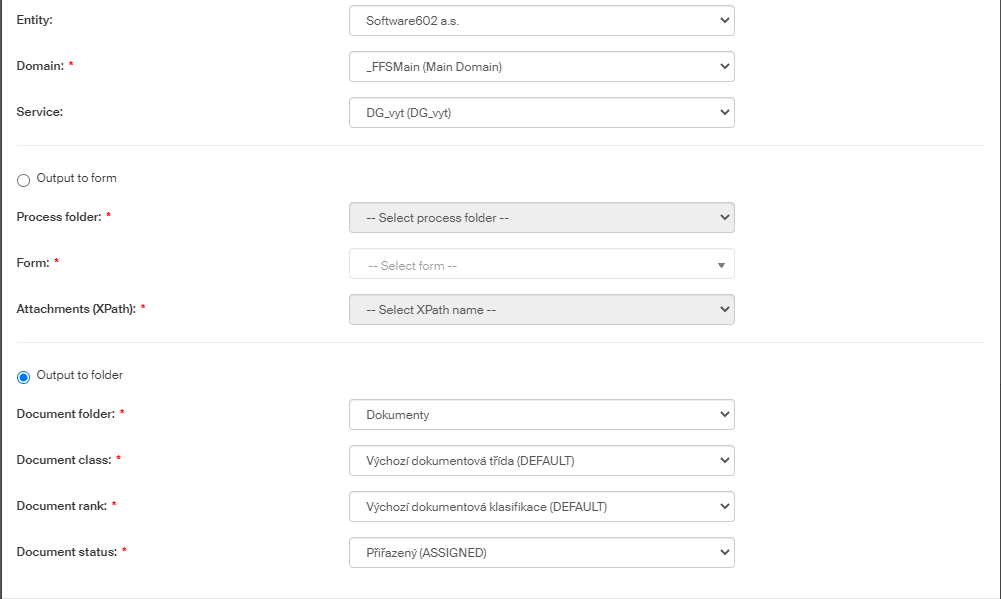
Entity – if you manage more than one entity, you can select which entity will own the document.
-
Domain – if there is more than one domain on this FormFlow, select in which one to place the document.
-
Service – select the background service:
-
Create a new service – when this import configuration is saved, a new background service will be created, as a child service to Import – Scanning/Extraction; you will find this service in section Background services.
-
Import - Scanning/Extraction Extraction-TestDG – readymade service for document extraction to DMS.
-
Import - Scanning/Extraction Extraction-TestXG – readymade service for document extraction to processes.
You can also create your own background service. This service must be created as a child service to Import – Scanning/Extraction; for more details on creating background services, see chapter Background services. Enter the following details:
-
Name (e.g. Import to DMS).
-
SID unique service identifier.
-
Service details – description to better understand what the service does.
-
Service launcher (e.g.
htdocs/services/extraction.php) -
Launching class – specify the PHP class implementing IServiceAdvanceRun. The launching class is an alternative to the Service launcher, therefore you need to enter one (and only one) of these two options.
-
Forced service termination – the default value is 300.
-
Servers – select the servers where the background service can run
-
Maximum number of running services – enter the maximum number of service processes that can run at the same time.
-
Group – select the group where the service being created will be placed
-
Parser – if you want to use your own parser during document extraction, select it here.
-
In the next section of the dialog, select whether to place the imported files in a form (Output to form) or to one of the DMS folders (Output to folder). Based on the selected option, continue to specify additional details.
Output to form:
-
Process folder – folder in the structure on the PROCESSES tab, where the form will be placed.
-
Form – form template that will be used to create the form for the file.
-
Attachments (XPath) – XPath attachments in the selected template (as described in chapter Attachments).
Output to folder:
-
Document folder – select a folder in the DMS module folder structure, where the document will be placed.
-
Document class – when the document folder is selected, use this field to select one of the available document classes to apply to the document.
-
Document rank – when the document folder is selected, use this field to select one of the available document ranks to apply to the document.
-
Document status – when the document folder is selected, use this field to select a document status to apply to the document.
Disabling and enabling an import
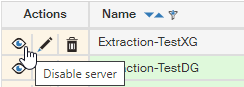
You can disable an existing import configuration temporarily and then enable again when needed. Use the buttons Disable (Enable) in the Actions column.

Editing an existing import
To edit an existing import and its properties, go to the Actions column on the left and click  Edit import in the corresponding row. A window opens, similar to the Add import one. Edit or add import parameters and click Save to confirm the changes.
To delete an existing import entry, go to the Actions column and click  Delete import.