Incoming mail
The Incoming mail room window combines all standard controls for bulk processing incoming mail. Click Incoming Mail on the RECORDS MANAGEMENT tab to open the window.
In older versions of FormFlow, the Incoming Mail button offered two options, New mail and Unassigned. Now you can find all the messages in a single view. The previous two options are now available as preset filter sets – check the box Read or Unread to apply them.

The window combines data from two resources:
-
New mail – collects as-yet-unopened (unread) messages received electronically, that is, from data mailboxes and e-mail.
-
Unassigned mail – collects data of all message types (including traditional paper mail) that have not been assigned to anyone to process yet.
Message list in Incoming mail
The Incoming mail button contains an entry for each message and checkboxes for bulk operations (see chapter Bulk operations in Incoming mail).
The window includes two preset filter sets for the group Everyone – Read and Unread. Click the corresponding box to adjust the view so that it matches one of the two views (New mail and Unassigned) from older FormFlow versions.
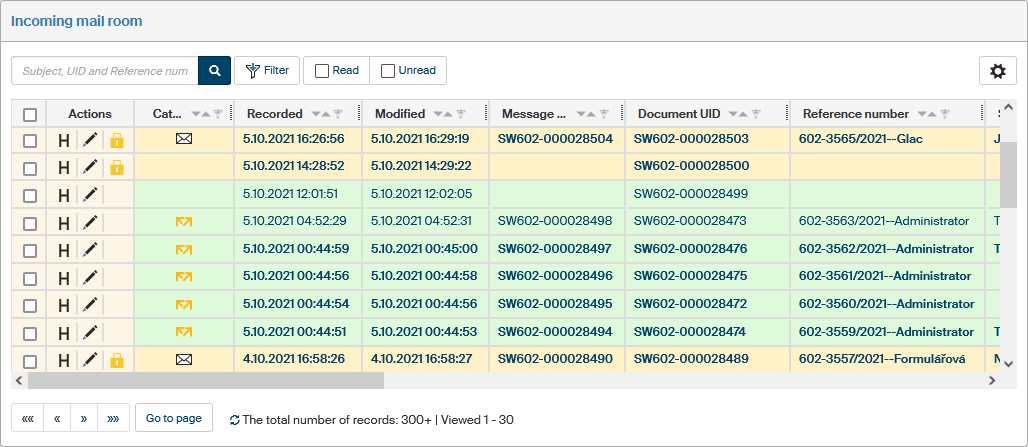
There can be three buttons available in the Actions column for each entry:
-
H Document history – displays a window of the same name with a chronological list of events related to the document.
-
 Edit message – opens the MSG_IN form for the document.
 -
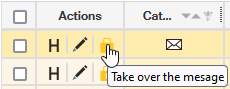
 Take over message – the document is on another user’s desk, but you can click to take it over; only displayed for documents you are authorized to take over.
The icon in the Type column indicates the shipment form:
-
 traditional paper mail.
 -
 DMIS data message.
 -
 e-mail message.
If you are authorized to view the document, you can click its identification details to display the form.
Other columns in the message list include the following:
-
Recorded – date and time the message (traditional mail, e-mail, data message) was entered in FormFlow;
-
Modified – date and time of the last change in the incoming message.
-
Message UID – unique identifier of the message, used since version 10.2.2.
-
Document UID – unique identifier of the document received with the message.
-
Reference number – reference number for the document received with the message.
-
Subject – subject (name, …) of the document received with the message.
-
Processor – name and surname of the user who has the incoming document “on their desk” for processing.
-
Organizational unit – name of the organizational unit where the incoming document is assigned.
-
Entity – name of the entity where the incoming document is assigned or received.
-
Sender – for received messages, the company name or name and surname from the address book entry for the sender.
-
Date of notification for personal handover – date and time an e-mail notification was sent
-
Recipient in person – surname and name of the user who was sent an e-mail notification or who received the incoming document at the mail room
Bulk operations in Incoming mail
The Bulk operations window
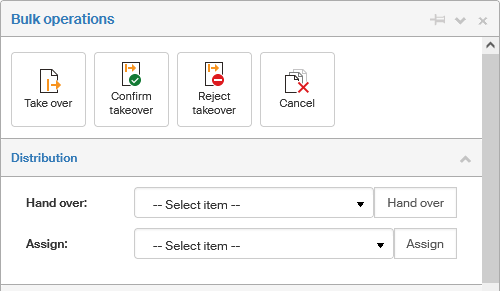
Check the box in the leftmost column for one or more table entries to display a floating window with a list of Bulk operations you can run for all the selected documents at the same time.
-
Take over – click this button to take responsibility for all selected documents.
-
Confirm takeover – if the selected documents have been handed over to you, click this button to confirm taking over all of them.
-
Reject takeover – if the selected documents have been handed over to you, you can click this button to reject taking over all of them.
-
Cancel – use this button to remove messages that have been registered in the records management, but it does not make sense to process them (e.g. spam or duplicates).
-
The Distribution section provides the option to change the officer – the person responsible for the document. Select the officer from the list and click Hand over or Assign to pass them all selected documents. If you have selected Hand over, the usual handover procedure follows, meaning that the selected user must confirm taking over the document, and they have the option to reject it. If you have selected Assign, the officer change is applied immediately.
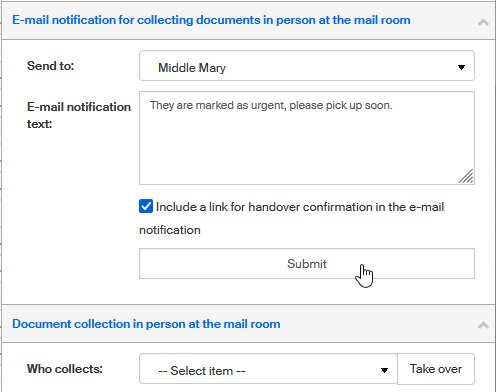
If the message includes paper documents that need to be collected from the mail room in person, the mail room staff can send an e-mail notification to the people responsible and later confirm the takeover or ask for its confirmation. To use this feature, visit section E-mail notification for picking up documents in person at the mail office.
Start by selecting the user who will receive the notification in the field Send. The e-mail notification text is preset, but you can add more details – enter it in the field E-mail notification text.
If you check Include a link for handover confirmation in the e-mail notification, the e-mail will include a link the user can use to confirm they have collected the documents. This is useful especially in the cases when the collecting user has a smart device (mobile phone or tablet) at hand and confirms the takeover on the spot when collecting from the mail room.
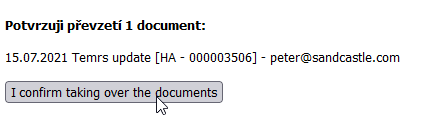
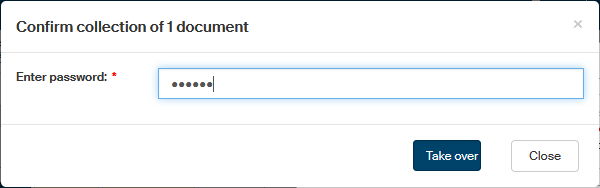
| If you have not been logged in to FormFlow when confirming the takeover, a password field is displayed next to the confirm button. In that case enter your login password to FormFlow and then click the button to confirm taking over the documents. |
The other option of confirming the collection is using the mail room staff device. In this case, go to section Document takeover in person at the mail office. The mail room staff selects the collecting user in field Who takes over and clicks Take over.

Then a dialog is displayed where the collecting user enters their password to confirm the takeover – note that this is not the FormFlow login password, but a special password for collecting documents. You can set up this password yourself in your personal settings (as described in chapter Change distribution password). Only then is the paper document collection complete.