Shredding procedure
To set up and monitor shredding of archived documents, open the Shredding window (). You need the corresponding operation permissions to access it.

When shredding without the National archive, you might be asked to approve the running shredding procedure. To approve it, you only need access to the Shredding approval button on the Dashboard.
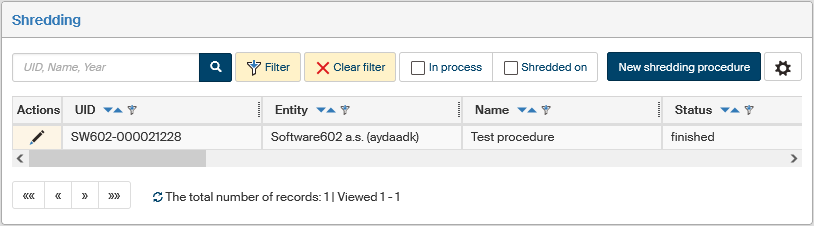
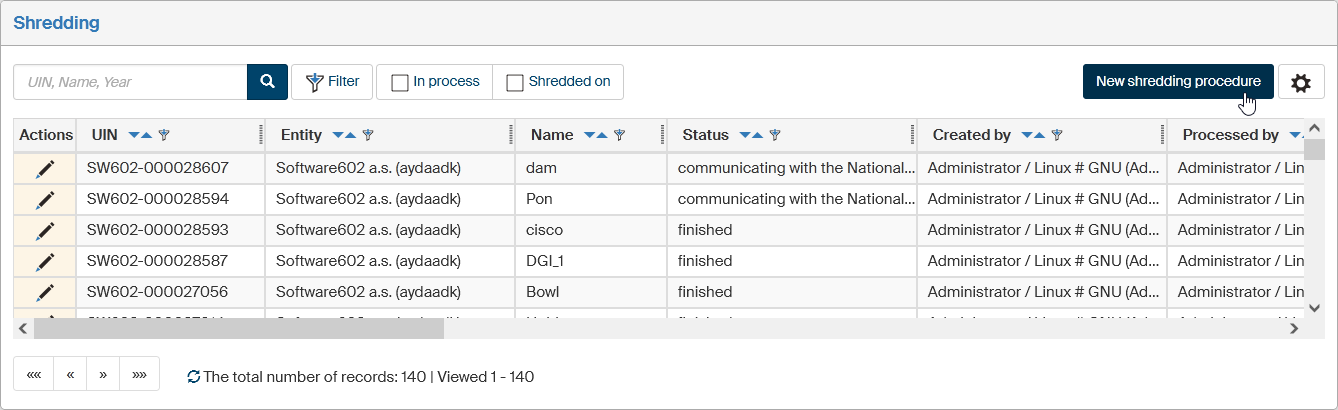
List of shredding procedures
Existing shredding procedures (both running and completed ones) are listed as a table. The list items can be sorted and filtered.
Click  Edit shredding procedure in the Actions column to open the Shredding procedure window.
There you can continue with a running procedure or view a finished one.
Edit shredding procedure in the Actions column to open the Shredding procedure window.
There you can continue with a running procedure or view a finished one.
Types of shredding procedures
A shredding procedure is a rather lengthy process, during which it receives comments from internal users or the National archive.
-
When the National archive is involved, the process includes several exchanges with the archive, and waiting for its response may take a few days or weeks. First you send the list of entities to be shredded to the archive, and the archive may request copies of some of them. Only after handing over the archives you can destroy the storage units and their contents.
-
If you select the simplified option without the National archive, FormFlow users selected during the procedure will be able to comment on the shredding. They will be able to select entities they do not want to shred yet. Such entities will be removed from the shredding procedure and will not be destroyed.
There can be more than one approval round.
Additionally, for both of the options listed above you can choose a test mode. A test mode will allow you to try out the procedure without losing the shredded data.
Creating a new shredding procedure
Select New shredding procedure in the upper right corner of the Shredding window to start a new procedure.
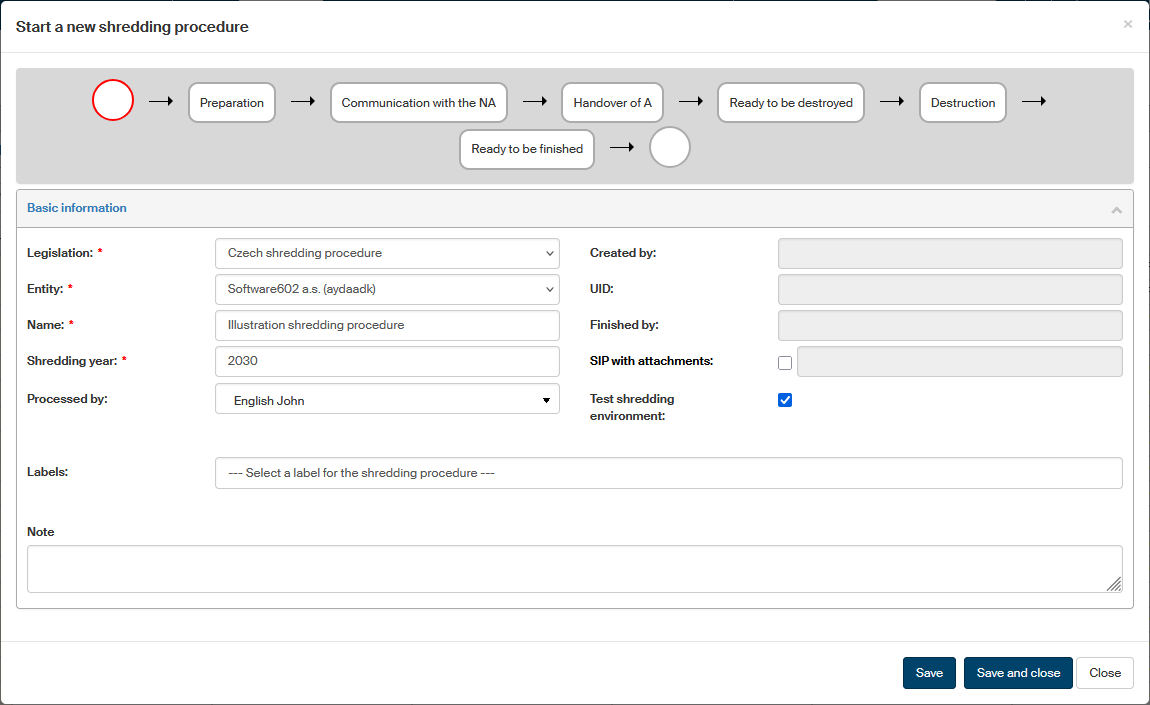
The window Start a new shredding procedure opens to guide you through the shredding procedure from the beginning to the end. Right now it contains a single section, Basic information. Enter at least the mandatory details, marked by a red asterisk:
-
Legislation – select the type of shredding procedure:
-
Czech shredding procedure – includes communication with the National Archive;
-
shredding procedure without the National Archive – only includes internal approval.
-
-
Entity – if you manage documents for more than one entity, select the one whose documents to shred.
-
Name – will be displayed in the list of shredding procedures.
-
Shredding year – the year the shredding is supposed to take place; for an actual shredding, only the current year or lower can be used, while the test mode allows any year including the future.
The other details are optional:
-
The Processed by field is prefilled with your name, but you can select another user.
-
The SIP with attachments field is only available if "Czech shredding procedure" is selected in Legislation. Check or uncheck it to select how to create SIP files. If it is not checked, the SIP files will only include metadata. Only when the National Archive requests it, the other components (files) from the entities (records, documents, …) will be inserted.
After saving the procedure, this field will display the application server address where the SIPs with attachments will be stored and where you can download them from.

This field is not used when shredding without the National Archive.
-
If you would like to test the shredding procedure without actually deleting any data, check Test shredding environment. The whole procedure will run normally, but the documents selected for shredding will return to the archive instead of being destroyed.
-
In the Labels field, you can attach one or more labels.
-
In Note, you can enter any text that might help with identifying and running the process.
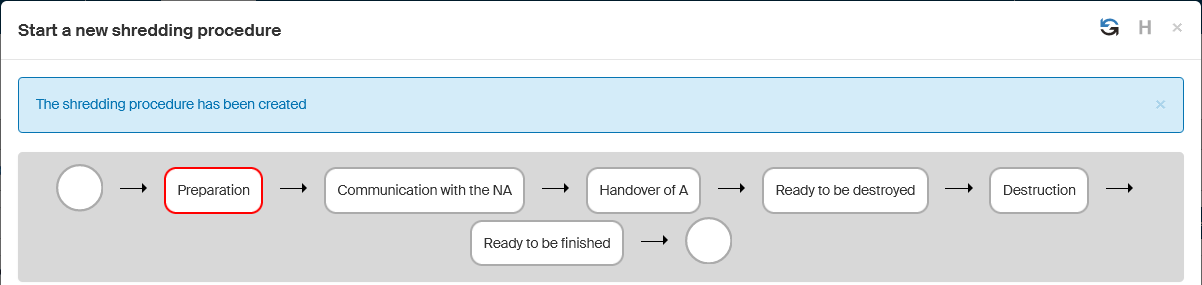
Click Save. The shredding procedure is created and assigned a UID. The shredding procedure window now displays additional sections and controls.
|
If the shredding procedure includes communication with the National Archive, it is not possible to cancel it once it is started. A procedure without the National Archive can be canceled if needed until the approval rounds are finished. |
The Shredding procedure dialog
Window header
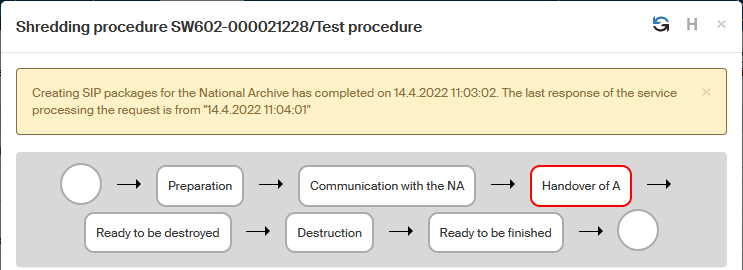
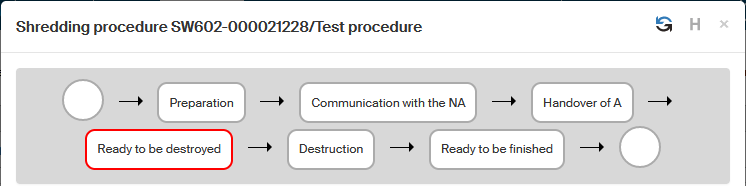
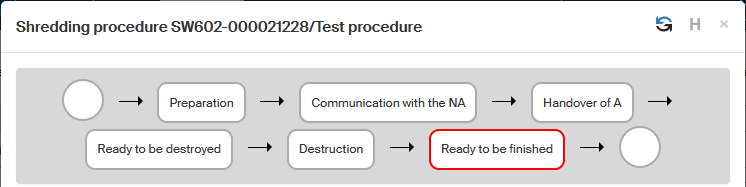
The shredding procedure consists of several phases. The current phase is marked by a red frame in the schema in the upper part of the window. The procedure steps depend on whether you have selected a procedure with or without the National Archive in the Legislation field.

There are two additional buttons in the upper right corner of the window next to the close button:
-
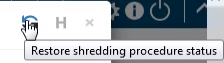
 Refresh shredding procedure status – refreshes the window to display the current status of the procedure.
 -
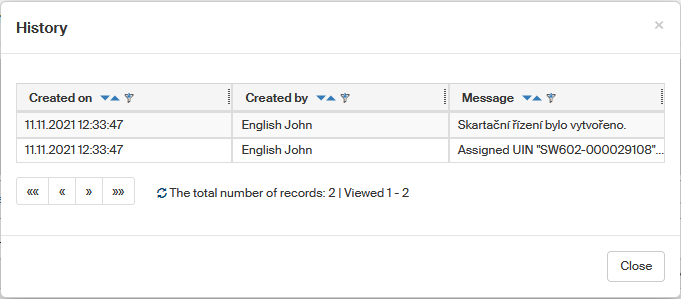
 Shredding procedure history – opens a History window listing what has happened in the procedure until now.
Process logging
A button Logs for download is available during the shredding procedure. Click the right part of the button with the arrow to display a list of log files (their availability varies based on the current status). Click the selected item to display the logfile or save it in a text file with the LOG extension.

Preparing the shredding procedure
Immediately after creating the procedure, it is in the Preparation phase.
A new section has opened below the Basic information – Shredding procedure contents. Now you need to select the storage units with the archived entities to be shredded. Click Insert a storage unit.

The list Select storage units is displayed. It contains all the storage units that can be considered for this shredding procedure – those with the shredding year equal to or lower than the shredding year selected in the procedure, and which are not empty.
Check the boxes next to the names of units you want to include in the shredding procedure and click Insert selected storage units in the shredding procedure.
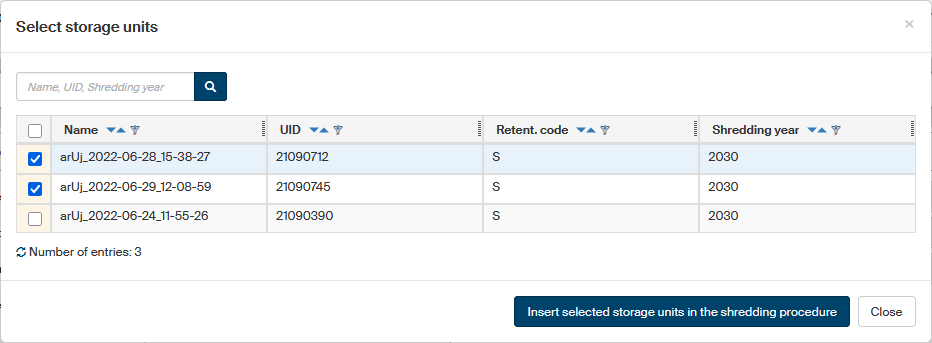
The selected storage units will be transferred to the section Shredding procedure contents.

Displaying and specifying the shredding procedure contents
You can check the storage units placed in the shredding procedure before starting the next steps.
There are two buttons in the Actions column:
-
 Display a quick preview of the storage unit contents – opens a floating window with a list of archived entities placed in the unit.
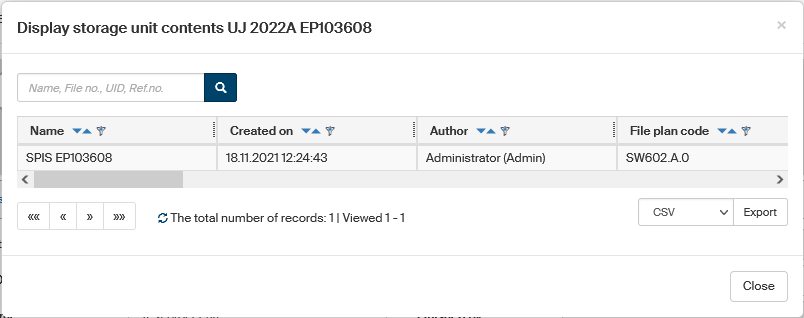
-
 Display the complete storage unit contents – opens a new window with a list of archived entities placed in the unit.
This option offers more actions with the inserted entities, such as viewing their metadata.
Display the complete storage unit contents – opens a new window with a list of archived entities placed in the unit.
This option offers more actions with the inserted entities, such as viewing their metadata.
The contents of a storage unit cannot be changed while they are in a shredding procedure. If you find out that a storage unit contains for example a document or record that should not be shredded yet, do the following:
-
Select
 Remove storage unit to remove the unit from the shredding procedure.
 -
Edit the storage unit contents as needed.
-
Select Insert a storage unit and place the storage unit back in the shredding procedure.
Using the button Insert a storage unit, you can continue adding more storage units.
To display a graph of the numbers of entities in this shredding procedure, select the Statistics button.
The next steps in the shredding procedure depend on the procedure type selected in Legislation:
-
If you have selected "Czech shredding procedure", continue with the chapter Approvals with the National Archive.
-
If you have selected "shredding procedure without the National Archive", continue with the chapter Approvals without the National Archive.
Approvals with the National Archive
If you have selected "Czech shredding procedure", the next steps are communication with the National Archive and sending the selected archives to the Archive.
Preparing SIP packages to export to the National Archive
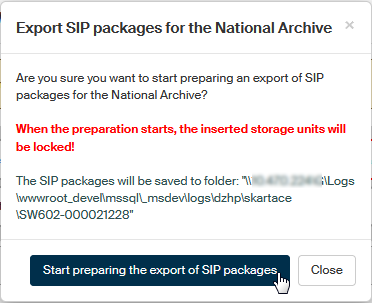
Once you have prepared the list of storage units, go to section List of shredding operations and select the button Export for NA. This starts the preparation of the SIP package to export to the National Archive.
|
The SIP (Submission Information Package) consists of the digital document itself and its descriptive and additional metadata. Metadata are records of all operations made on a document. |

The window Export SIP packages for the National Archive with a query whether you are sure you want to export packages for the National Archive. Note the warning: "When the preparation starts, the inserted storage units will be locked!" This means that it will not be possible to remove the storage units, and they will be processed. The window also gives the application server address where the SIP packages with attachments are stored and where you can download them from if you need to.
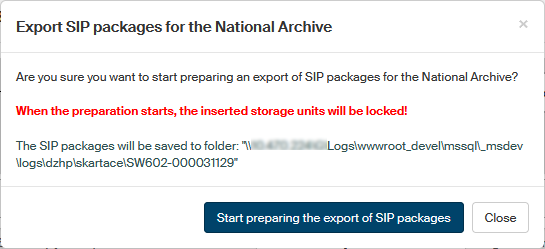
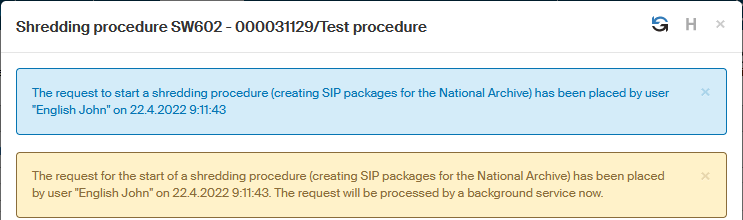
Click Start preparing the export of SIP packages.
The request is confirmed by information in two frames and passed on to the background service for processing. In our case the service ESS - shredding procedure tasks – DsEssSkartTask is used.
| These services are often run at longer intervals (for example 60 minutes). |
In the upper right corner of the Shredding procedure window, click Refresh shredding procedure status.
The red indicator in the upper part of the window moves to the third item – Communication with the NA.

Note that the Actions column in section Shredding procedure contents does not contain the trash bin buttons anymore that allowed removing (and editing) storage units.
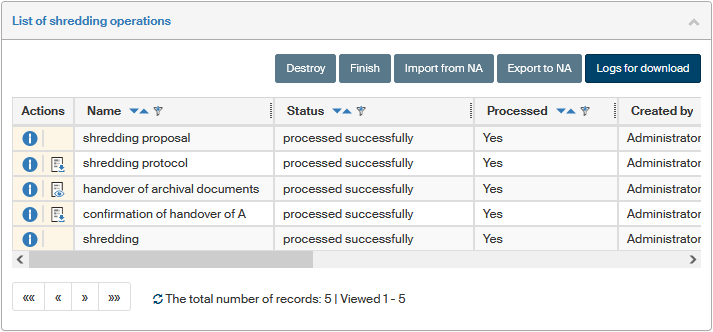
Shredding proposal
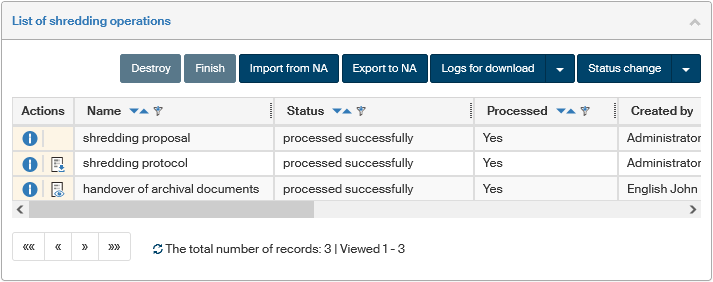
When you start communicating with the National Archive, the third section in the Shredding procedure window becomes relevant – Shredding procedure list. The operation listed is called shredding proposal.

If everything is correct, the Status column next to this operation displays processed successfully.
To display more details on the shredding procedure process, go to the Actions column and click  Display log.
The History window opens where you can view all operations that have taken place.
Display log.
The History window opens where you can view all operations that have taken place.

To view individual SIP packages, click  Display the list of SIP packages.
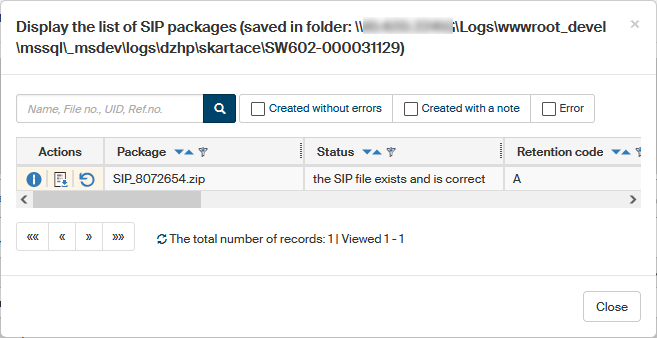
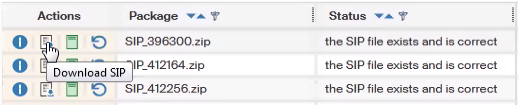
You can click  Download SIP to download the individual SIP packages.
If the packages are large (they might contain hundreds of files), downloading individual files this way would take uncomfortably long.
The window header therefore displays an address of a folder where you can download them faster and all at once.
Download SIP to download the individual SIP packages.
If the packages are large (they might contain hundreds of files), downloading individual files this way would take uncomfortably long.
The window header therefore displays an address of a folder where you can download them faster and all at once.
Click  Open form to display the form of the record to be shredded.
Click Display log to open the History window where you can view all operations that have taken place in the procedure.
If you need to (there were errors), you can click  Recreate SIP package to generate the SIP again.

A Query window is displayed; click Yes, create and the SIP package will be regenerated.
When closing the window Display the list of SIP packages, the system checks whether the user has requested regeneration of a SIP package (or packages). If such a request exists, a new shredding operation of type “shredding proposal” is created. To process the regeneration request, refresh the shredding procedure window. The newly created request will then be displayed in the table Shredding operation list.

Submitting SIP packages to the National Archive
The next step is downloading the individual SIP packages and sending them to the National Archive. Use the Download SIP buttons next to the entries to download the packages.
SIP packages are stored as ZIP files, and they will be typically saved to your default download folder (e.g. Downloads).

Send them to the National Archive using their website, on CD/DVD or other method you use to communicate with the National Archive.
Processing the packages and receiving the response
The National Archive processes the SIP packages and then sends a response file in XML format to your address.
| This process is not and cannot be online, because the processing may take up to several weeks. |
Upload the received file in the shredding procedure; click Import from NA.

A dialog Import response from the National Archive is displayed; click Select to look up the received response file and then click Save to server to import it in the system.
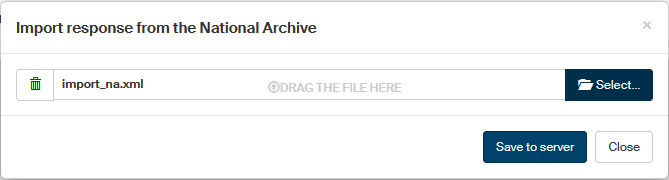
A message framed in blue will notify you about a successful import of the National Archive response file.

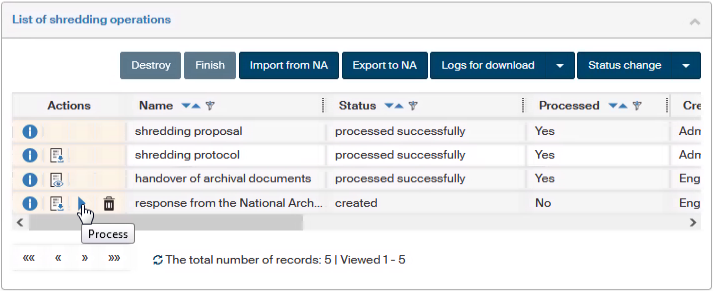
The imported data then needs to be processed. In section Shredding operation list, click the Process button on the row with the import entry.
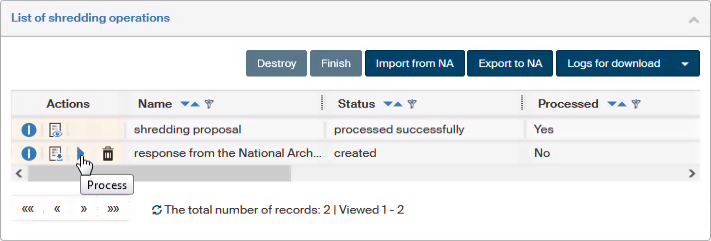
Then click Yes, process in the Query window to confirm the operation.
A message framed in blue will notify you about creating a request to process the National Archive response.

The processing itself is handed to a background process.
This processing can be repeated several times until the archive response will mark all the contents for archiving, destruction or removal from the shredding process.
Handing over the archives
In the upper right corner of the Shredding procedure window, click Refresh shredding procedure status.
Creating new SIP packages for the National Archive is announced by a message in an ochre frame and the red indicator in the upper part of the window moves to the fourth item – Handover of A.
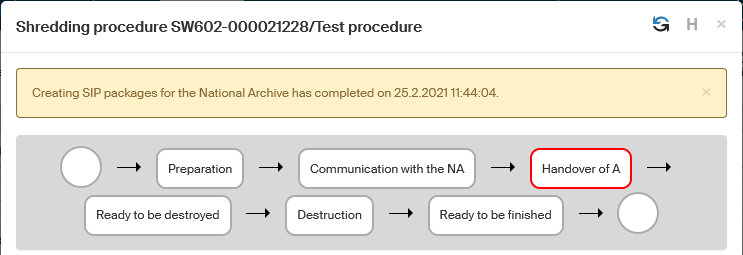
The status has reached the phase when packages marked "A" will be handed over to the National Archive for archiving. If everything is in order, only packages for destruction and for archiving (S and A) are left in the shredding procedure. There are no V packages with undecided status left. For Handover of A, SIP packages with only records and documents marked A (archives) are created.
Click Export to NA.
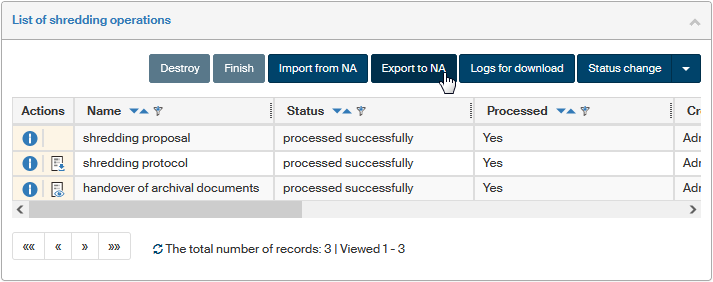
A query is displayed to confirm the package export as in chapter Preparing SIP packages to export to the National Archive.
The request to create SIP packages is confirmed by framed messages.
As soon as the request is processed by the background service, section Shredding operations list display a confirmation of archives handover.
Archives handover confirmation
After handing over the archives, wait for the response from the National archive. Then import the received XML file containing the response in FormFlow and process it.

The import and processing follow the same procedure as described in chapter Processing the packages and receiving the response.
Submit the request to process the data from the received response file.
When you confirm the query and the background process processes the request, section Shredding operation list displays a confirmation of archives handover.
The request is processed by a background service and confirmed in the shredding operation list section after the window status is refreshed.

Only the last step is remaining: Destroying packages selected for shredding.
Approvals without the National Archive
If you have selected a shredding procedure without the National Archive, the next step is one or more approval rounds.
Setting up the approval group
While setting up the shredding procedure contents, you can also start creating the list of users who will be asked to approve the procedure.
-
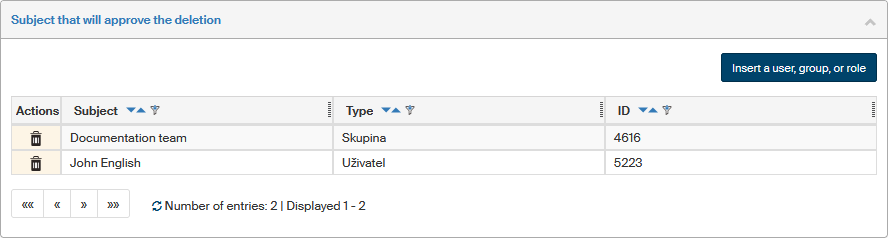
In section Subjects that will approve the deletion, select Insert a user, group, or role.
-
In fields Users and Groups or roles, select the approval round participants. You can use the field repeatedly to add more participants at the same time.
-
Select Insert selected subjects.
A table with the list of selected participants is displayed in section Subjects that will approve the deletion.
You can continue editing the list: add new entries in the same way or select Remove subject to remove selected participants from the list.
Running the approval
Once the list of storage units and approvers is ready, you can start the approval round.
| From now on, it will not be possible to add or remove storage units. |
-
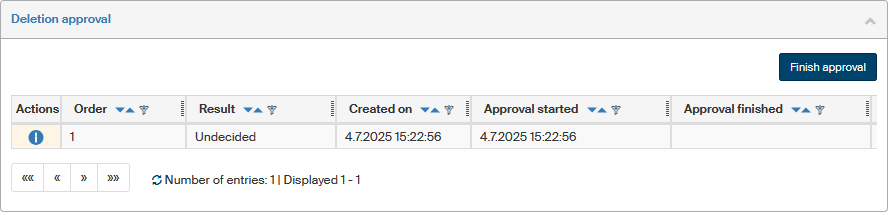
In section Deletion approval, select Create a new approval round.
-
Users listed in section Subjects that will approve the deletion find the shredding procedure on their Dashboard to approve. If they have notification e-mails set up, they receive a notification. If there is a group or role on the list of participants, all its members are included in the approval round.
-
The procedure is now in the Deletion approval status.
Approving the shredding procedure
If you have been asked to approve a shredding procedure, do the following:
-
Display the details of the shredding procedure: on the
 Dashboard, select Shredding approval.
A list of all shredding procedure you can comment on is displayed.
Click the name or description of the selected procedure to display its details.
Dashboard, select Shredding approval.
A list of all shredding procedure you can comment on is displayed.
Click the name or description of the selected procedure to display its details.If you have received a notification of the approval round, you will find a direct link on the procedure details in the message.
-
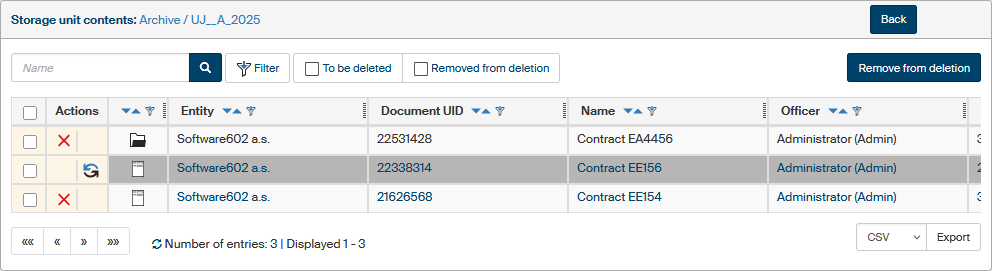
A table "List of storage units placed in the shredding procedure" is displayed. Select the button next to a unit to display its contents, meaning the archived entities placed in it. If you have access permissions to the entities, you can display them using the corresponding button (


 ) in the Actions column.
 -
Check the contents of each storage unit. If you agree with shredding the stored entities, you don’t need to do anything. If you do not agree with shredding an entity, select it one of the following ways:
-
Click the
 icon in the Actions column.
 -
Check the box on the left and select the Remove from deletion button. You can check more than one entity at once, or all of them using the box in the table header.
Following a confirmation dialog, the removed entities will be marked by a background color.
-
-
While the approval process is running, an entity selected for removal from deletion can be returned back to the shredding process: use the button
Delete this entity. -
Once you have reviewed the storage unit contents, select Back to return to the list of storage units.
-
When you have reviewed all storage units, add your statement. Select Finish approval. A dialog window Finish approval with the result is displayed.
-
In Approval result, select whether you approve or reject the shredding procedure as a whole. You can also attach a Comment, which will be displayed to the procedure author.
-
Select Finish approval to confirm. Your statement is saved, but you can still change it.
The procedure is now displayed in the list of shredding procedures with a background color corresponding to your statement: green for approved, red for rejected. If you have selected an entity to be removed from shredding, but approved the overall shredding procedure, the procedure author will see your statement as "approved with reservations".
You can reconsider your statement until the approval round ends. Edit the inclusion or exclusion of archived entities in the same manner as before, and edit the overall statement if needed.
Ending the approval round
The shredding procedure author can view the approval round status while the approvals are in progress.
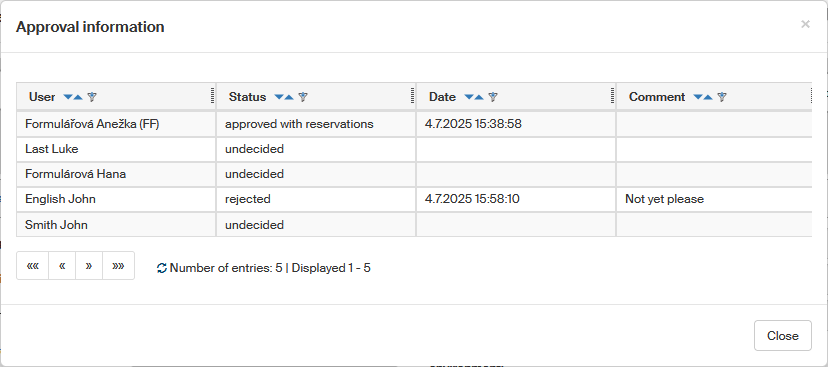
Select Display approval results for the corresponding approval round.
A window is displayed with a list of all users who are taking part in this approval round, whether they were added individually or as group members.
You can end the approval round anytime, regardless of how many approvers have given their statements so far. In section Deletion approval, select Finish approval. The dialog Finish the deletion approval is displayed.
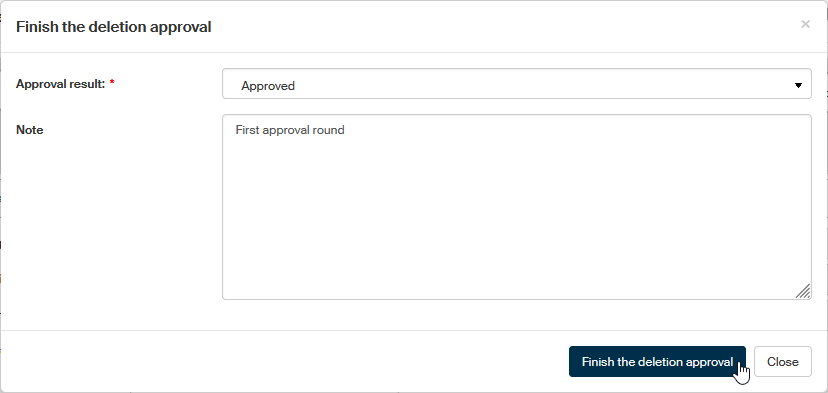
In Approval result, select the approval result, which can be either "Rejected" or "Approved". The selection is not limited by the statements from individual participants. Select the result in accordance with your organization’s guidelines.
You can enter additional text in the Note field.
Select Finish the deletion approval to confirm the statement.
Additional approvals
Once the approval round is finished, you can run new approvals, for example with a different set of users. Edit the list of approvers in section Subjects that will approve the deletion. The procedure is the same as described in chapter Running the approval and following.
You can run any number of approval rounds.
|
Removing entities from deletion
Once all required approval rounds have finished, the entities that should not be deleted need to be removed from the storage units. Entities selected by at least one approver during at least one approved voting round will be removed. This step is always mandatory, even if no one selected any entities.
The removed entities will stay in the archive, outside of storage units. You can then place them in other units and then for example in a later shredding procedure.
| This point is the last chance to create a new approval round or cancel the shredding procedure. It will not be possible after removing the selected entities. |
Select Remove the selected entities from deletion. After the confirmation dialog, a background service task is created.
Completing the task may take a while, based on the background service settings and the number of entities to remove. When it completes, only entities approved for deletion are left in the shredding procedure.
Destroying packages selected for shredding
The only step left is the actual shredding, the final deletion of archived entities. This step and the following are again common for both shredding procedure types, only the terms used are different. Based on the procedure type, the red indicator in the upper part of the window moves to step Ready to be destroyed or Ready to be deleted.
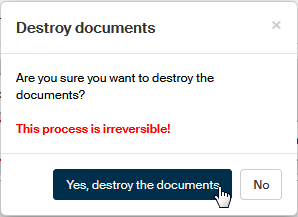
In section Shredding operation list, click Destroy or Delete.

You need to confirm the operation by clicking Yes, destroy the documents or Yes, delete in the confirmation dialog. Note the warning in red: the process is irreversible (unless you are running the test mode).
The request to destroy the documents is handed to a background process. The service is run at regular intervals, for example 60 minutes. If you’d like to force the service run immediately, the procedure is described in chapter Preparing SIP packages to export to the National Archive.

As soon as the background service processes the request, the records and documents are marked with the fact that they were saved in the National Archive or destroyed, the DMS documents are destroyed and the metadata set for anonymization is anonymized.
Preparing to finish the process and finishing
The red indicator in the upper part of the window moves to the next to last item – Ready to be finished.
The last item in section Shredding operation list displays shredding – processed successfully.

In section Shredding operation list, the Finish button is now enabled.

Click Yes, finish the shredding procedure in the confirmation query, the shredding procedure will be finished and the whole process is complete.
The red indicator in the upper part of the window moves to the last item.

If you have been working in the test mode, you can click Cancel test shredding in the lower part of the window to restore all the files. This action is also performed by a background service.

The complete list of shredding operations now contains all the stages from preparation to archiving to destruction and finishing the process.
The shredding procedure entry in the Shredding window now displays finished in the Status column.