Takeover permissions
Sometimes it is useful for a user to take responsibility and start processing a document or record that is assigned to someone else. To do that, the user needs the corresponding permission.

On the left panel in the Entities screen (), make sure the entity you want to edit is selected in the Entities list. Then go to Menu and click Takeover permissions. The screen Takeover permissions (entity name) is displayed on the right. The section contains a list of existing permissions, which you can edit or add to.
Creating a takeover permission
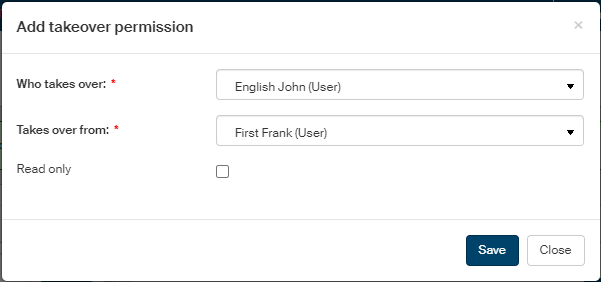
Click Add a new permission above the list of existing permissions to open the dialog.
-
In the field Who takes over, select the user, group or role who will be authorized to take over a document or record from the user selected in the next step. For clarity, the options in the list are marked with information whether it is a user or a group/role.
-
In Takes over from, select the user, group or role whose document or record can the user/group/role selected above take over. For clarity, the options in the list are marked with information whether it is a user or a group/role.
-
If you check Read only, the user selected in “Who takes over” will not take over the document/record from “Takes over from” completely, but will be able to view the document in “read-only” format.
To confirm insertion or changes, click Save.
Displaying and editing permissions
The Takeover permissions screen displays a list of existing permissions. Use the buttons in the Actions column to manage the entries:
-
Click
 Edit permission to display the permission edit dialog. The controls are the same as when adding a new permission.
 -
Click
 Delete the permission to remove the permission.