Remote signing settings
Users who want to use remote signing for forms and documents must have a suitable RSM certificate and the remote signing must be set up.
Enabling remote form signing
This setting requires administrator permissions. To sign forms (MSG_IN, MSG_OUT and POST_ARCH) by an RMS certificate on finishing, the following settings are needed.
-
Open the ERMS forms ().
-
Select a form entry, go to the Actions column and click
 Edit form configuration.
 -
In window Edit configuration, set the Finish without a signature option to finishing with a signature.

Controlled documentation templates need a similar setting.
-
Open the window Form settings for Controlled documentation ().
-
Look up the required template, go to the Actions column and click
Edit form settings. -
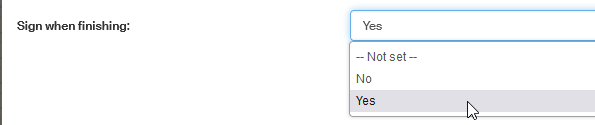
In window Edit form settings, set the option Sign when finishing to Yes.
Enabling remote signing for users
This setting requires administrator permissions. The user finishing the form must have remote (RSM) signing enabled. This means that they need to be granted the operation RSM_SIGNING_USER.
-
Open the window Operation Permissions ().
-
Click Grant permission in the upper right corner.
-
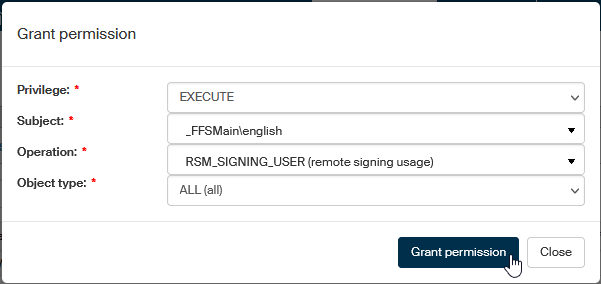
The dialog Grant permission opens. Set up the following:
-
In Privilege, select EXECUTE.
-
In Subject, select the user (by their username or group name) to receive the permission (the autocomplete function is available to look up the name).
-
In Operation, select RSM_SIGNING_USER (remote signing usage).
-
Leave the Object type set to ALL (all).
-
-
Click Grant permission.
A message in a green frame will notify you that the permission has been set.

Certificate check
The user needs to have a valid RSM certificate. How to tell that this requirement is met and the certificate is in order? The user can check their FormFlow account.
-
Click Preferences.
-
Click the Signature certificates button and select Certificates from the menu.
-
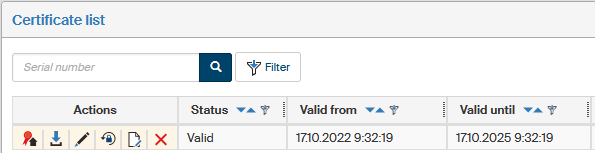
There must be at least one valid certificate listed in the Certificate list. This means that the Status column must read Valid and the current date must be between the Valid from and Valid until values.
If the user does not have a valid certificate available, they need to request one.
-
Click Preferences.
-
Click the Signature certificates button and select Requests from the menu.
-
In the upper right corner of the List of certificate requests window, click Signature certificate request.
-
Fill in the required values in window Signature certificate request and click Create a request to submit the request.
For a detailed description of filling out and processing the request, see chapter Creating and submitting a certificate request.
Remote signing setup
Remote signing using RSM must be enabled in the user’s application settings.
-
Click Preferences.
-
Click Application Preferences.
-
Set Signing method to Server signing service.

Signer and remote sealing, authentication setup
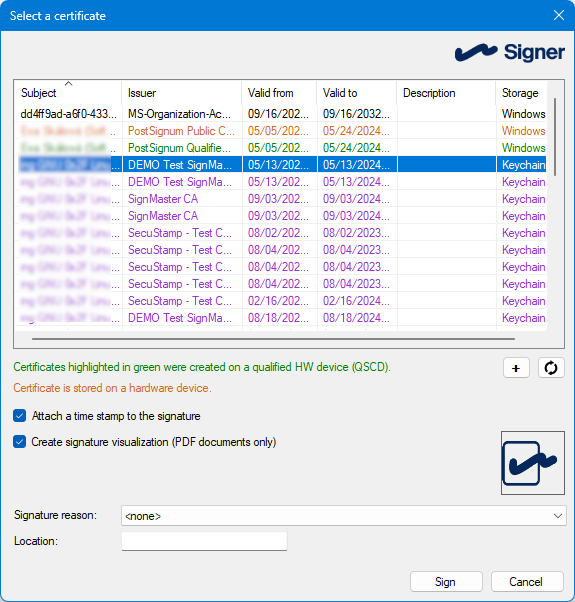
When using the Signer application, you can sign PDF documents with a qualified certificate stored on a secure HSM device at FormFlow.
To enable the connection, a link from Signer to FormFlow must be set up. The setting is available from the menu .
Click Add to open the Add login dialog and set up the following:
-
Enter any name for the new connection in the Alias field.
-
In User, enter the username of the corresponding FormFlow account.
-
In Password, enter the password for the FormFlow account given in the previous field.
-
Check Company login.
-
In field Web service URL, enter the url address, which should be in the following form:
formflow://example.com/soap/signerInfo.php.
Now you can click Test connection to check the setting. If everything is in order, click Save. The setting will be listed in the table on the Login tab.
The setting is also transferred to the eToken application. Following the next login, the signatures will be available to sign documents.
Signer and remote signing, combining both login options: SSO and basic authentication
When using SSO authentication, the procedure is identical to chapter Login using SSO (Single sign-on). To enable basic authentication (using a name and a password) at the same time, permissions to the \soap2\ folder must be adjusted in the IIS Manager to the following values:
-
Using the right mouse button, switch Anonymous access to Enable.
-
Using the right mouse button, switch Windows system authentication to Disable.
-
Using the right mouse button, switch Basic authentication to Disable.
Then open Signer and change the URL setting to formflow://example.com/soap/signerInfo.php.
In the Signer setting dialog, open the Login tab (). Click the corresponding connection entry and then Edit.
This opens the dialog Add Login, where you can set up the login parameters, as in the previous chapter. Edit the Web service URL field to formflow://example.com/soap/signerInfo.php.
Test the connection and save it.