Groups and roles
Named groups of users make it easier to set up more than one user at once. Instead of processing users one by one, you can apply the operation once to the whole group.
User groups can be managed manually or be synchronized along with the list of users from another source. Synchronization settings are described in chapter Synchronization.
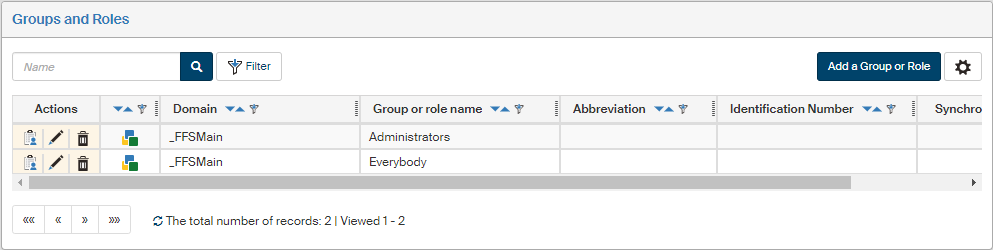
This chapter describes manual settings of groups and roles using the screen Groups and roles (). You can create groups here, edit and delete them.
The default configuration (after installation) contains two basic groups: Administrators and Everybody. Members of the Administrators group are authorized to set up the program environment and change its parameters (including, for example, setting up users and groups). The other group, Everybody, provides general user privileges only.
List of groups and roles
Group and role entries are displayed in a table, where every line contains details of one group (role). The table columns have the following meaning:
-
Actions – contains the buttons for the following functions:
-
 Assigned privileges – displays the list of permissions assigned to the group or role. This section is described in chapter Setting up group and role permissions.
 -
 Edit the group/role – displays a dialog to set up group or role properties. This section is described in chapter Editing group or role details.
 -
 Delete the group/role – a confirmation dialog is displayed and then the group or role is deleted.
-
-
The icon in the unnamed column shows whether the entry is a group (
 ) or a role (
 ).
). -
Domain – name of the domain where the group or role is placed.
-
Group or role name – this name will be used in lists of groups or roles.
-
Abbreviation, Identification number – group or role identification details.
You can sort the table by domain, name, abbreviation or identification number. Change the sorting using the buttons  Descending or
  Ascending, placed in the column headers.
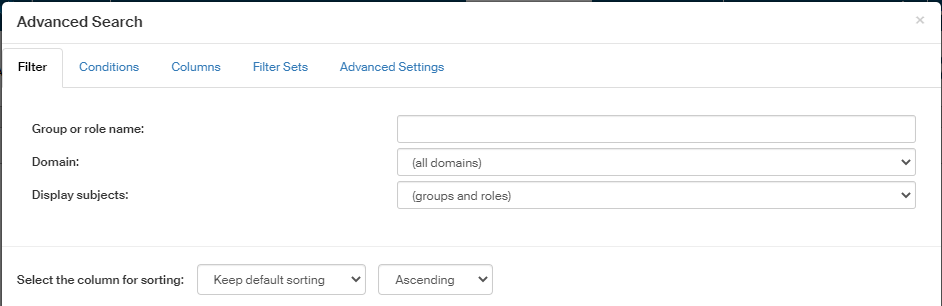
The list of groups can be also filtered, that is, only a selected subset of the entries will be displayed. The Filter button is placed above the list. Use the button to filter based on the name or its part, or domain, or whether it is a group or a role.
Adding a new group or role
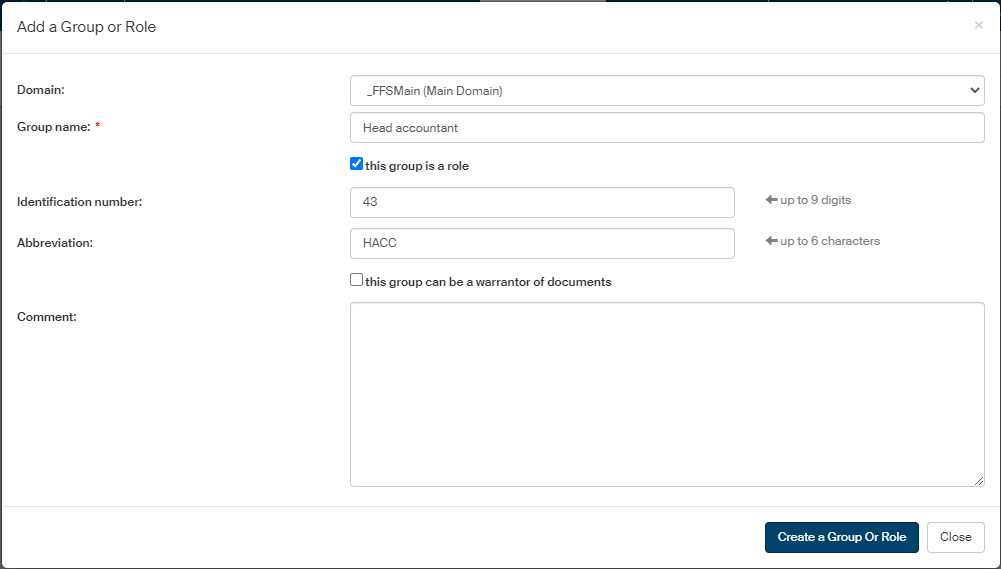
Create a new group or role by clicking the button Add a group or role, placed on the right above the list of existing groups and roles. Use the following dialog to enter the group or role details:
-
Domain – if you are using more than one domain, select in which one to place the group or role.
-
Group name – the name that will be displayed in dialogs and lists.
-
If the group is to also serve as a role, check this group is a role.
-
Identification number and Abbreviation are optional.
-
this group/role can be a warrantor of documents – if checked, this group or role will be available in the document section of FormFlow as a warrantor, which means it will be possible to assign it documents for processing.
-
The Comment can be used to enter any text note, but it will not be displayed anywhere else.
Confirm creating a new entry by clicking Create a group or role.
Roles
For compatibility with other software (e.g. IDM=Novell Identity Manager), FormFlow introduces the concept of ROLE, starting with version 2.5.6. A role in FormFlow is similar to a group of users, but it has several specific properties:
-
A member of a role can be a user or a group, but not another role
-
A role cannot be a group member.
Typically, there will be only one member of the role, e.g. “General Director”.
These roles are not related to the roles set in user details, where the “role” field can contain any text, which will be copied to the gw_role tag in a form.
|
Editing group or role details
Click in the list of groups and roles to display details of the group or role. The details contain several tabs where you can edit and insert the group or role properties.
-
If it is a group, the screen Group detail is displayed.
-
If it is a role, the screen Role detail is displayed.
These two types of screen differ in the number and type of tabs available.
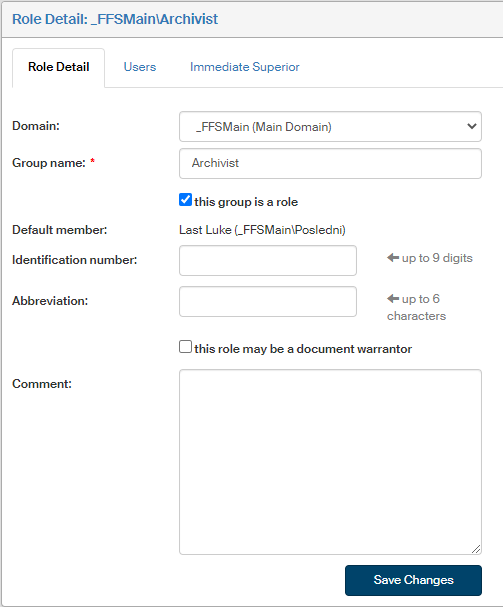
Group or role detail
The Group detail (Role detail) tab can be used to edit the details entered when creating the group or role. Also displayed is the default member of the group (role), which can be changed on the next tab (Users).
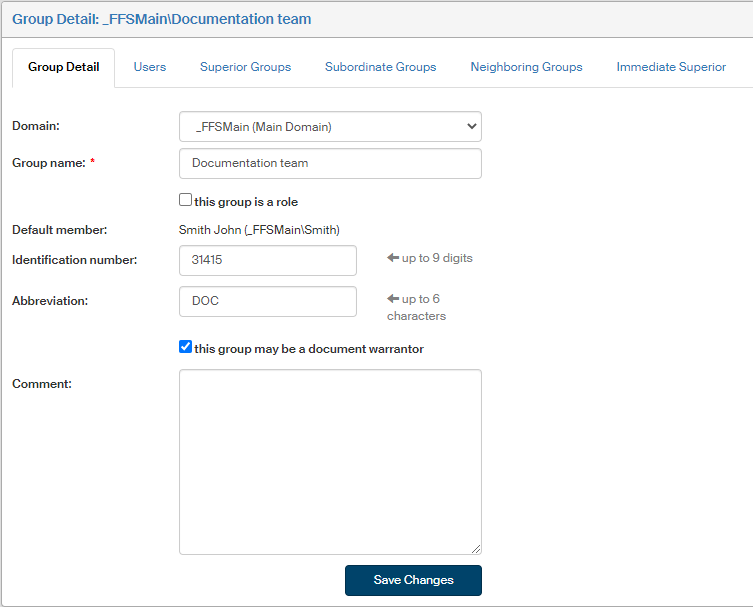
Users
The Users tab can be used to specify, using the checkboxes in the list of users:
-
Which user is to be the default member (check the box in column Is the default member).
To cancel the current default user setting, click Save changes and remove default member, placed on the right above the table. -
Which users are to be group members (check the box in column Is a member).
-
Which users are to be the group or role manager (check the box in column Is the manager).
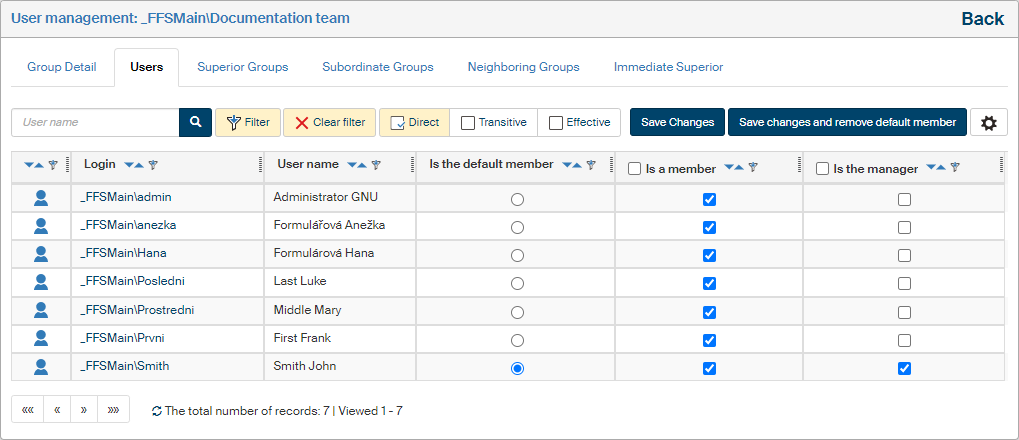
The checkboxes in the table header can be used to check all boxes in the respective column.
If you change any settings, do not forget to click Save changes.
You can narrow down the displayed list of users by filtering: use the Filter button above the list to e.g. display the group members only.
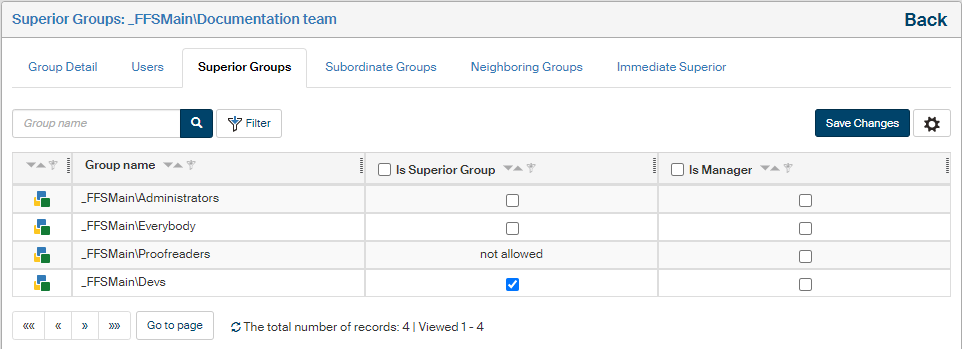
Superior groups
Use the Superior groups tab to specify groups that will be superior to the group you are setting up. The properties of group superiority and subordination are useful for inheriting granted permissions.
You can check the name of the current group (the group being set up right now) in the tab header, above the list of existing groups. Check the box in the column Is Superior Group to select the group or groups superior to the current group. Check the box in the column Is Manager to make the members of the selected group act as managers for the group you are setting up.
For groups where this assignment is not possible, the checkboxes are replaced by the text not allowed. This applies to the current group and its subordinate groups.
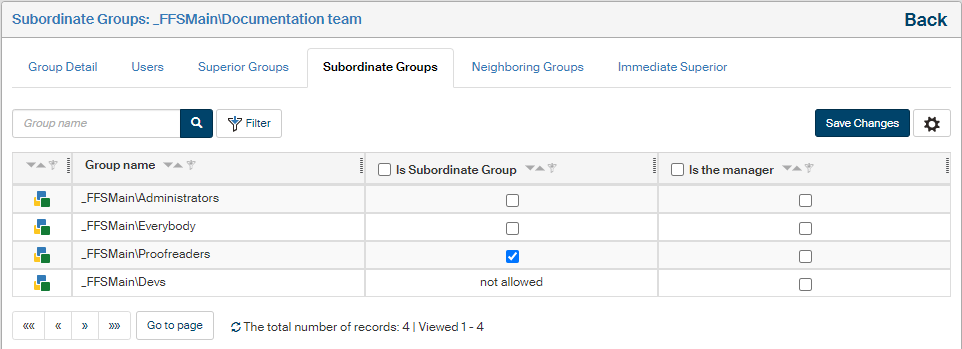
Subordinate groups
Use the Subordinate groups tab to specify groups that will be subordinate to the group you are setting up. Check the box in the column Is Subordinate Group to select the subordinate group or groups. For groups where this assignment is not possible, the checkboxes are replaced by the text not allowed.
You can also check the box in the column Is Manager to make the members of the current group act as managers for the selected (checked) group.
Neighboring Groups
Use the Neighboring groups tab to display an overview of superior and subordinate relations to the current group.
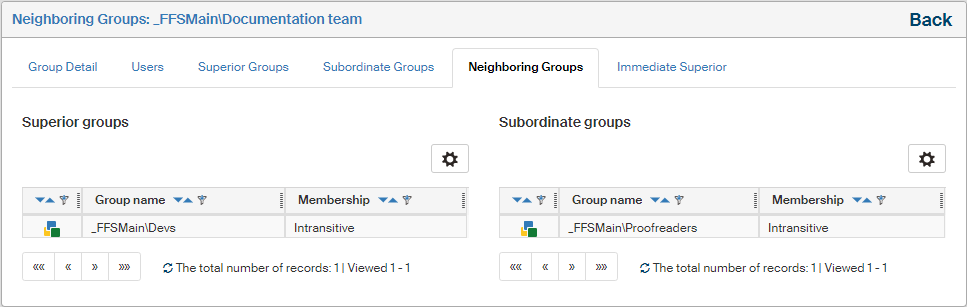
The name of the current group is listed in the page header. Its superior group(s), if any, are listed in the left-hand column Superior groups, while its subordinate group(s), if any, are listed in the right-hand column Subordinate groups.
| When editing a role, the tabs Superior Groups, Subordinate Groups and Neighboring Groups are not displayed; this setting only applies to groups. |
Immediate Superior
The Immediate Superior tab is used to build the employee structure by entering a rule that specifies the immediate superior for the current group or role and its members. These relationships can be used to create workflow rules easily: simply set that at a certain step, the form will be forwarded to the user’s immediate superior, without having to specify individual names or departments. For more details on workflow rules, see chapter Settings on the Modify tab.
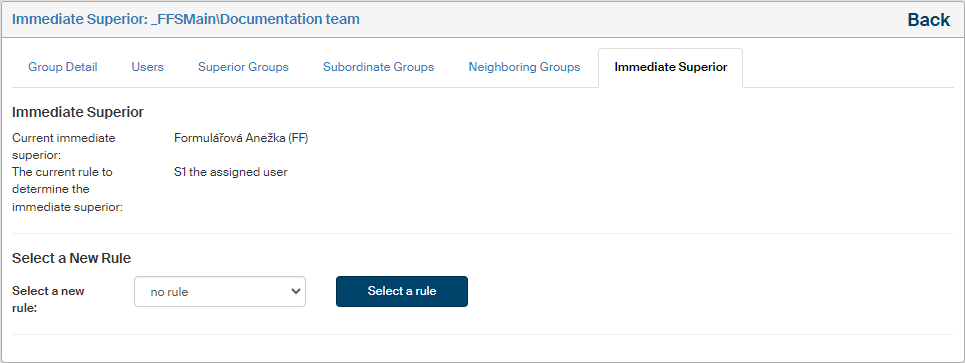
If a rule is set for the group or role, the upper part of the tab specifies the rule itself and the name of the user who is set by this rule as the current immediate superior.
You can change this setting in section Select a New Rule. Use the option of the same name to specify how the superior will be determined:
-
no rule – cancels the current setting, no superior will be set for the group or role;
-
the assigned user – a specific user;
-
the assigned group – another user group.
Confirm the selection by clicking Select a rule. If you have selected no rule, the setting is now complete. In the other cases, a list of users or groups is displayed. You can use the field above the list to filter by the name, or go directly to the Actions column and click  to select the required entry.
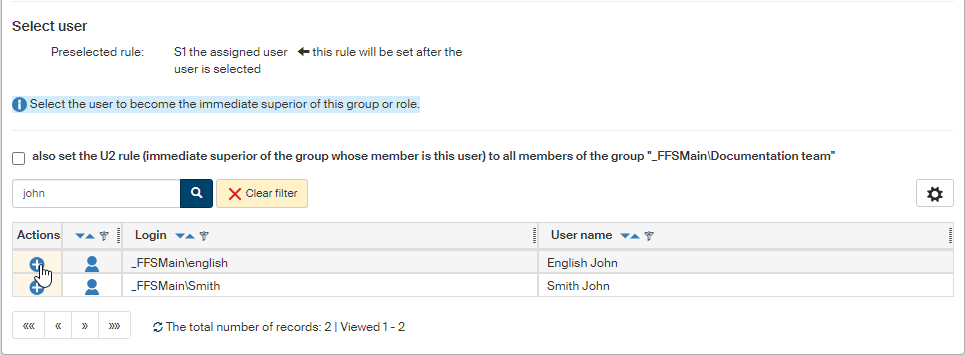
To apply the rule not just to the group but also all its members, check the box also set the U2 rule (immediate superior of the group whose member is this user) to all members of the group before you select the name. This will apply the newly selected superior to all users who are members of the group.
Setting up group and role permissions
Just as individual users, also groups can be granted various permissions to documents, forms (processes), folders or system-wide operations. Grant a permission to a whole group to grant it to all its users.

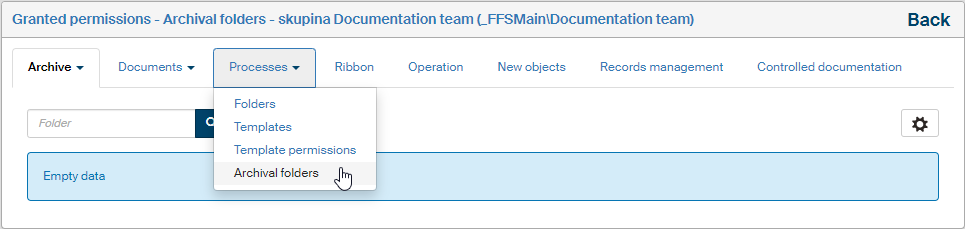
Click Assigned Permissions in the list of groups and roles () to display a list of permissions granted to the group. The list is divided into several tabs and the first three of them contain additional menus to narrow down the displayed data more precisely. The menus available for the Archive and Documents tabs are the same: Folders, Metadata, Classes and Ranks. The Processes tab provides the following options: Folders, Templates, Template permissions and Archival folders:
-
Archive – access permissions to folders, metadata, classes and ranks in the archive.
-
Documents – permissions to document folders, metadata, document classes and ranks; use the menu in the tab to select which of the permissions categories to display.
-
Processes – permissions to process folders, permissions to form templates and related permissions (e.g. permissions to other users' signature certificates, process roles, substitution for other users, the role of a censor to anonymous users), permissions to archive folders; use the menu in the tab to select which of the permission categories to display.
-
Ribbons – permissions to tabs and buttons on the ribbon.
-
Operations – permissions to system operations.
-
New objects – operation permissions to apply to objects that will be created in the future;
-
Records management – if the FormFlow installation includes the Records management module, permissions related to it will be displayed here.
-
Controlled documentation – if the FormFlow installation includes the Controlled documentation module, permissions related to it will be displayed here.
In this section you can only view the granted permissions. To grant or remove these permissions to groups, go to administration of the objects in question. For example:
-
Permissions related to documents can be found using the button and the individual sections are described in chapter Documents.
-
Permissions related to processes:
-
Folders – permissions to process folders: , described in chapter Group permissions.
-
Templates – permissions to form templates:
 , described in chapter Form permissions.
 -
Template permissions – process roles:
, described in chapter Creating form flow in practice. -
Template permissions – Censor to anonymous users:
, described in chapter Censor for processing anonymous users' forms.
-
-
Permissions to tabs, buttons and other ribbon items:
button, described in chapter Ribbon and its subchapters. -
Permissions to operations: , described in chapter 8.2 Operation permissions.
-
Permissions to new objects: , described in chapter 8.3 New object permissions.
-
Permissions to Records management: , described in chapter Electronic records management service.
-
Permissions to Controlled documentation: , described in chapter Settings in Controlled documentation administration.
Deleting a group or role
The request to delete a group only applies to the group itself – users assigned to this group will not be deleted.
-
Open the ADMINISTRATION tab and select the button Users, option Groups and roles.
-
Look up the group or role to be deleted.
-
Go to the Actions column and click the trash bin icon
Delete the group/role.

A confirmation dialog is displayed first. Only after you click Yes, the group (role) is deleted.