General overview of Electronic records management
Records management layout
The Electronic records management features can be found on the RECORDS MANAGEMENT tab.

The tab contains the following buttons:
-
New – create a new document or record. For more details, see chapters Creating a new incoming document, Creating a new outgoing document and Creating a new record.
-
Documents – list of documents, described in chapter Document list.
-
Records – list of records stored in the Electronic records management, described in chapter Record list.
-
Local address book – opens the window of a local address book for the current managed entity.
-
Queue – managing the incoming and outgoing messages in progress: those that are waiting to be sent or downloaded, or their sending or download has failed for some reason. Described in chapter Queue.
-
Statistics – summary of numbers of documents and records kept in the Electronic records management, described in chapter Statistics.
-
Posting diary – displays the dates and times when each document was registered, modified and processed by the records management. Each entry allows a detailed view of the document. The list can be filtered using an advanced filter.
-
Delivery ÚPVS – to manually confirm receipt certificates for messages sent from the ÚPVS portal – service used for the Slovak data mailboxes to download data messages sent from the ÚPVS portal (Ústredný portál verejnej správy).
-
Incoming mail – displays a list of documents received by the Electronic records management, described in chapter Incoming mail.
-
Outgoing mail – list of documents ready for submitting or submitted from the Electronic records management service, described in chapter Outgoing mail.
-
Bulk posting forms – displays a list of bulk posting forms.
-
Shipments – displays an overview of all shipments.
| Some of the buttons might be hidden. They are displayed based on the permissions settings and managed by the Administrator. |
Certificates and electronic signature
Most data message operations require a confirmation with your electronic signature. To create an electronic signature, you need to have a certificate issued by a certification authority (e.g. PostSignum or První certifikační) or by your organization’s internal certification authority.
The certificate can be stored in the operating system or on a portable device, or it can be available directly in FormFlow.
When you click a button in the form, you will be asked to select a qualified certificate and also other options, if needed. The signing process depends on FormFlow settings and more details can be found in chapter Signing.
Sharing documents and records
You can share documents and records you have access to with another user who is not authorized yet. By sharing, you give them permission to see the document or record, but not to take part in processing it in any way.

Click the ![]() button in the upper right corner of a form to open the sharing dialog.
button in the upper right corner of a form to open the sharing dialog.
The dialog is composed of three tabs. The first two tabs, Users and Groups and roles, are used to assign read permission to the current document version.
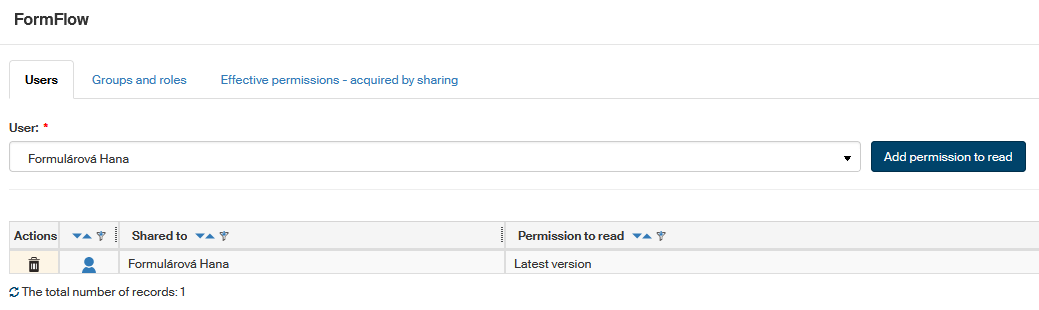
You can choose to give access to individual users or whole groups and roles; the procedure is similar. Open the corresponding tab and use the User or Group or role field to select who you are assigning the permission to. Click Add permission to read to confirm.
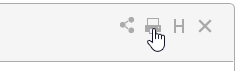
The table displays the list of all users, or groups and roles, who have been assigned the read permission. You can remove the permission again using the ![]() button in column Actions. The figure symbol indicates the user status:
button in column Actions. The figure symbol indicates the user status: ![]() Active internal user,
Active internal user, ![]() Active external user.
Active external user.
The third tab, Effective permissions – acquired by sharing, displays the resulting permissions for individual FormFlow users based on the created permissions for groups, roles and individual settings.
Printing documents and records
You can use templates saved in FormFlow to print documents and records you are processing.
Start printing by clicking the ![]() button in the upper right corner of the form. The print template selection dialog is then displayed.
button in the upper right corner of the form. The print template selection dialog is then displayed.
Click Select to confirm the template. The system creates a document preview based on the template and displays it in a separate window. The Complete form template can be saved as PDF, the other templates offer opening or saving the document file in DOCX format.
Open or save the form as you need or simply print out the usual way.