Data collection and form flow
The purpose of the whole environment described in this manual is to enable data collection and processing. FormFlow also collects data from forms. This chapter should give you some insights into the principles applied to form workflow and data processing.
We will use the word form in the meaning of an XSL-FO data file containing the form layout design, correctness check of the input data and the data record for the input data. Integrity and authenticity are secured using electronic signatures.
Form templates are designed and created in Software602 Form Designer or Web Designer. An administrator then uploads the template to FormFlow, which then creates the corresponding tables in the SQL database.
Then the form template is available for authorized users to use. Users download the forms from the templates installed at FormFlow, or they receive forms digitally by other means. They can fill out the template using either Software602 Form Filler software or, with the help of a plugin, directly in a web page, and then submit it (either the whole form or just the filled-in data) for further processing in FormFlow. The data filled in the forms is loaded and saved in a database, which then serves as a source for further processing.
FormFlow also allows the forms to be filled out by anonymous users, provides form circulation among registered users, archives forms and provides fulltext search in the forms and entered data.
There are two different approaches to collecting data.
-
There are forms intended for data collection only. They do not contain any signing steps. A user downloads such form (or receives them e.g. by an e-mail as an anonymous user), fills it out and sends back. FormFlow saves the received data in the database. If the user is anonymous, an arbiter might be needed to approve saving the data first.
-
The other approach are workflow forms. A filled-out form passes through several signing steps (its contents is e.g. approved by managers at various levels of company hierarchy). Only when the form passes the approval process successfully, a selected user finishes it and saves the data to the database.
The following sections of this chapter describe form workflow, the latter of the described categories.
Form workflow
Form workflow is controlled transfer of a form between users who take turns in filling it out and signing it with their electronic signatures. The form is forwarded to the next user based on signing steps and their rules, set up in advance in FormFlow configuration.
Basic workflow rules:
-
Form workflow in FormFlow is composed of signing steps and their rules.
-
When a user signs and submits a form, FormFlow places the form in a folder to be signed by another user.
-
After the form is signed by all the specified users, the form is saved in the database and finished.
General notes on signing steps and their rules
Approval and signing are based on signing steps, where each step has one or more rules.
-
The signing steps and their rules define which users will sign the form and in which order.
-
There must be at least one rule specified in each signing step. The rule in the first signing step may be empty.
-
There may be any number of rules in each signing step.
-
The rules are processed in the order they are entered on the list (from the top downwards).
-
Using more than one rule in one step allow having different signers based on the previous signing or forwarding users. As a result, the rules may specify that the request of user A will be signed by user B, while the same request from user C will be given to user D to sign.
-
The first signer can be anonymous, the other signers must be registered FormFlow users.
-
The number of signing steps corresponds to the maximum number of signatures in the form.
-
The forwarders (users who prefill the form) and final recipients (users who finish the form) do not sign the form and therefore do not have a signing step. They are specified on a separate tab in the rules of the first step.
Accessing the form settings
Let us show how to access specific settings for an existing form template in form administration – for example the details of the first signing step in the Outgoing document (MSG_OUT) form.
-
Open the form administration screen ().
-
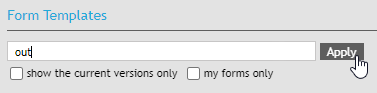
In the upper left corner, click Form templates.

-
Use the filter field to look up the form template. We are looking for the MSG_OUT form, so you can try entering out and clicking Apply.
-
FormFlow will list forms with matching titles and codes. If you do not remember the MSG_OUT code, you can find the form by entering a part of the form name.
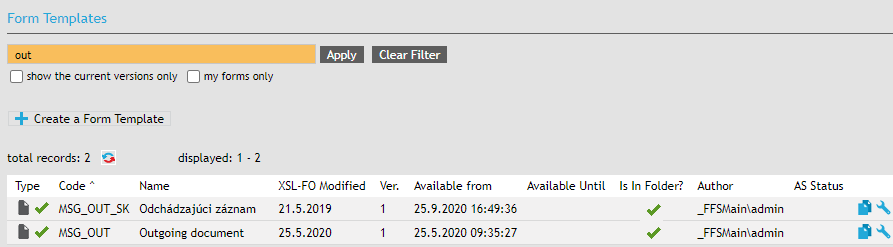
-
We have found several matching templates. Let us select the first one – MSG_OUT. Click the wrench symbol
 Edit the form’s detail at the end of the corresponding line.
 -
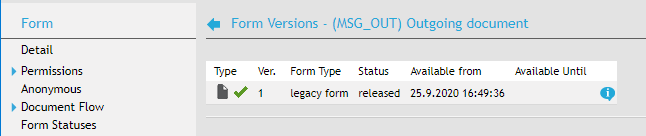
The window Form versions – (MSG_OUT) Outgoing document opens.
-
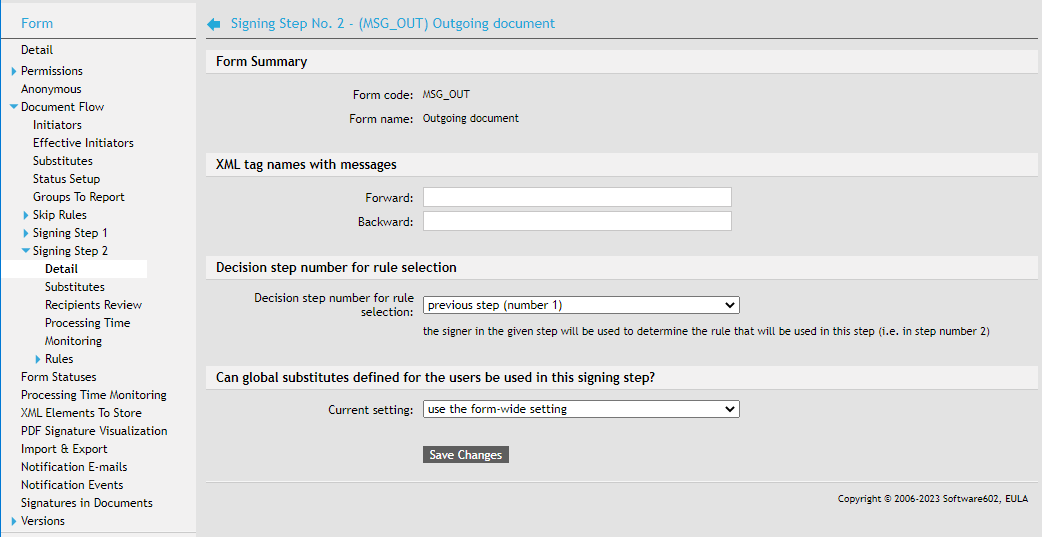
On the left, click Document flow, then Signing Step 1 and then Detail.
You are now viewing the information on the first signing step of Outgoing document. This way you can view any of the form description entries.
The first signing step
The first signing step defines the first signer (recipient), and it may also define the forwarder (user who prefills the form).
In simple applications the first step is not used, because the first signer downloads the form template based on their access permissions, fills out and signs the form and the second step follows. The first step still must be specified with a rule, but the rule may stay empty.
During the first step, the final recipient is also defined. The final recipient is the user who receives the form for processing (not signing) when the workflow is complete. Placing the final recipient definition in the first step rule means we can bind the initiator and the final recipient. That means that the workflow initiator can be also the final recipient.
When using forwarders in the first step, there must be a rule specified for the situation when a supposed signer behaves as a forwarder, even if the design does not expect such behavior.
The rule with no forwarder selected is applied to anonymous users in the first step.
Next signing steps
In the second and following steps, the signing rules may depend on the signer in one of the previous steps.
On the left, click Detail for the corresponding step. In section Decision step number for rule selection, you can select a step whose signer will be used to select the rule to apply in this step. In practice, you can e.g. select the rule in the fourth step based on the user who signed the form in the second step.
If there is more than one recipient specified in a rule, the form is handed to the default recipient. If the default recipient is not specified or the signer is allowed to select the next recipient, the user can select the recipient from options in the form or there is one selected using a calculation (the form must support it).
In section Can global substitutes defined for the users be used in this signing step?, you can select that a user’s global substitute takes precedence over substitutes set up for this form. If global substitutes are disabled, they are never used in this step. Using the form setting means that a global substitute will only be used if there is none explicitly set for the form.
An illustration example
Situation
Here is a simple example: how to set up a workflow for a leave request, which:
-
an employee looks up in FormFlow and fills out,
-
submits to their manager,
-
the manager approves (signs) the request and submits through FormFlow to an accountant, who processes the data and finishes the form.
| For simplicity, we leave out the options of form prefilling, returning, forwarding etc. |
Setting up the form step by step
The expected form behavior:
-
The whole transaction starts by the employee (we will call them the initiator) who will need to download the leave request form from FormFlow. This step must be defined at FormFlow as the first signing step with one rule. Because this is the simplest workflow case, this rule will be empty, only the user who will finish the form at the end of workflow must be set up on the Final recipient tab. In our case, it is the accountant.
-
Based on the second signing step, FormFlow prefills the next user (signer) in the leave request form – in our case, it is the initiator’s manager, who will receive the filled-out form for signing.
-
The initiator fills out the form and signs it (this will be the first user signature in the form) and submits it to FormFlow. The form is placed in the signer's folder To Be Processed by Me.
-
The signer downloads the form, signs it (the second signature) and submits to FormFlow again.
-
The filled-out and approved form is then placed in the folder of the final recipient, which is the accountant. The accountant submits the form to FormFlow to save the data and finish the form.
Workflow path
There are two types of form workflow – the signing path can be defined for the whole workflow in advance, or the next signer can be selected dynamically during each step.
-
Approval (signing) path set in advance – the signer in second, third etc. step is defined in advance. The users singing the form are fixed in the server rules and users cannot change the signing path during signing.
-
Path with signer selection – there can be a group of users set up for each signing step and the signing user can select from a list who to send the form to for the next signing step.
| Forms can also be forwarded and there can be skip rules to skip some steps. |
Form statuses
During the approval process, a form passes through the following statuses:
-
The form is in progress, it does not have all signatures yet.
-
The form has been rejected (any user taking part in the approval process can reject it).
-
The form has been approved (signed by the last signer).
During approval, forms ale placed in the folders To Be Processed by Me and In process:
-
To Be Processed by Me – the folder contains forms waiting to be processed by the current user.
-
In process – this folder displays all forms in progress the current user is authorized to see. Forms waiting for the user to process them are highlighted in green; forms highlighted in yellow are those the user can take over; the rest has standard white background.
Any user with the corresponding permissions can display a form, but only the one whose turn it is based on the approval process rules can sign and submit it.
A Group manager can also be defined; a group manager can watch the form circulation for all users in their group. A user with FormFlow administrator permissions can watch the circulation of all forms.
More form options
Forwarding and taking over a form
FormFlow allows users to forward an unsigned form to another user, who will then sign it and submit to the approval process. This option allows one user (e.g. a secretary) to initiate and prefill a form and then hand it over to another user (e.g. manager) to sign.
User taking over a form means a user can take over a form waiting to be processed by another user, sign it and submit it to continue its approval process.
Substitution when signing a form
FormFlow deals with the issue of substitution when a user is absent. Information on a user’s absence is stored for each user. A substitute in case of absence can be set up for the whole form or for each signing step separately. Each user can also have a global substitute set up to be used in all forms. If FormFlow learns that a user who is receiving a form for signing is absent, it will attempt to find a substitute.
-
When successful, it will place the form in their folder To Be Processed by Me. The substitute will find the form there and can process it.
-
If a substitute is not found, the form will be placed in the absent user’s folder To Be Processed by Me.
Using user groups
It might be useful to include user groups in the rule definitions. Using user groups means that e.g. a new employee will be automatically included without having to adjust the rules for all forms.
Groups also allow more than one user to process a form – by allowing a group to take over.
When using this method, the form must be handed to a selected user first (either by selecting them directly or setting up a default recipient). Then other users from the group can take over the form.
If there is no default recipient set up for the group, the first user in alphabetical order will be the default one. When selecting the next recipient, the list will include all members of the group (groups).
Another option is allowing the whole group to take over and process the group. When using this method, the form must be handed to a selected user first (either by selecting them directly or setting up a default recipient). Only when this user takes over the form, the other group members can take over it too.
Creating form flow in practice
In this chapter, we will describe the whole process of creating a workflow form step by step.
Selecting the form and creating a signing step
Go to , select a form and click  Edit the form detail. In the menu on the left, click Document flow.
You can manage the signature path and some additional details in this section. Section Document flow properties includes several general workflow settings:
-
The forms can use global substitutes defined for the users.
-
Import and keep the data of rejected forms.
-
A substitute is allowed to decide on his/her own form in the next signing step – this setting applies to situations when a user has signed a form and submitted it to the next signing step. In the next step, thought, the form recipient is absent and this user is the absent user’s substitute. If this option is checked, this user will be allowed to approve their own form; otherwise they need to wait for an approval by another user.
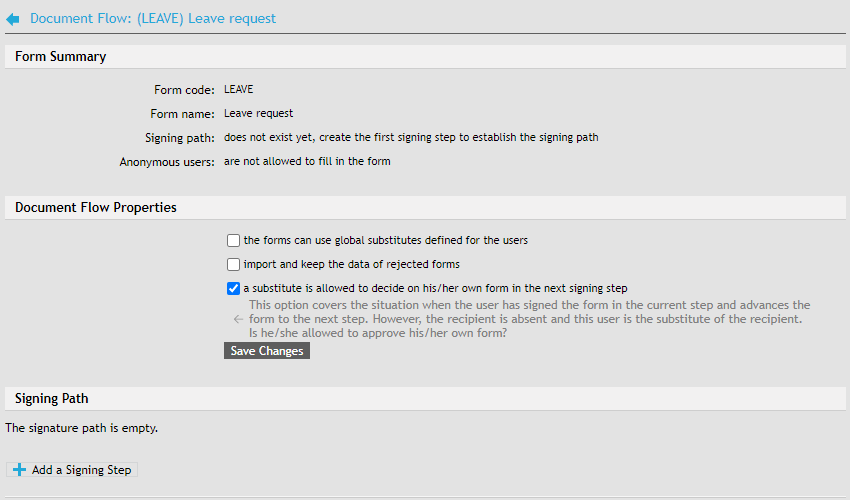
To create a signature path, click  Add a signing step.
The step is then added to the list. The  icon is made available at the same time, which you can use to delete the step if needed.
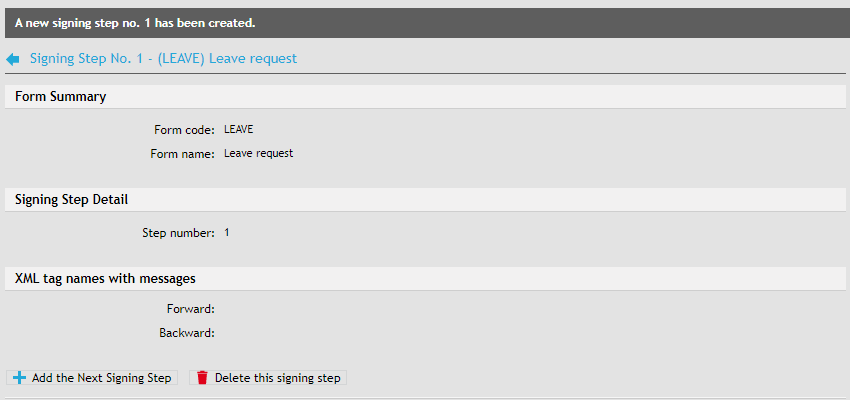
The menu on the left offers for each step – this one is named Signing step 1 – a set of options, including Detail, Substitutes and Rules.
Announcing group memberships
When setting up the form flow, you can also set up Announcing group memberships.
Select the groups and corresponding texts for a form. If the current user is a member of such a group, FormFlow will add the attribute member_of to elements <gw_current_user> and <gw_grp_fwdX> with the selected text inserted. If the user is a member of more than one such group, FormFlow will use the text corresponding to the first group it finds, so it is recommended to pay attention to group order in the list and adjust it using the arrows on the right.
As a result, it is possible to adjust the form behavior based on the user’s membership in groups.
Setting up the first rule
Click Rules to display a screen where you can create one or more rules for the signing step.
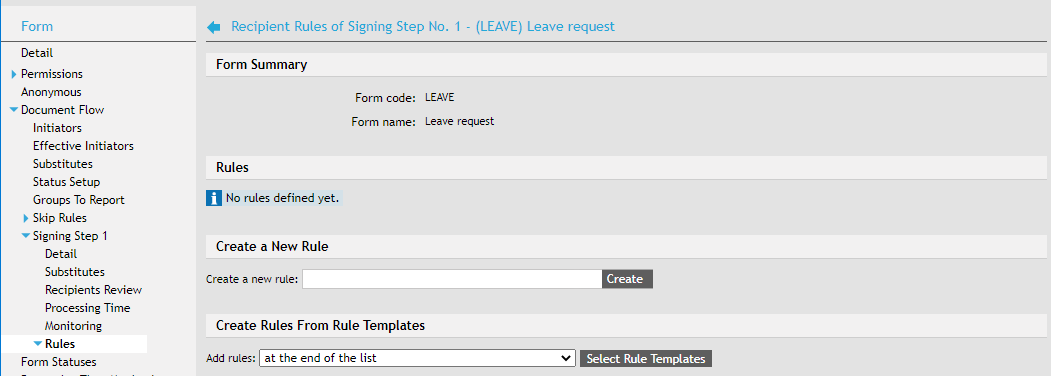
Enter the rule name in the corresponding field and click Create.

There are now several tabs available to set up the rule or to edit it later.
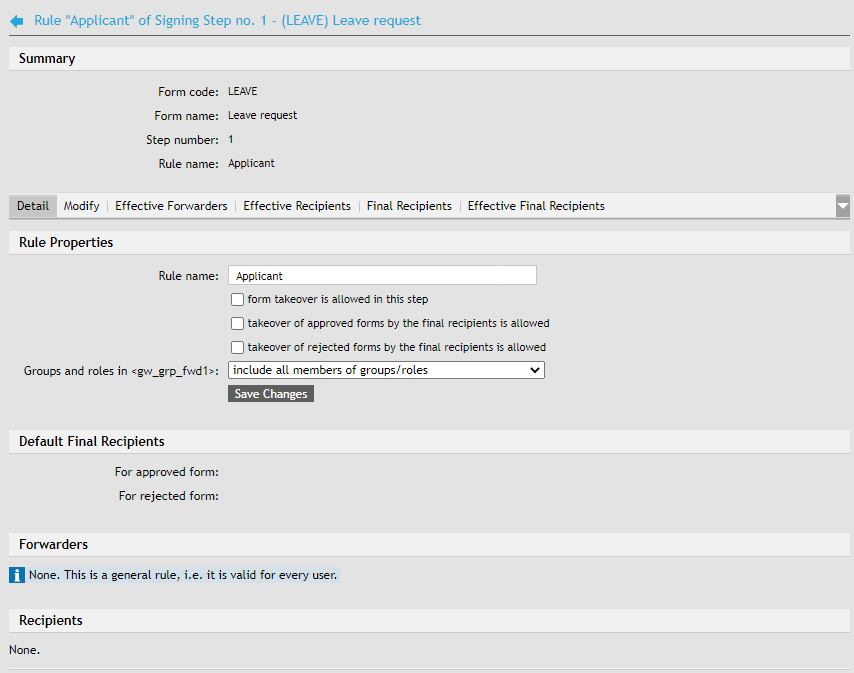
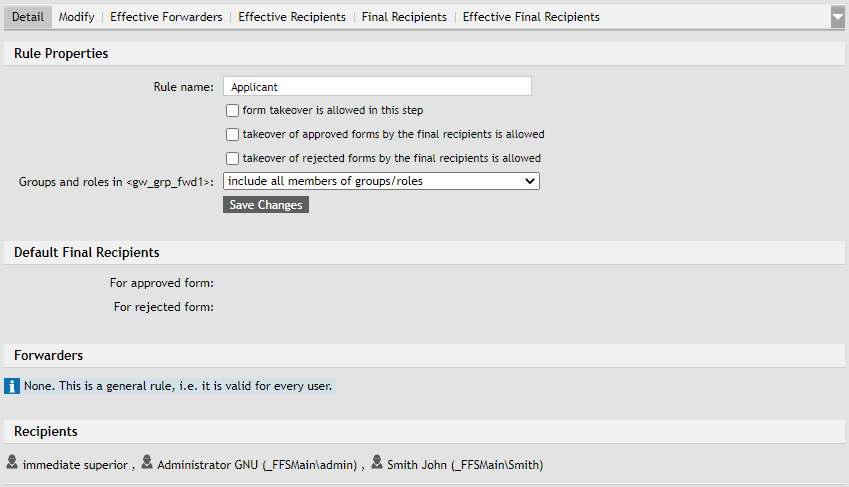
Settings on the Detail tab
On the Detail tab, check form takeover is allowed in this step to allow other users than the current form recipient taking over the form during this step.
Check or uncheck takeover of approved forms by the final recipients is allowed and takeover of rejected forms by the final recipients is allowed to select whether it is allowed for the final recipients to take over the form in this step based on its approval status.
If the rule makes use of groups and roles, you can also select whether to include all the group/role members, or the default members only.
Settings on the Modify tab
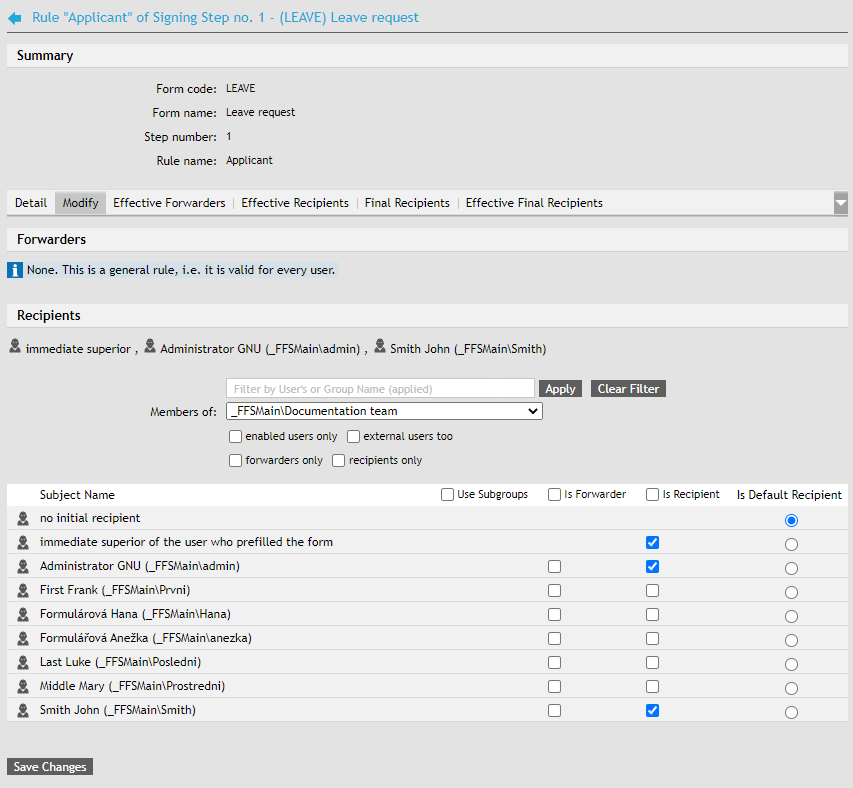
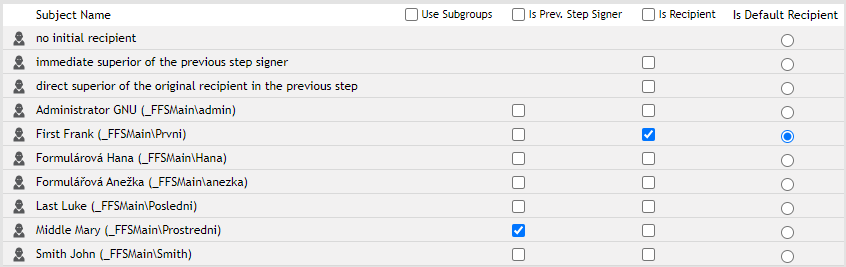
As the next step, check the boxes in the list of users and groups on the Modify tab to select who can forward the form (the column Is forwarder) and who will be the recipient (the column Is recipient). You can also select the default form recipient in column Is default recipient.
In column Use subgroups, you can select for each group whether to use its subordinate groups too when applying the rule.
Apart from users and groups, there is a special category immediate superior of the user who prefilled the form available in the rule. You can use it if there is structure of direct superiors and subordinates set up in FormFlow (see chapters Immediate superior for users and Immediate Superior for groups). Then you do not need to create separate rules for each recipient and update them every time the employee structure changes. Simply keep the structure up to date at one place and check this option for the recipient when setting up the rule. The form will be automatically forwarded to the user who is the prefiller’s immediate superior right now.
| There is no prefiller in the rules for the next signing steps, but they contain the signer in the previous step instead. Similarly, the general rule for the immediate superior uses the immediate superior of the previous step signer. There are no other differences when creating the next rules. |
Effective forwarders and recipients
The tabs Effective forwarders and Effective recipients display the lists of all forwarders and recipients – including those who gained the roles indirectly by being a member of a group selected on the Modify tab.

Selecting the final recipient
Open the Final recipient tab and check the boxes in the user and group list to select those who will become the form’s final recipient.

Effective final recipient
You can check your settings on the Effective final recipients tab, which again lists both the final recipients set explicitly and those who became final recipients by being a member of a selected group.
Settings overview
Return to the Detail tab, and you can see that it now lists the selected forwarders, recipients and the default final recipient for both accepted and rejected forms in sections Forwarders, Recipients and Default final recipient.
| The final recipients are only set up in the first signing step; there are no Final recipients and Effective final recipients tabs available in the second and later steps. |
Adding more rules and their relations
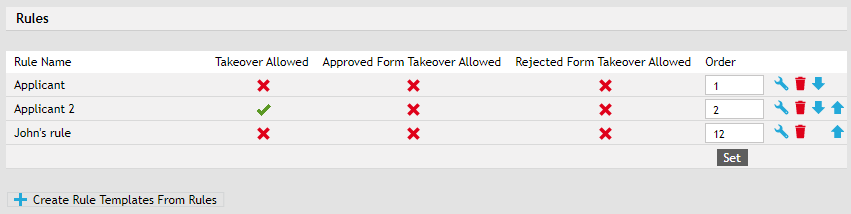
Use the Rules section in the menu on the left to insert as many rules as you choose for the given signing step.
The section then lists all the rules you have created. Included are details such as whether takeover, takeover of an approved form and takeover of a rejected form are allowed. A green checkmark  is used for allowed actions and a red cross
  for actions not allowed.
During the signing step, rules are processed in the order they are listed, from the top downwards. To reorder the rules, edit the numbers in the Order column (you can do that for more than one rule at the same time) and click Set to apply the order. Or you can move individual rules up and down the list using the blue arrow buttons.
Click Create Rule Templates From Rules to save the selected rules and use them in another form.

Click Modify this rule to edit a selected rule. Or click to delete a rule from the list.
Inserting a rule from a template
When adding a new rule, you do not need to set it up from scratch. If you have rule templates saved, simply create a new rule based on the selected template and then adjust it as needed.
Instead of section Create a New Rule, use section Create Rules From Rule Templates instead. Select whether to add the new rules at the end of the list or directly after one of the existing rules. Then click Select rule templates to display a list of existing rule templates.

The list of templates always displays templates from one set. Select the group in field Rule template set and click Show templates to confirm. The bottom part of the tab displays the set contents
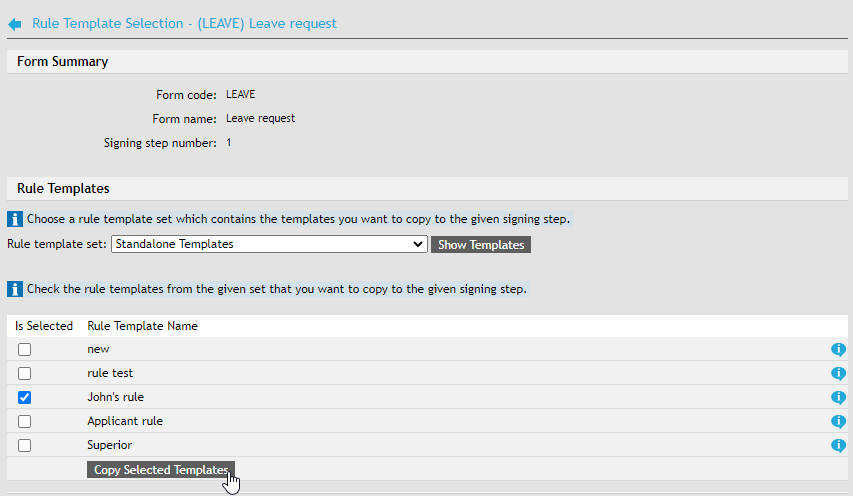
You can add more rules at once – simply check the boxes Is selected for the rules you want to add. Click Copy selected templates and the rules will be added to the selected place in the list of rules. If you need to adjust some of them, display their detail as usual (with the button) and edit them like you would any other rule.
Saving a rule template
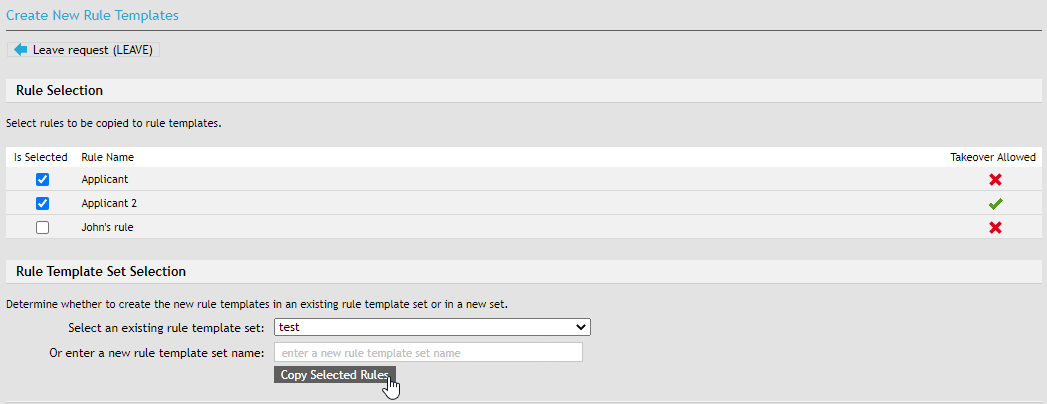
You can save existing rules as rule templates and reuse them later in other steps or forms. Click Create Rule Templates From Rules. A dialog is then displayed where you can select the rules and add them to a set.
Check Is selected next to a rule or rules. Then go to section Rule Template Set Selection and either select one of the existing template sets or enter a name in the following field to create a new set.
Click Copy Selected Rules and the rules will be added to the set you have specified.
Skipping a signing step
Another way to adjust the flow of a form is skipping a signing step (or steps), so that when certain conditions are met, the form can e.g. go to the fourth step directly after the first signature. It is only possible to skip signing steps when the form is signed, that is, In all signing steps except the first one.
Set up the skip rules in section Skip Rules, available in the form detail (section Form – Document flow – Skip rules). Note that skip rules are defined for the whole form (not for a specific signing step like common rules).
The rule name entered in field Skip rule name must be unique among skip rules defined for this form template and must be in a format suitable to use in an URL address (it is recommended to use the letters of the English alphabet, numbers and the underscore character).
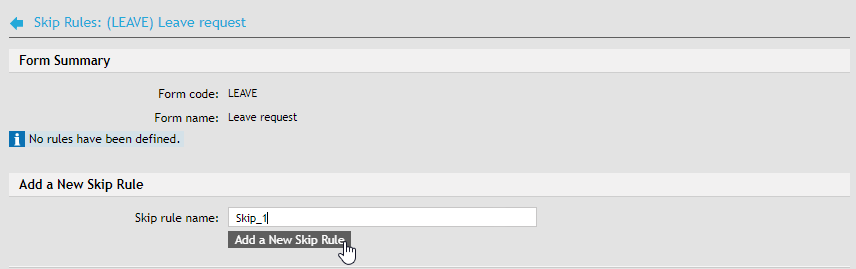
Click Add skip rule to open a screen with four tabs.
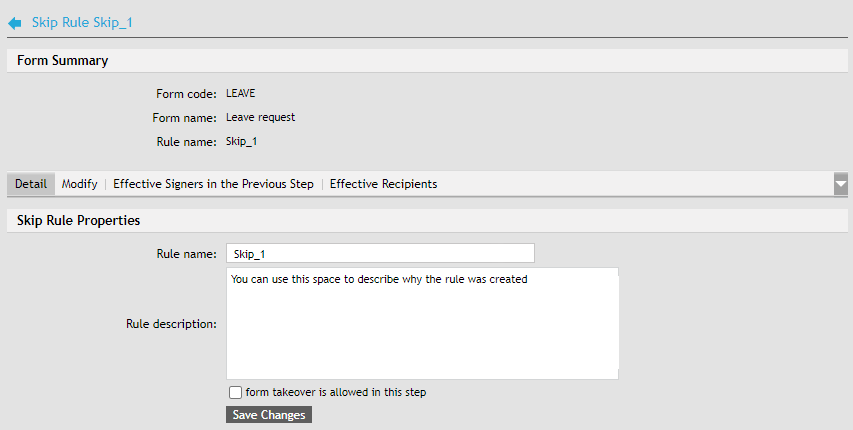
Apart from a name, each rule can have a description. Add it in the corresponding field on the Detail tab; the description can help the administrators better understand the purpose of existing rules.
On the Modify tab, set up the lists of users and groups for the rule:
-
previous step signers,
-
form recipients, and optionally also the default form recipient.
Set them up the same way as when setting up common signing step rules. The form will be delivered to the default recipient defined by the skip rule. If there is no default recipient set in the skip rule, the first recipient in alphabetical order (by surname) will be selected. This means the user cannot select which one from the defined recipients will receive the form.
Do not forget to click Save changes to confirm the rule settings.
The tabs Effective signers in the previous step and Effective recipients display the complete lists of users who become the signers and recipients – including those who received this role as members of the selected groups.
Messages for signers in the given step
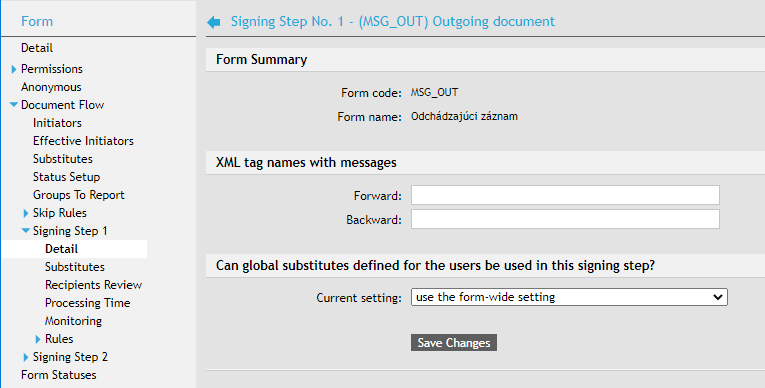
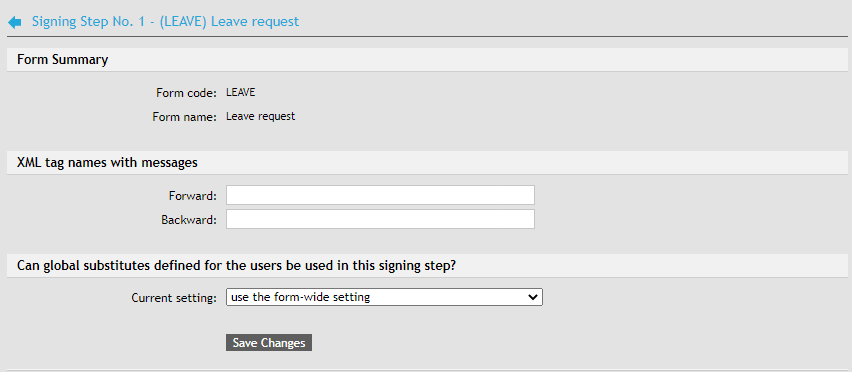
Open Detail. For every signing step, you can set the messages displayed to the following signer, or the previous signer when returning the form, in section XML tag names with messages.
These elements are configured at the step from which they are sent, e.g. the element for the message from the first signer to the second is configured in the first step, the one for the message from the second signer to the first one is configured in the second step, etc.
-
Forward – the contents of this text element will be displayed to the next signer.
-
Back – the contents of this text element will be displayed when the form is returned and signed by the previous signer again.
In section Can global substitutes defined for the users be used in this signing step?, you can enable or disable using global substitutes in this step. Enabling global substitutes means that a user’s global substitute takes precedence over substitutes defined for this form. If global substitutes are disabled, they are never used in this step. Using the form setting means that a global substitute will only be used if there is none explicitly set for the form.
Setting up substitutes in case of signer absence
Go to section Substitutes to set up users who will receive the form if the signer is absent and has set up their absence period. Click Add a substitute to insert a new one.
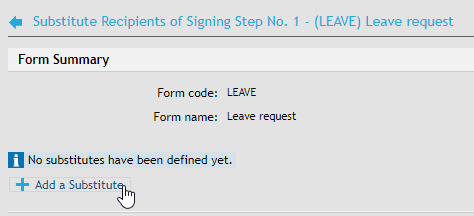
Now select the two users from the lists: the recipient (signer) and their substitute.

Click Add a substitute to confirm the selection and complete the setup.