Document folders
Open the Administration of document folders tab () to create and edit the folder structure where documents in the document section of FormFlow are stored. This folder structure is then displayed to users on the Documents tab.
List of folders and subfolders
The screen Administration of document folders is split into two sections. The left one displays the existing folder structure. Click the folder name with the  icon to display its subfolders on the right. You can return to the start of the folder structure by clicking the Main folder link.

The section on the right displays a list of subfolders to the selected folders and their editing options.
Use the checkbox on the left to select folders to edit their permissions in bulk – when you have selected the folders to edit, click Bulk edit of permissions and follow the instructions in chapter Setting up document folder permissions.
The Actions column buttons provide the following features:
-
 Assign processes to the folder – displays the list of processes that can be run from this folder (they will be available in the right-hand panel when one or more documents are selected).
-
Click
on the List of processes for the folder… to go to form (process) template administration. -
Click
 to remove the process from the folder.
 -
Click Add new processes to display a dialog window with a list of existing processes and check processes to add to the folder.
-
-
 Set permissions – displays a dialog where you can grant or remove permissions to (from) users, groups or roles.
 -
 Change order of metadata in GUI in this folder – displays a list of metadata that is displayed e.g. when editing document metadata or when filtering documents in a folder. For more details on ordering metadata, see chapter DMS metadata designer.
 -
 Edit the folder – displays a dialog window where you can edit the same parameters as when creating the folder and also assign statuses to the individual steps during the process.
 -
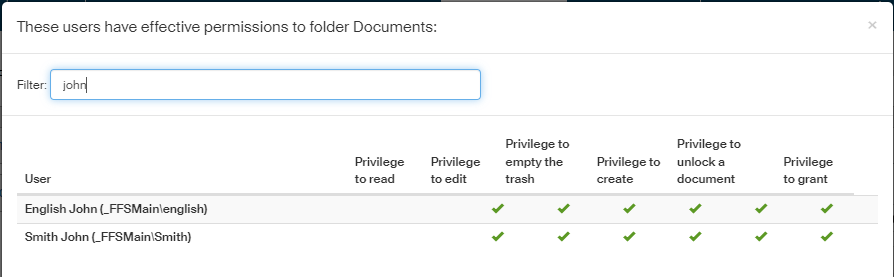
 Show effective permissions – displays a window with a list of users who were granted a permission or permissions to the folder, either directly or through membership in a group or role. The assigned permissions are displayed as a green check mark in the corresponding column. There is also a filter the upper part of the window to look up a specific user.
 -
Delete the folder – removes the entry.
You can use the  and
and  arrows to change the folder order.
Creating a new folder
To create a new folder, go to the upper right corner of the Administration of document folders screen and click Create a folder. The folder will be placed at the same level as the folders in the list; if the top-level folders are currently displayed, a new main folder will be added.
When you click the button, a dialog New folder is displayed with the following fields:
-
Name – this name will be displayed in the folder structure;
-
Folder SID – unique identification string;
-
Select a value in the Folder order field to set its position in the folder list directly (or you can change the order later manually in the list, using the arrow buttons).
-
Select document templates from the list in field Document templates to make them available in the folder. For more details on document template management, see chapter Office templates.
-
Similarly, you can also assign Document classes, Document ranks and Document statuses to the folder. For more details on managing document classes and ranks, see chapter Classes and ranks; managing document statuses is described in chapter Lists.
You can select a status to assign automatically to a document when it is moved to trash or removed from trash, or when it is returned from the archive back to the document folder. Set up these statuses in section Automatic status change.
-
Use the option Moving document to trash to select the status assigned automatically when a document is moved to trash.
-
Use the option Restoring document from trash to select the status assigned automatically when a document is restored from trash back to the folder.
-
Use the option Moving a document from the archive back to the DMS to select the status assigned automatically when a document is returned from the archive and placed in the DMS folder again.
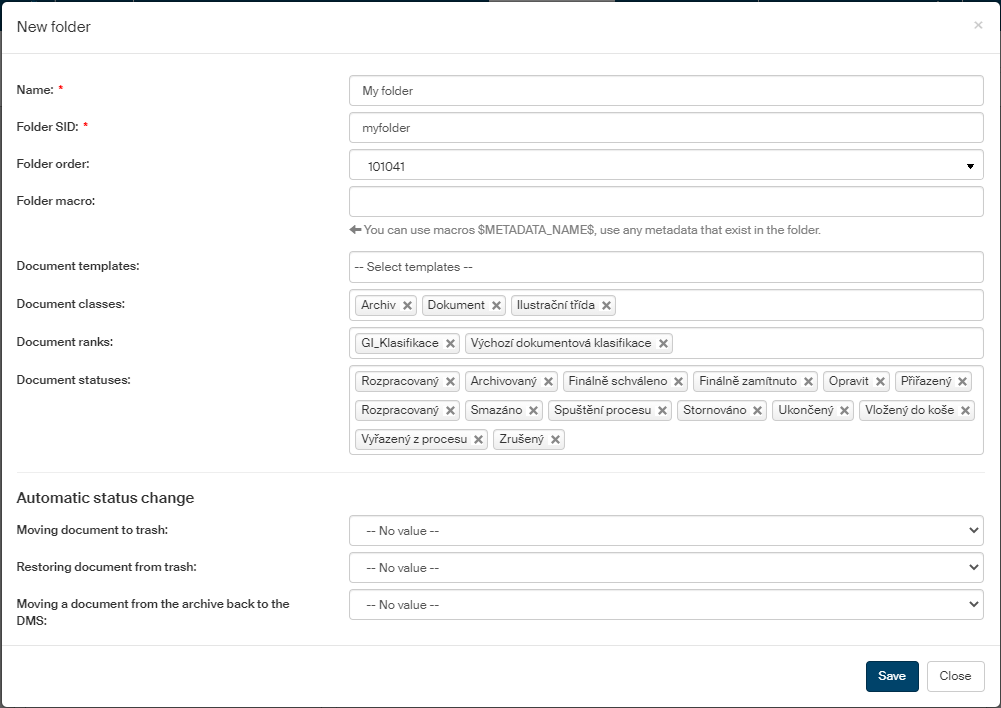
Click Save to confirm creating the folder.
The new folder is then placed in the folder list on the position selected in Folder order, or at the end of the list. You can adjust the order using the and arrows.
Now click Set permissions in the Actions column and assign folder access permissions to users or groups as needed.
Editing document folders
To edit existing document folders, click the Edit folder button on the corresponding row in the list on Administration of document folders.

In window Modify the folder, edit the document folder basic details, such as the Name, Folder SID, its order in the list, the Macro displayed in the browser header or the assignment of document templates, classes, ranks and statuses. In section Automatic status change, set up automatic change of status for documents in a selected process or processes.
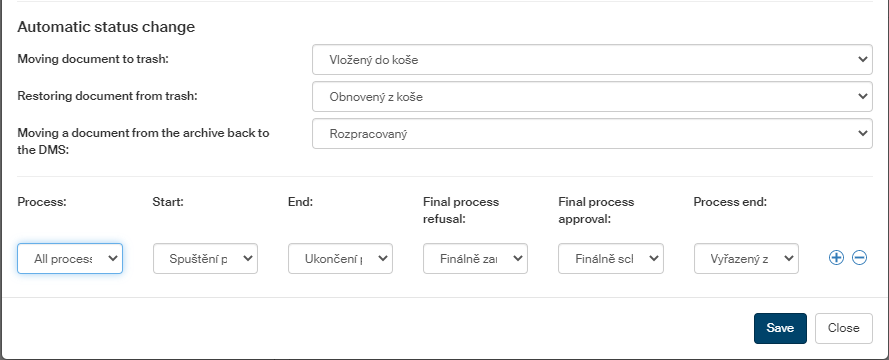
Select the process name in Process and set up the automatic status change for various process phases.
Use the plus and minus buttons to add or remove rows with settings for more processes.
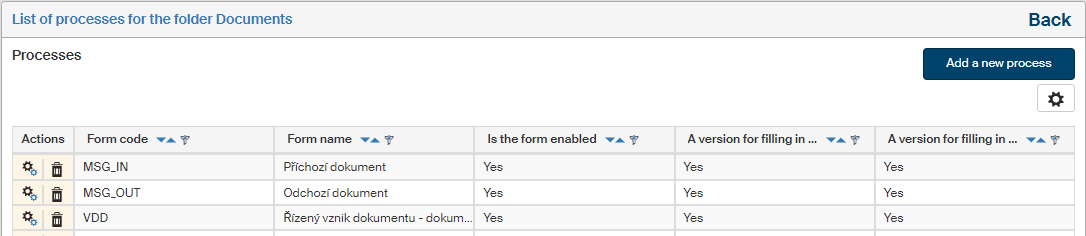
Assigning processes to a document folder
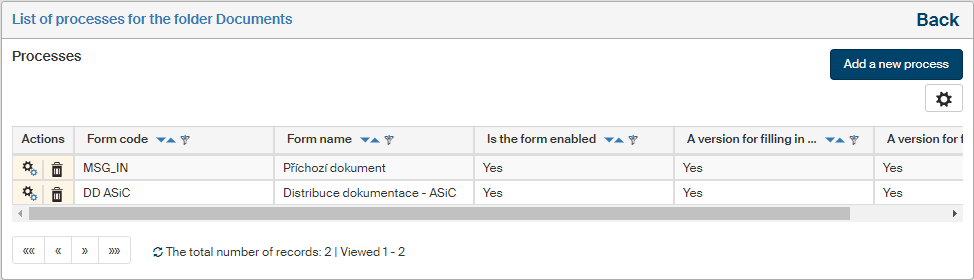
To assign processes to a selected document folder, go to the Actions column and click Assign processes to the folder in the corresponding row.

The window List of processes for the folder… is displayed. To add another process, click Add a new process.

A list of available processes is displayed. Check the box next to the process or processes you want to add and click Add.
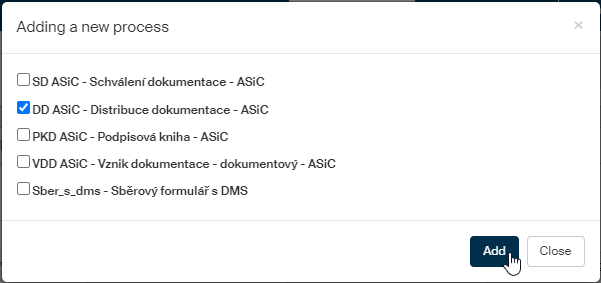
The selected processes are then added to the list of processes available in the folder.
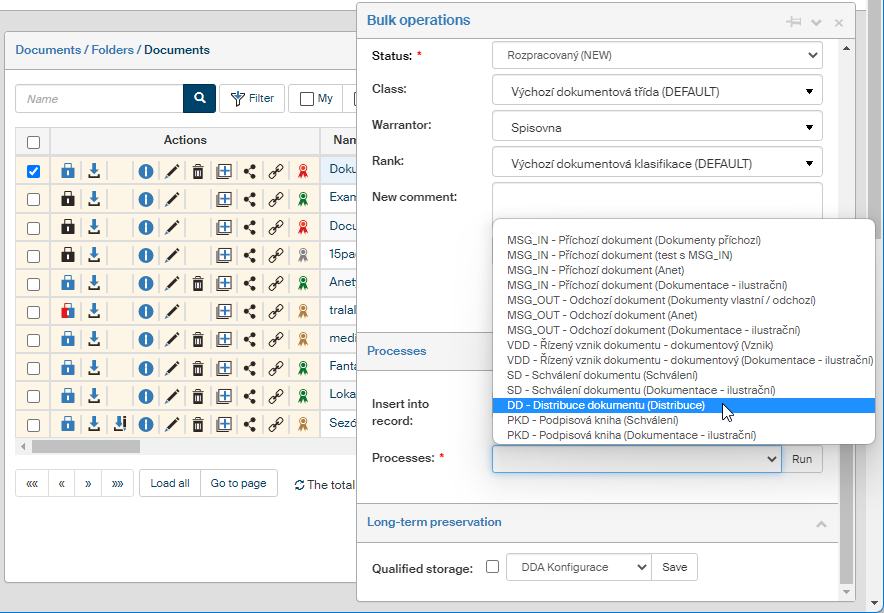
When there are processes assigned to a document folder, they are available from the Bulk operations window opened when a document is selected.
Setting up document folder permissions
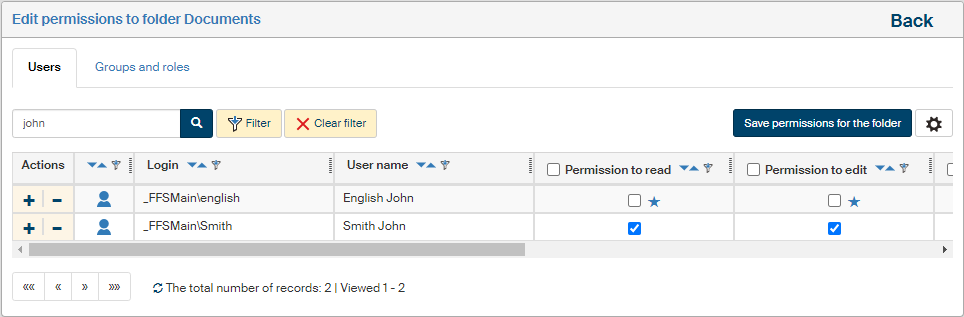
Click Set permissions next to a selected folder in Administration of document folders to open the window Edit permissions to folder…, where you can assign access permissions to users as well as whole groups and roles.
If you select the checkbox on the left for several folders and then click the button Bulk edit of permissions, a similar window will be displayed but the settings will apply to all selected folders. In such a case the window title is Edit permissions to folders. There is a button Show selected folders next to the title, which you can use to check the list of folders this setting will apply to.

For the rest of the setting, proceed the same way whether setting up a single folder or several folders at once:
Use the tabs in the upper part of the page to switch between a list of users and a list of groups and roles. A filter is also placed above the list, and you can use it to look up individual entries.
Check or uncheck the individual permissions for every entry (user, group or role):
-
Permission to read;
-
Permission to edit;
-
Permission to empty the trash;
-
Permission to create a document;
-
Permission to unlock a document;
-
Permission to grant permissions.
If there is an asterisk  displayed next to a permission, the user has received the permission through membership in one or more groups or roles. Move the mouse cursor to the asterisk to display a tooltip with the list of groups that provided the permission. You can still grant the permission to the user directly.
Click  to check all the fields and assign the user, group or role all the permissions at once, or
  to remove all permissions at once.
When bulk editing folder permissions, there are three options available for each permission: yes, no and do not change.
To confirm your changes, click the Save permissions for the folder button placed above the list of users or groups. To apply the newly granted permissions to subfolders as well, click Save permissions for the folder including subfolders. Click the Back link in the upper right corner to return to the list of folders.
If you want to check the overall permissions assigned to a user (i.e. permissions assigned both by being a group/role member and individually assigned permissions), return to the folder structure and, in the Actions column, click Show effective permissions.