Bulk operations
Check the box in the leftmost column for one or more entries to display a new, floating window Bulk operations over the list of documents. The window offers a list of operations that can be run for all checked documents at the same time. You can also check one document, then hold down the Shift key and check another document several rows below to select the whole range of documents at once.
|
The Bulk operations window can be docked in the FormFlow window by clicking on the first from the three buttons in the top right corner. 
|
Action buttons
There are several document processing buttons placed at the top of the Bulk operations floating window. Their presence varies based on the properties of selected documents and your permissions. The window only displays the action buttons that can be applied to all the selected documents. If you have selected e.g. eight documents, and you are not authorized to delete one of them, the Move to trash button will not be available in the window.
- PDF/A conversion
-
Runs conversion of the selected documents to the PDF/A archival format. The process might take some time, but it runs in the background, so you can continue your work while it is running.
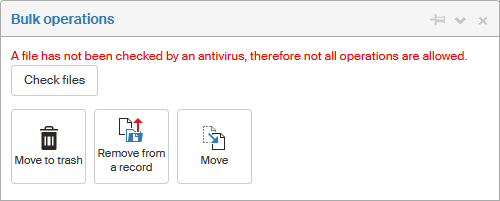
- Move to trash
-
Deletes the documents. They will not be removed completely, but you will only be able to look them up if you check Documents in trash in the filter. You can only use the button to remove documents if you are authorized to do it.
- Remove from a record
-
Takes documents out of records, if they were placed in any.
- Copy
-
Copies the selected files in a chosen folder.
- Move
-
Moves the selected files in a chosen folder.
- Share
-
Displays the document sharing dialog. For details of the procedure, see chapter Document sharing.
- Relations
-
Displays a dialog with the list of existing document relations. Handling relations is described in chapter Relations.
- Export to ZIP
-
Creates a compressed ZIP file containing the selected documents and a list of their metadata. In the dialog, select the file name and the metadata list format (CSV or XSLX). The file will be then offered for download.
- New relation
-
Starts creating a new document relation. For details of the procedure, see chapter Creating a new relation.
- Check signatures
-
Runs validation of the document’s electronic signatures.
- Place in the archive / Remove from the archive
-
If a document is finished, it can be archived. Then the Bulk operations window displays one of these two buttons you can use to place the document in the archive or remove it from the archive.
- Sign
-
Displays a dialog to attach electronic signatures to the selected documents. For details of the procedure, see chapter Signing a document.
- SignPoint process
-
Displays a dialog to sign the documents using the Sofa app and its SignPoint process. Availability of this button depends on your contract with Software602 a.s. For details of the procedure, see chapter Signing with SignPoint.

If one or more of the files have not been checked by antivirus, the message The file has not been checked by an antivirus, therefore not all operations are allowed (or A file has not been checked by an antivirus, therefore not all operations are allowed) is displayed along with the button Check file, which you can use to run the antivirus check immediately. At the same time some buttons (for copying, PDF/A conversion and export to archival ZIP file) are hidden.
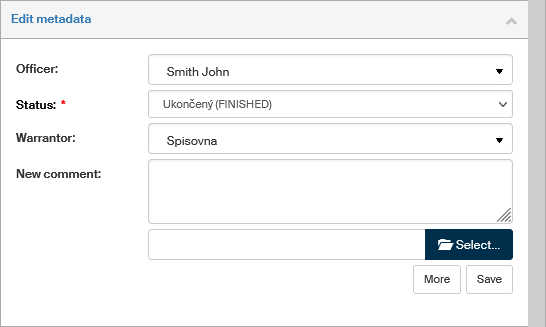
Editing metadata
The section Edit metadata in the middle section of the Bulk operations window allows setting some metadata to the selected documents, e.g. the Warrantor, Officer or Status. You can also use the field Entity to check to which entity’s scope this document or documents belong. You can add a comment here and attach a file of your choice to the comment. To do that, use the entry field and file selection field in section New comment. Then click Save to confirm entered or changed values.
Processes
The last section in Bulk operations is Processes. Use it to insert the selected documents in a record or process.
-
Look up the record in the field Insert into record – it is usually enough to type the first few characters and FormFlow will offer a list of matching records. This autocomplete function takes into account the first characters of the record name, but also groups of characters inside the name. If you enter e.g. OVM, a record named TEST OF OVM will be found as well.
Then click Insert to confirm inserting all the selected documents in the record.
-
The field Processes contains a list of available document processes.
If a document is placed in a running process, it is generally possible to run another process on it. It is also possible for documents in LTA preservation (but in such a case the document’s binary data cannot be changed, which means the document cannot be signed, etc.).
But it is not possible to run a process on documents that are in a controlled documentation process – specifically the processes “document creation” and “signature book”, because they change the documents' binary data and therefore it is not practical to e.g. send such an unfinished document as an outgoing message or save it to the archive.
Select a process out of the Processes options and click Run to confirm. FormFlow will create a form for the selected process, open it in a new window and insert the selected documents in the process. Continue by processing the form as is usual for the form type: enter the other data and run the process or hand it over to another user.
As soon as a document is placed in a process, it is locked from changes. The document’s lock icon in the list will be displayed in black until the process is finished. Based on the administrator’s settings, it might be still possible to include it in other processes, with the limitations described in the note in the previous paragraph.
Qualified storage
If qualified document storage feature (formerly LTD) is enabled in FormFlow, you can set the selected documents to long-term preservation or select the preservation policy.
If a single document is selected, the settings are available directly in the floating window.

If you have selected more than one document, the floating window offers the button Edit storage configuration for the selected documents. Click it to open a new window with a list of the selected documents and their long-term preservation options.

Check the box on the left of a document entry (Qualified storage) to start long-term preserving the document. Select one of the preset methods using the field Storage configuration. The other details displayed in the window are for your reference and cannot be changed.
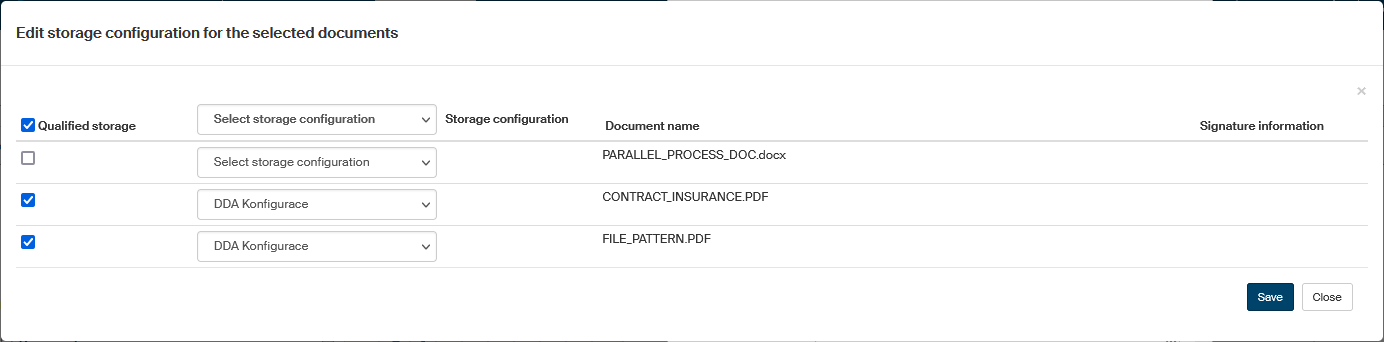
Confirm the settings by clicking Save.