Retention policy
A retention policy is an overall setting of properties related to retention and shredding: the retention code, retention period and retention trigger. Each retention policy must have at least one file plan code (file plan class) attached, while one file plan code can be used in more than one retention policy. In most cases, one file plan code is used in one retention policy.
When a user fills out document properties and selects a file plan code, there will be a limited set of retention policies available. Selecting one will also set all the related properties.
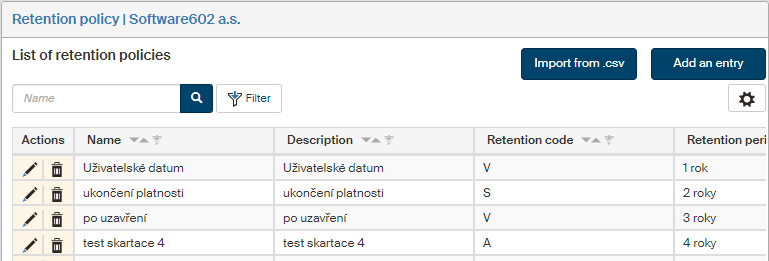
On the left panel in the Entities screen (), make sure the entity you want to edit is selected in the Entities list. Then go to Menu and click Retention policy. The screen Retention policy (entity name) is displayed on the right. It lists existing retention policies available for the entity and controls to add and edit them.
Creating a new retention policy
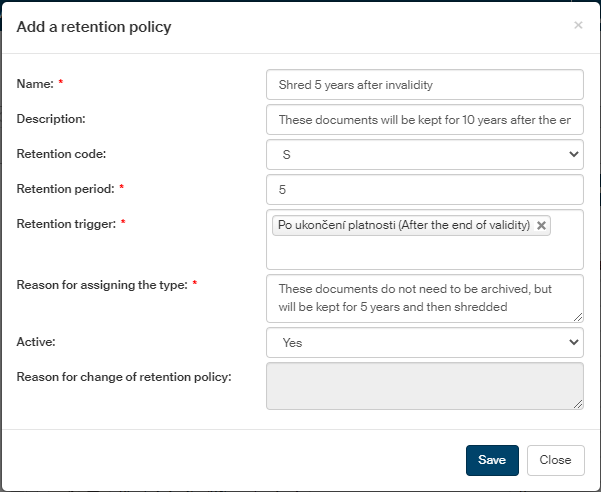
Click Add an entry above the list of existing retention policies to open a dialog to create a new retention policy.
-
The text from the Name field will be displayed in retention policy lists, for example when filling out a document form.
-
You can enter additional information in field Description.
-
Then select one of the options in Retention code (A – archive, S – shred, V – undecided).
-
In Retention period, set the number of years after processing, finishing etc. the document will be placed in a shredding procedure. If you enter a zero, it will be shredded the next year.
-
In Retention trigger, select the moment when the retention period starts. These details will be automatically filled in a document when this retention policy is assigned. There may be more than one retention trigger set.
-
In Reason for assigning the type, select a reason or a purpose for creating this retention policy. This field is only editable when adding a new retention policy; during later edits, it stays read only.
-
Select Yes or No in the Enabled field to make the retention policy available or unavailable to users as they fill out forms.
-
The field Reason for change of retention policy is only available to fill in when editing an existing retention policy. When creating a new policy, this field is not editable.
Importing and exporting retention policy definitions
If you have a CSV file available with retention policy definitions, you can simply import them in the list. Click Import from .CSV. Click the button to display a dialog window where you can look up the definition file on your drive. Select the file and click Import to confirm. Retention policies described in the file are then imported in the retention policy list.
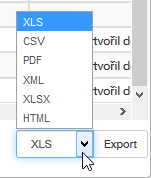
Conversely, you can export existing retention policy lists from FormFlow: the corresponding field and button are available in the lower right corner of the screen. First, select the file format from the list on the left, then click Export to create the export file.
Based on your browser settings, you might find the file in the Downloads folder, and the name will be e.g.: Export_2024-08-26_10.08.31.csv.
Editing existing retention policies
Use the buttons in the Actions column to manage the entries:
-
Click
 Edit retention policy to display a dialog where you can edit the retention policy (as described in chapter Creating a new retention policy).
 -
Click
 Delete retention policy to remove the retention policy entry completely.