Certificate administration
Certificate overview
The Certificates window () displays a list of certificates used in FormFlow. It does not contain user certificates, but it displays certificates used to sign in to services, e.g. the SecuSign services, and electronic seal certificates for the qualified storage service.
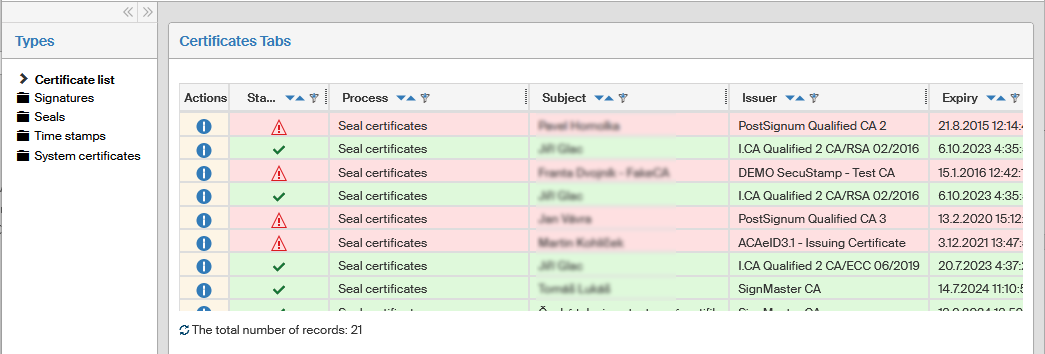
The window opened using the Certificates menu entry is a complex tool providing an overview of certificates, time stamps and seals. Use the item structure in the Types section on the left to set what to display.
Not all list entries are always visible. You will only see the parts of the structure you are authorized to.
The following list contains operations that give access to the specific sections.
- Certificate list
-
OPER::SETUP_CERTIFICATES, OTYP::ALL, GRANTREVOKE_PRIV::EXECUTE
- Signatures > Requests
-
OPER::RSM_SIGNING_ADMINISTRATOR, OTYP::ALL, GRANTREVOKE_PRIV::EXECUTE
- Signatures > Certificates
-
OPER::RSM_SIGNING_ADMINISTRATOR, OTYP::ALL, GRANTREVOKE_PRIV::EXECUTE
- Signatures > Certificate operations
-
OPER::RSM_SIGNING_ADMINISTRATOR, OTYP::ALL, GRANTREVOKE_PRIV::EXECUTE
- Seals > Electronic seal certificates
-
OPER::SETUP_LTD_AND_MARKS, OTYP::ALL, GRANTREVOKE_PRIV::EXECUTE
- Seals > PDF attachment seal visualization templates
-
OPER::SETUP_LTD_AND_MARKS, OTYP::ALL, GRANTREVOKE_PRIV::EXECUTE
- Time stamps
-
OPER::RSM_SIGNING_ADMINISTRATOR, OTYP::ALL, GRANTREVOKE_PRIV::EXECUTE + OPER::SETUP_LTD_AND_MARKS, OTYP::ALL, GRANTREVOKE_PRIV::EXECUTE
- Time stamps > Timestamp operations
-
OPER::RSM_SIGNING_ADMINISTRATOR, OTYP::ALL, GRANTREVOKE_PRIV::EXECUTE + OPER::SETUP_LTD_AND_MARKS, OTYP::ALL, GRANTREVOKE_PRIV::EXECUTE
- System certificates > SecuSign
-
OPER::SETUP_LTD_AND_MARKS, OTYP::ALL, GRANTREVOKE_PRIV::EXECUTE
Individual parts of the structure will be displayed only if you have the corresponding permission:
-
RSM_SIGNING_ADMINISTRATOR ⇒ Certificates / Signatures – Requests, certificates, certificate operations
-
RSM_SIGNING_USER ⇒ Preferences / Signature certificates
-
SETUP_LTD_AND_MARKS ⇒ Certificates / Seals / Electronic seal certificates, PDF attachment seal visualization templates:
-
SETUP_LTD_AND_MARKS + RSM_SIGNING_ADMINISTRATOR ⇒ Certificates / Time stamps / Stamp operations
-
SETUP_LTD_AND_MARKS + XG_IS_LTV_ENABLED from XG_LSYS table ⇒ Certificates / System certificates / SecuSign
The list open from the Certificate list entry provides primarily an easy validity check of the inserted certificates. The individual entries are color coded as follows:
-
green highlighted entries are valid certificates;
-
orange highlighted entries are certificates with their validity expiring in less than a month;
-
red highlighted entries are already expired certificates.
Server signing certificate permissions
Users might often use server-based (remote) signing to sign documents, using the SignMaster or PostSignum services. Some permissions are needed so that users can be issued remote signing services and use them:
-
RSM_SIGNING_ADMINISTRATOR – administrator permission to manage remote signing certificates.
-
RSM_SIGNING_USER – general user permission to use remote signing. This permission enables the Signature certificates button on the Preferences tab.
-
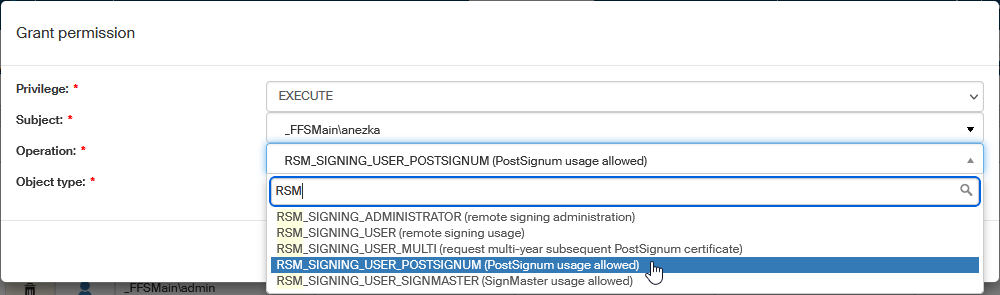
RSM_SIGNING_USER_POSTSIGNUM – user permission to use the PostSignum technology.
-
RSM_SIGNING_USER_SIGNMASTER – user permission to use the SignMaster technology.
-
RSM_SIGNING_USER_MULTI – user permission to request multiannual PostSignum certificates.
This means that in order to use a SignMaster certificate, the user must have the EXECUTE permission for RSM_SIGNING_USER and RSM_SIGNING_USER SIGNMASTER.
Users with operation RSM_SIGNING_USER_POSTSIGNUM may request to be issued a PostSignum signature certificate. This is a new operation, therefore:
-
In a new installation, the EXECUTE permission to this operation is granted to the group Everybody, while the GRANT and REVOKE permissions are granted to the role of Security Administrator. The ffs_system_account user will be granted all three permissions.
-
When updating an earlier installation, the user ffs_system_account is granted all three permissions, the role Security Administrator will be granted the GRANT and REVOKE permissions and then the permissions set for the RSM_SIGNING_USER operation are copied.
-
On update, all users/groups authorized to the existing RSM_SIGNING_USER operation will be granted the new operation RSM_SIGNING_USER_POSTSIGNUM.
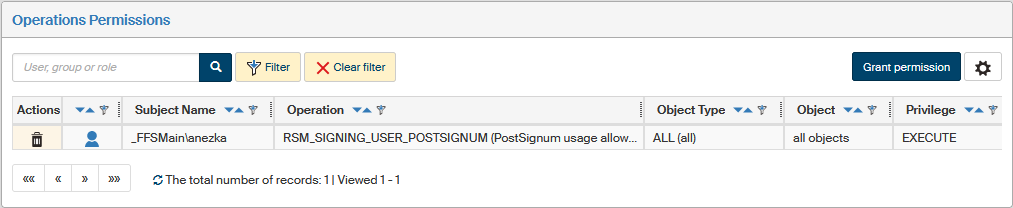
Set up the permissions at . You can set permissions to individual users or to groups. Look up the user (group) in the Operation Permissions window using a filter and then click Grant permission in the upper right corner of the window.
Server signing certificates
The server signing feature is mostly located in the three subfolders in the Signatures folder: Requests, Certificates and Certificate operations.
List of certificate requests
Click in section Types and the List of certificate requests screen will display a list of requests from users who requested to be issued a certificate.
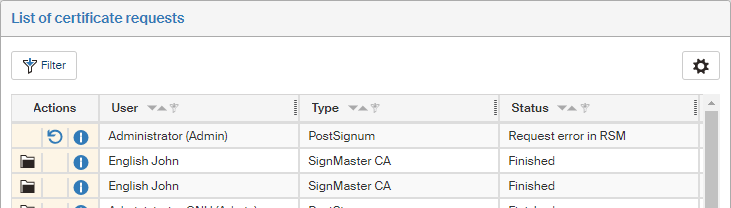
The Actions column contains several buttons that will provide you more details on the individual requests:
-
 Approve – use this button to approve the certificate request.
 -
 Display certificate – displays the certificate details in the Certificate list window.
 -
 Check status – displays a report on the current request status – e.g. Certificate with request ID: xxx has not been created at the CA yet.
 -
 Request details – opens a dialog window with request details (who and when requested, organization ID, request status and the date of the last status change).
 -
 Reject – use this button to reject the certificate request.
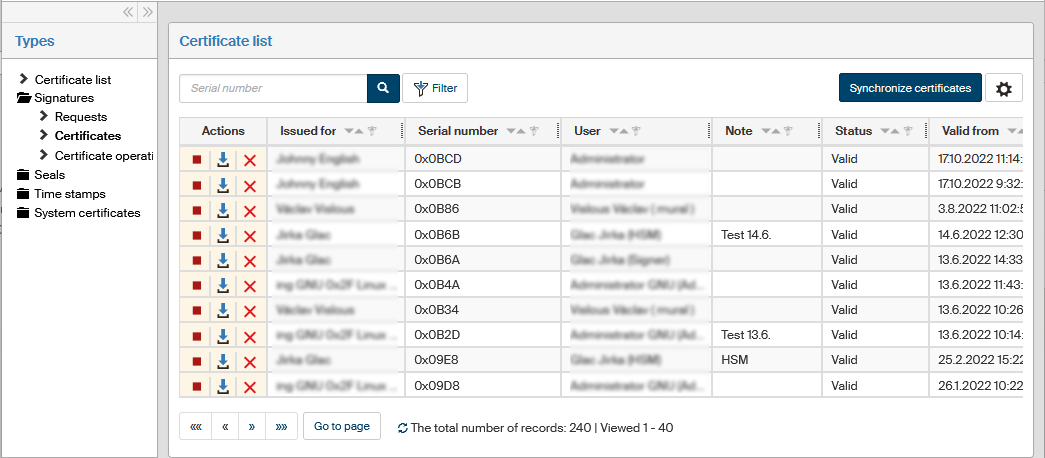
List of issued certificates
Select in section Types to open a window with a list of certificates already created from requests.

The Actions column contains the following buttons:
-
 Suspend certificate validity or
  Cancel certificate validity suspension – allows suspending the validity of a valid certificate and restore its validity later.
 -
 Download certificate – use this button to download the certificate and save it to a CER file.
 -
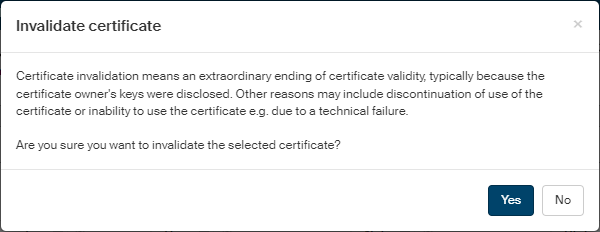
 Invalidate – opens a dialog window, where you can invalidate a valid certificate before its expiry – for example when the keys have been disclosed or because you will not need it anymore.
-
If the certificate has been issued by the internal certification authority, SignMaster, simply select Yes in the confirmation query.
-
If the certificate is issued by PostSignum, use the web form available from the link you will find in the Invalidate certificate window. You will also need to know the certificate serial number and revocation password. You will find both details in the certificate issue report, available from the link Download certificate report.

-
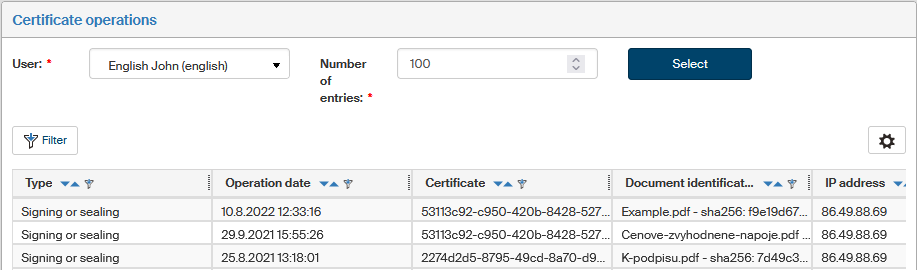
List of certificate operations
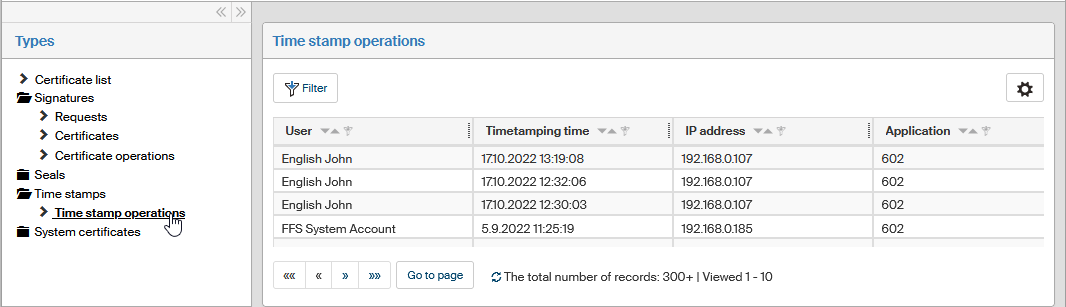
Select in section Types to display a window with the same title. In this window, you can use the Number of entries option to adjust how many entries to display in the window (the default value is 100, the maximum is 1000).
Then select whose certification operations to display in the field User. Select the name using autocomplete and click Select.

A dialog window is then displayed with a list of certificate operations: when and which certificate was used for signing, whether it was a stand-alone signature or a time stamp or a signature with a time stamp.
The list is for your information only, there are no controls to edit the data. You can filter the displayed data based on the operation date or type, certificate, document, IP address and entity.
Electronic seal certificates
Electronic seal certificates are used to sign documents that are to be long-term preserved but have no signatures of their own. FormFlow allows you to attach more than one system seal. The uploaded seals are available for selection in form management, where it is possible to select a specific seal for the given form template.
Seal list
Open the Electronic seal certificates window with a list of certificates to be used for sealing by going to and clicking Seals – Electronic seal certificates.
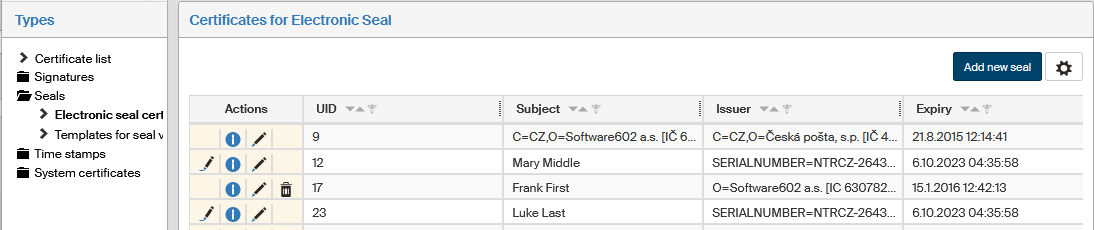
The window displays all system seals uploaded to FormFlow. Use the buttons in the Actions column to check and edit the entries:
-
Click
 Signing test to test the sealing feature on a test PDF file. The test result will be displayed in a red or green frame in the upper part of the window.
 -
Click
Forms with a seal to display a list of form templates that use the given seal for stamping.
-
Click
 Edit / Update seal to display the seal editing dialog.
Use the button Add new seal in the upper right part of the window to display a dialog to enter new seal properties.
Use the button  placed on the right above the table to display the filtering and sorting limits for this list. The settings are described in more detail in chapter Grid administration.
Creating and editing a seal
Use the button Add new seal above the seal list or the button Edit / Update seal in the Actions column for an existing seal to display a dialog where you can enter or edit seal properties. Both dialogs are identical except for the title.
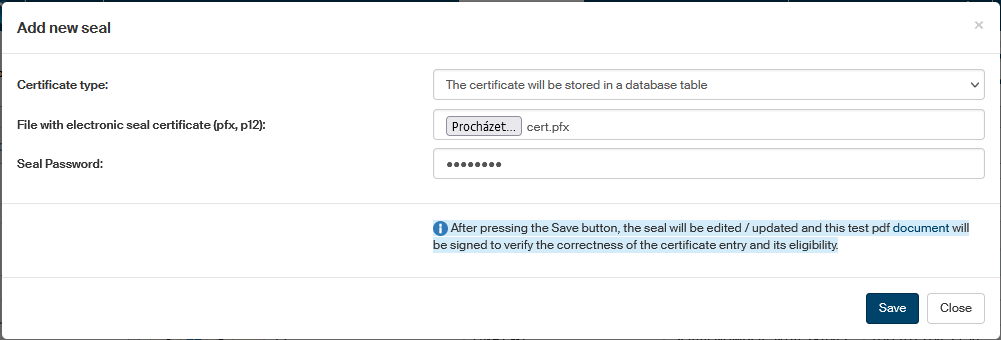
The Certificate type field offers three options:
-
The certificate will be stored in a database table,
-
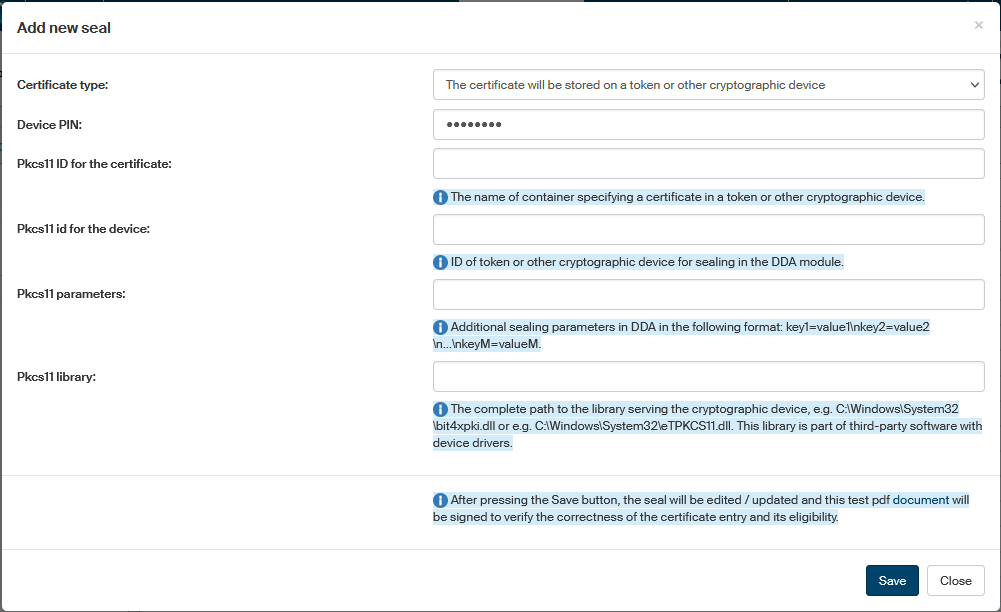
The certificate will be stored on a token or other cryptographic device,
-
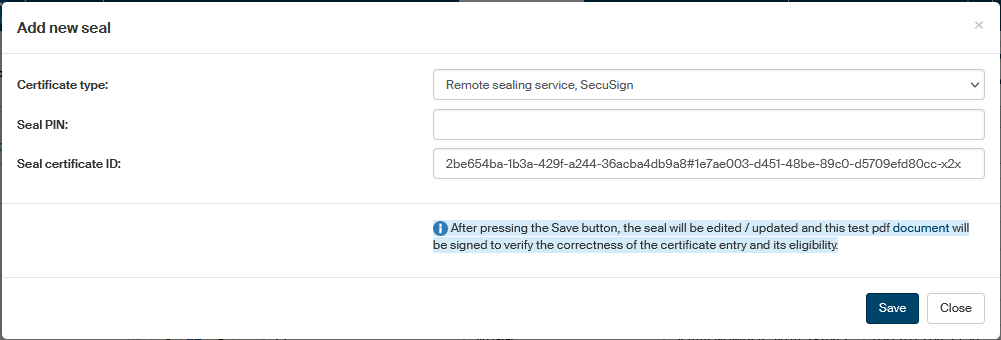
Remote sealing service, SecuSign.
Other form fields will be displayed based on the option selected here. The options are described in the following paragraphs.
The certificate will be stored in a database table
Look up the certificate using the field File with electronic seal certificate (pfx, p12) and enter the password in the following field, Password.
The certificate will be stored on a token or other cryptographic device
If the certificate is to be stored on a token or a similar device, the following fields will be available to fill in:
-
Device PIN – access PIN to the device where the certificate is stored.
-
Pkcs11 id for the certificate – the name of container specifying a certificate in a token or other cryptographic device.
-
Pkcs11 id for the device – ID of token or other cryptographic device for sealing in the qualified storage module.
-
Pkcs11 parameters – additional sealing parameters in qualified storage in the following format:
key1=value1\nkey2=value2\n…\nkeyM=valueM. -
Pkcs11 library – full path to the library for the cryptographic device, e.g.
C:\Windows\System32\bit4xpki.dllor e.g.c:\Windows\System32\eTPKCS11.dll. This library is part of third-party software with device controllers.
Remote sealing service SecuSign will be used
Use the Certificate type option to select Remote sealing service, SecuSign. The service will provide the document with an advanced electronic seal and an electronic time stamp from an external source in compliance with ETSI (European Technical Standards Institute) specifications.
Identification of the seal to use needs to be also entered in the Add new seal dialog window.
-
Seal PIN – access PIN to the seal.
-
Seal certificate ID – identification string for the SecuSign seal certificate to be used for this sealing method.
Saving and checking the seal
Click Save to confirm the entered details. The entered certificate is then checked by signing a test PDF document. You can download and check the resulting document or documents.

Remote sealing for more than one entity
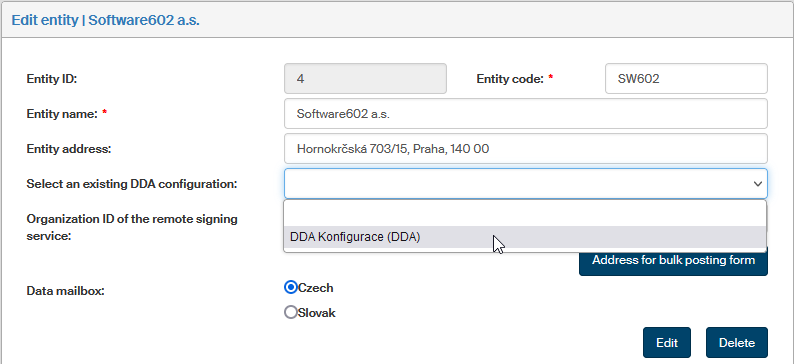
To use this feature, you need to set up the default qualified storage configuration for the entity first ().

To edit the details for an existing entity, select the entity and click Edit to display the window Edit entity. Use the field Select an existing DDA configuration to select the required item and click Edit.
Note that settings for DMS (controlled documentation) documents are applied using the following priorities:
-
Settings from document metadata.
-
If metadata are not set, entity settings are used.
-
If there is neither metadata nor entity setting available, the settings from the qualified storage (formerly Long-term Digital Archive) module are used.
Seal visualization in PDF attachments
For easier orientation, an electronic signature in a PDF document can be displayed on the page as graphics (image), optionally with some additional text (e.g. the signature date or name of the signing person).
To set up the seal appearance for all long-term preserved PDF files, go to the window Templates for seal visualization in PDF attachments (, and in section Types, click Seals and then Templates for seal visualization in PDF attachments).
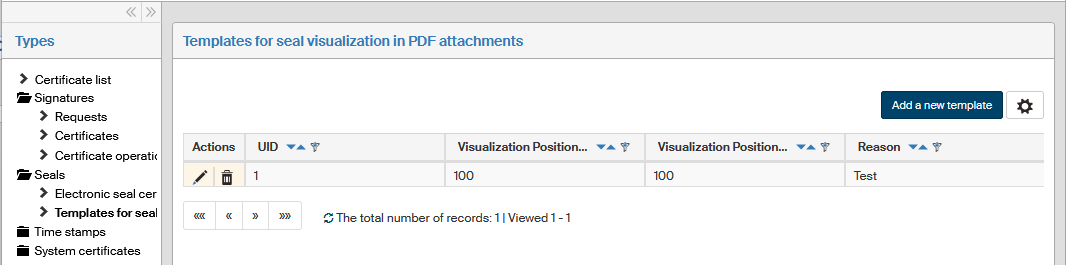
Every template contains a range of details describing the seal visualization image location coordinates, image size, description, additional text for the image and other variable data.
-
Click Add a new template to create a new visualization template.
-
Or click
Edit the template in the Actions column to open the dialog window for editing an existing template. -
You can also click
 Remove template in the Actions column to delete an existing template.

The settings can be used to adjust the location of individual seals in the document so that their visualizations do not overlap. This way you can specify e.g. that the second signature will be placed to the right of the first one, the third one below them, etc. Enter the following details in the dialog:
-
UID – template identifier.
-
Visualization Position X (pixels) – horizontal location of the seal image (in pixels).
-
Visualization position Y (pixels) – vertical location of the seal image (in pixels).
-
Image width, Image height – image size in pixels. Settings for the image itself are on the right-hand part of the dialog.
-
Page – document page number where the seal image will be placed. Value:
1 … means the first page,
2 … means the second page, etc.;
-1 … means the last page,
-2 … one before last, etc. -
Reason – reason for sealing.
-
Location – place of sealing.
-
Visualization comment – place any comment here.
The right-hand part of the dialog contains the section New image, where you can enter a link to the seal image. If you are editing an existing template, section Current image contains the selected image to be used for seal visualization. You can replace it by selecting a new file in PNG or JPG format in the New image field.
Use the Visualization text field to select the text to be displayed along with the image. There are macros available to be used in the text and automatically insert some seal details:
-
Digitally signed by: [SigningCertSubject_CN]
-
DN: [SigningCertSubject]
-
Issuer: [SigningCertIssuer]
-
Reason: [Reason]
-
Location: [Location]
-
Contact: [Contact]
-
Serial number: [SigningCertSerialDec], hexadecimally: [SigningCertSerial]
-
Date: [DateTime]
-
Visible user-defined data: [UserDataVisible] – string entered in the Visible user data field.
Click Save changes to save the created or edited visualization template.
Time stamps
A time stamp is a service provided by a certification authority, who guarantees the document creation time. It is recommended to use a time stamp for electronic documents that require proof of the time they were created, such as accounting documents.
Time stamp settings
To manage time stamps, go to the window Time stamps (, and in section Type, click Time stamps).
The window displays a list of time stamp providers currently available in FormFlow.
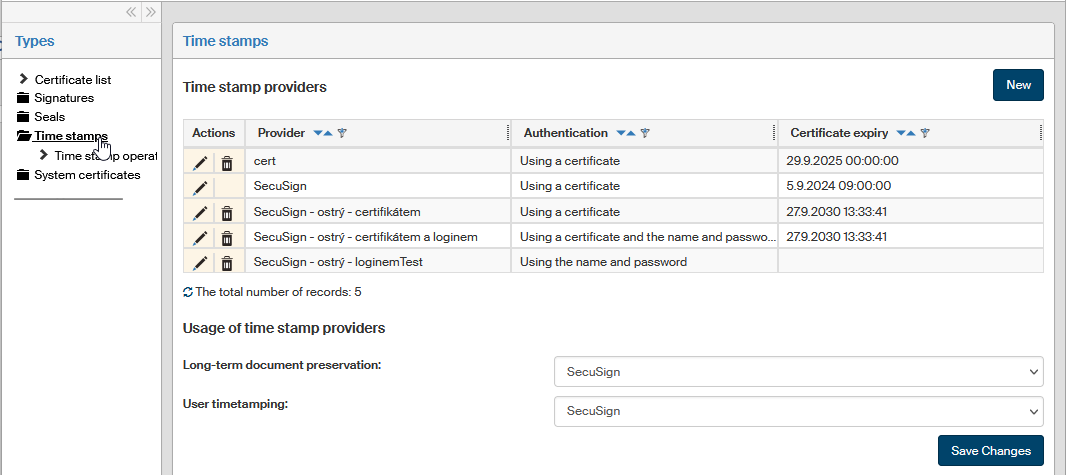
Below are two fields where you can select which of the listed providers will be used for long-term document preservation time stamps and which will be available to users for common time stamping. Click Save changes if you have made any edits.
To add another time stamp provider, click New in the upper right part of the screen. A dialog window Add time stamp provider will be displayed. Enter the required details, select the certificate file and click Save. You should get the details and the certificate from your external time stamp provider. Name the provider as you like in the Provider name field.
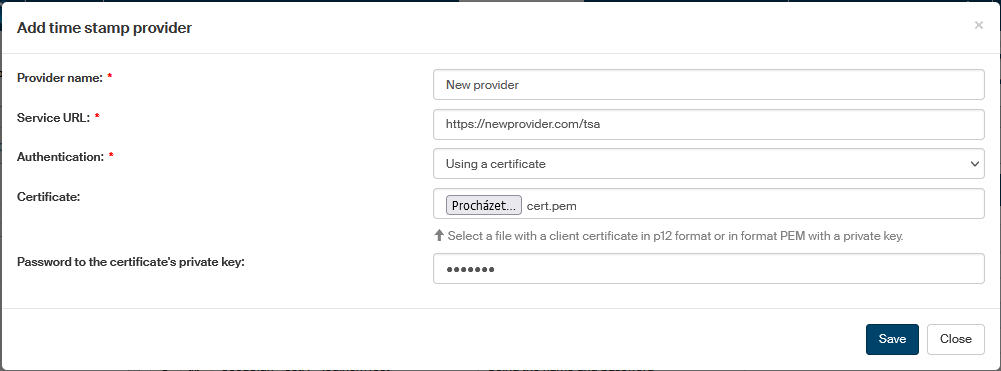
If you need to edit any time stamp provider’s entry, go to the Actions column and click Edit time stamp provider. Adjust the details as necessary in the Edit time stamp provider dialog window and confirm the changes by clicking Save.

To delete a time stamp provider entry, click Delete time stamp provider next to the entry.
Logging in to SecuSign
Use the SecuSign window to set up or check your login to the validation service for digitally signed documents (document integrity, certificate validity, check against the current revocation list, check whether the signature format complies with long-term signature preservation requirements). The service checks input signatures based on qualified certificates issued by accredited certification authorities in the Czech Republic and other EU countries based on the TSL (list of trusted accredited certification authorities, issued by the EU) which is continuously updated.
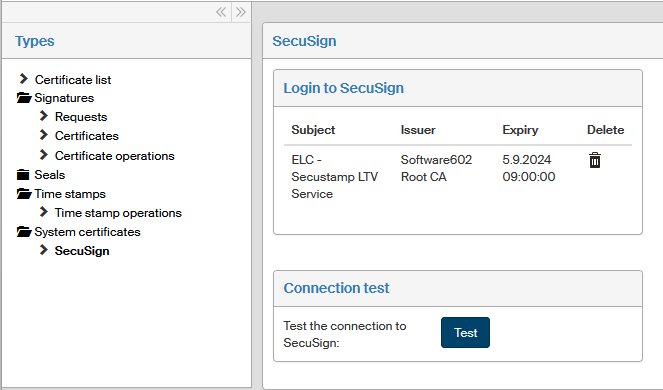
Open the SecuSign window by going to , and then in section Type, click System certificates – SecuSign.
If you are not signed in to SecuSign yet:
-
Look up the client certificate file using the Client certificate field. The file must be in P12 or PEM format and contain the private key.
-
Enter the certificate password in the Password field.
Save the settings by clicking Save changes. You can test your connection to the SecuSign service immediately by clicking the Try button.
When the service is configured and running, the SecuSign window displays login details. You can log out by removing the certificate: click Remove client certificate.
The service also provides sealing and stamping with a document or archival stamp.