Search

Searching the whole FormFlow

Use the search field in the upper right part of the application window to search in the whole FormFlow, that is in both documents and forms (processes). It is a fulltext search, which means that FormFlow will search for the words in the whole contents of forms and documents.

While searching, you can make use of the following properties:

  • Multi-word phrases. Text entered in quotes will be looked up as a whole, exactly as it was written, e.g.: "May 2017" will find Minutes May 2017, but not Minutes May and June 2017.

  • AND. Space between words is treated as the AND operator, which means that if more than one word is entered, the system will look up entries containing all the words at any positions, e.g.: job description will find Job description, Job – detailed description as well as Description of the job.

  • OR. If you want to search for entries that contain at least one of the keywords (the OR operator), separate them using the || symbol, e.g.: timesheet may || june will find both Timesheet for May and Timesheet for June.

  • Text to exclude from the results. If you want to find documents that do not contain a word or a phrase, place a minus sign before them, e.g.: sheet -time will find Balance sheet, but not Time sheet.

    + NOTE: A space must be placed before the minus sign, otherwise it is treated as a hyphen and therefore part of the word, e.g.: january-june will find Timesheet January-June, while searching for january -june will not find it.

You can find more search options in various sections of FormFlow – for example in individual folders on the Documents or Processes tabs. The corresponding controls are always placed above the list of entries and only apply to the specific folder. For more details, see chapter Filtering.

The specifics of searching for users and document processors

Displaying the results when loading a list of users and document processors (formerly officers) when using the autocomplete has some specifics. If there are many (the order of thousands) such items registered for a company, FormFlow will not load them all in a list or a right-side pane. Instead, these users will be loaded gradually.

Advanced search

The easiest way to search is to simply enter the searched expression in the search field and confirm the query by clicking image69 Advanced search.

image70

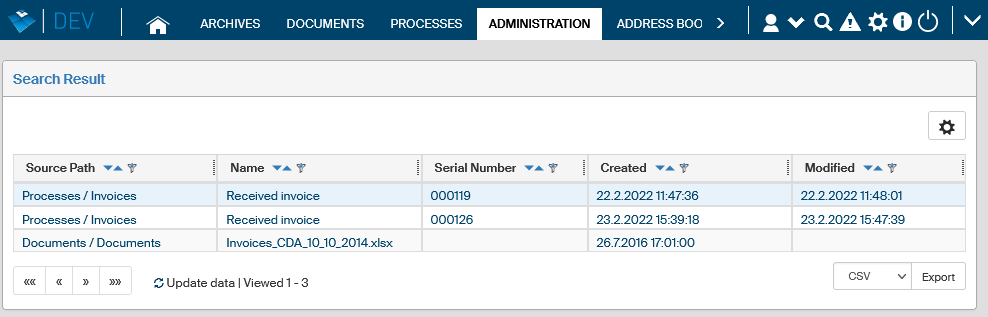
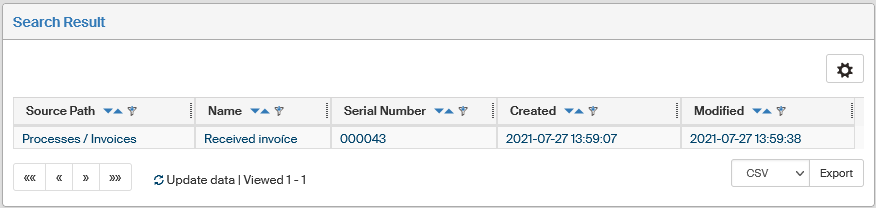
FormFlow will look up all documents and processes that contain the expression. The results are displayed in the Search results window as a table.

image71

Advanced search parameters

Another option is advanced search, where you can enter, besides the searched expression, also other parameters to specify the search in more detail. To open the Advanced search window and set the search parameters, click image72 Advanced search parameters.

image73

You can set the following parameters here:

  • Use the Search switch to specify whether to search in documents, processes or all records.

  • Text placed in the Searched term field will be looked up in the contents or metadata of searched documents or processes.

  • Use the section Created or modified on to specify a time interval. Only documents or processes that were created or modified in the given interval will be found.

  • The last item – Search in trash – can be used to specify whether to include deleted documents and processes – those “in the trash” – in your search, or even to search in the trash only.

image74

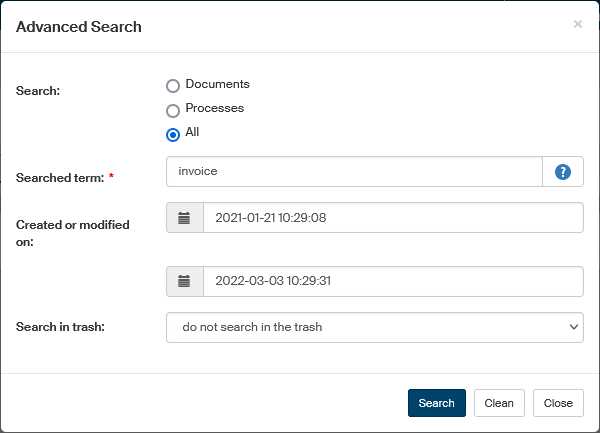
Start searching by clicking the Search button. FormFlow will look up all documents and processes that contain the expression. The results are then displayed in the Search results window as a table.

image75

Filtering

When working with documents and processes, you might often need to look up something, and sometimes based on a combination of various properties. That is why FormFlow contains, apart from general search options (described above in chapter Searching the whole FormFlow), also another tool, which allows both simple and advanced search within a given list, data filtration and also settings that enable you to adjust the layout of the search result table.

This filtration tool is available in the various windows that display tables with lists of documents and processes, opened from the tabs Documents, Processes, Records management, etc. It consists of two parts: the quick filter field, available above every folder with which the user is currently working, and the buttons of the advanced filter with fulltext search options on the given folder.

The controls for these filters are placed in the top left part of the document or process folder window.

image76

Quick filter

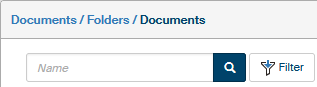
The easiest way to filter data is using the Quick filter. It is an entry field that allows filtering based on one specific preset data item (it is written in the field as grey italics; e.g. Name) – which one it will be depends on the folder or list settings, managed by the FormFlow administrator.

image77

The figure above shows a quick filter where the filtering is set to the string “attachment” in the document name. 
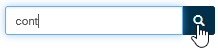
Entering just a part of the document name (e.g., “atta”) is usually enough. Start searching by clicking the magnifying glass button or the Enter key. FormFlow then displays in the default window a list of all documents containing the search expression.

Advanced search

For a more detailed search, use the ikona Filtr Filter button placed next to the quick filter field. When you click it, FormFlow will display a dialog window with all the details (metadata) that can be used for searching. The window consists of several tabs.

The Filter tab

Use the Filter tab to enter any combination of details to use in your search. But you will always need to fill in at least one of the fields highlighted in blue and marked with a red asterisk.

The Total number button will display the number of entries that match the current filter. The Clear button will return the filter to default.

Click Submit to start searching. The original FormFlow window will now display only the entries that match your filter.

The contents of the fields may slightly differ from the following figure, based on the context. For example, the ERMS documents and Records windows contain additional fields related to searches based on document lending and returning.

image79

The last section in the lower part of the Advanced search window contains the option to select which column (piece of data) to use for ordering the search results. Click Select the column for sorting to open the drop-down list and select a column. Click the second item to open a menu where you can select the ordering direction – Ascending or Descending.

image80

If there is a filter set, the filter controls are highlighted by a yellow background. To reset the filter and return to displaying all items in the window, use the button Cancel filtering. The previously set filter is then cleared; the Filter button will return to white background and the Cancel filtering button will be hidden again.

image81

While filtering, you can also adjust the layout of the resulting list. To do that, go to another of the tabs in the Advanced search window – The Columns tab.

The Conditions tab

The Conditions tab in the Advanced search window offers more detailed filtering settings than the Filter tab, based on individual properties or metadata. You can set more than one condition and specify whether all of them should be met or at least one of them.

image82

Every condition is built from three parts:

  • The piece of data that is being compared in this condition (Operand 1) – on the following figure, it is the Author (of a document). As soon as you select a metadata item from the list, the fields for setting up the other two parts of the condition will be displayed.

  • Operation used in the condition. The options depend on the type of data to be compared – for text data (e.g. document name) and data selected from a list (e.g. users) it is only possible to evaluate its equality (the = operator) or inequality (the != operator) with a specified value. For date and time data, “larger than” and “smaller than” operators are also available.

  • Specify the value to compare with in the third field (Operand 2 – using the operation in the second field, it will be compared with Operand 1). The field options vary again based on the data type:

    • For text fields, simply enter the required text directly in the field.

      image83
    • For list items, including items only allowing the Yes or No values, the field offers the list of allowed values. Select the required value from the list.

      image84
    • Items of date and time type contain a button in the left part of the field, which can be used to display a tool for selecting date and time.

      image85
    • If the Operand 2 item (regardless of type) allows entering an empty (not filled in) value, the field also contains the button nevyplnene, or the Unspecified option in the list of options. You can set this value to look up entries that do not have (or, conversely, do have) this item specified.

      image87

To combine more than one condition in the filter, add more rows using the plus v kolecku button on the right of the condition.

image89

Every row contains the field for Operand 1 again and when it is selected, you can continue to specify the operator and the value of Operand 2 again. If the filter contains more than one condition, there will be additional controls displayed next to them:

  • On the left, before the field for data, an additional field specifies the relation between the condition (on individual rows). If both conditions are to be met, select and. If meeting just one of the conditions is enough for the entry to match, select or.

image90
  • On the right, you can find the buttons to plus v kolecku Add a condition and image91 Remove the condition.

  • Use the buttons sipka nahoru Move up and sipka dolu Move down to adjust the condition order.

Click Submit to start filtering.

Another option is to use the button plus modre Add subcondition. It can be used to create combined conditions, e.g. "the author is … and at the same time the officer is …".

image95

Start by creating an ordinary filter condition.

Then click plus modre and continue by entering a subcondition. To specify the relation between the two conditions, use the drop-down menu to choose between and and or options, placed before Operand 1.

image97

Then you can click plus modre to add another subcondition or click plus v kolecku to add more conditions to the filter.

The Fulltext tab

The Fulltext tab in the Advanced search window can be used to search anywhere in a document, form, etc. or in their metadata. Place the text you are looking for in the field Search expression and click Submit.

image98

FormFlow then displays the search results in the original window as a list of entries in the folder which contain the expression, either in the entry itself or in some of its metadata.

image99

While searching, you can make use of the following properties:

  • Multi-word phrases. Text entered in quotes will be looked up as a whole, exactly as it was written, e.g.: "May 2017" will find Minutes May 2017, but not Minutes May and June 2017.

  • AND. Space between words is treated as the AND operator, which means that if more than one word is entered, the system will look up entries containing all the words at any positions, e.g.: job description will find Job description, Job – detailed description as well as Description of the job.

  • OR. If you want to search for entries that contain at least one of the keywords (the OR operator), separate them using the || symbol, e.g.: timesheet may || june will find both Timesheet for May and Timesheet for June.

  • Text to exclude from the results. If you want to find documents that do not contain a word or a phrase, place a minus sign before them, e.g.: sheet -time will find Balance sheet, but not Time sheet.

    + NOTE: A space must be placed before the minus sign, otherwise it is treated as a hyphen and therefore part of the word, e.g.: january-june will find Timesheet January-June, while searching for january -june will not find it.

To search for documents in all folders, use the fulltext search field placed in the upper left part of the window. This field offers search throughout the whole FormFlow; for more details, see chapter Searching the whole FormFlow.

The Columns tab

The Columns tab in the Advanced search window contains a list of all data that can be displayed in columns in the search result window. You can use this tab to set for each column whether to display it and, for those displayed, in which order.

image100

Displayed columns

The table on the left allows you to select the columns, that is, the types of data to be displayed in the search result window. The table is divided in two columns: Columns not displayed and Displayed columns. Use the Arrow left icon and Arrow right icon buttons placed between the columns to move the individual items from one column to another to set whether to display them or not.

There are several more buttons placed in a vertical row to the right from Displayed columns, and you can use them to set the order of the individual items in the list of search results. Tap on the item you want to move and then use the buttons to set its position: click Arrow up icon or Arrow down icon to move the item one place up or down. Or you can use the buttons image and image to move it to the beginning or end of the list.

Every item will become a separate column in the search result window. The items placed higher on the Displayed columns list will be placed to the left in the search result table.

Operation visibility

The Columns tab can also be used to adjust the contents of the Operation visibility column containing the buttons for manipulation with the entry. The column is always displayed on the left of the search result window. The range of buttons to display and their order will vary based on the type of the list you are working with, but you can set for every one of them whether to display it or not. Use the checkbox on the left from the button icon: check it for all actions to be displayed and uncheck for those not to be displayed. Or you can use the checkbox in the section heading to display or hide all the buttons at once.

The Filter sets tab

Once a filter is set, you can save it for later use under a name and activate it under that name anytime again. The Advanced search window contains a tab Filter sets, where you can save and edit filters.

Here is an example of saving a filter. You log in to FormFlow as Agnes and want to create a simple filter that looks up your own documents only. Go to the Conditions tab and create a condition: Author = Smith John.

image107

In the bottom right of the tab, click on the arrow part of the Save button and select Save as a new set from the submenu.

In the Save as a new set dialog, name the filter in the Name field and select a Color that will be used to display the filter items. Adjust the checkboxes Display as tag and Display in menu to set where you want to see the new filter set. Click Save to save the new set.

image109

You will find the set you have just created in the Advanced search window, on the Filter sets tab. This is where you can edit, delete, share, save or directly apply the sets from all the filter tabs by clicking a symbol in the Actions column.

  • If you have checked Display in menu in the Save as a new set dialog, the filter will be available from the menu on the Filter button.

  • If the option Display as tag is checked, the filter will be available as a button above the list of search results.

image110
  • Use the Edit icon Edit button to set the current filter, visibility, and column order according to the saved set and you can continue using this setting.

  • Click Remove icon Remove to delete the saved set.

Here is how to share a filter saved in a filter set with other users. In the row containing the filter you want to share, go to the Actions column and click Share icon Share. The dialog Filter sharing (name) will open up. Use the selector in the top right part of the dialog to select the user with whom to share the filter and click Add.

image114
  • To apply the filter to the tabs, go to the Action column and click image Load the set data to tabs. The action will be applied without any other queries and the result announced in a message box.

  • Click ikona Filtr Apply to apply the filter directly on the files in the current folder.

The Advanced settings tab

The Advanced settings tab allows you to set what to display when you open a window with the given folder.

The option Set this filter after loading the page is used to set what to display when you open a window with the folder contents. The Settings offer the following options:

  • Show empty grid – will not display any search results.

  • Display the grid without a filter – displays the search results without any filters applied, which means all entries.

  • Display an empty grid with the advanced filter window – does not search but directly displays the Advanced search window to set a filter.

  • Display the grid with the last filter used – repeats the last search used when the tab was last displayed.

In addition to that, your saved filter sets are included in the menu under the heading Filter sets. If you select one of them, it will be used for the first search.

The setting Set sets after clearing the filter allows you to set what to display when you cancel previous filtering. Only two options are available here:

  • Show empty grid – will not display any search results.

  • Display the grid without a filter – displays the search results without any filters applied, which means all entries.

image116

Browsing lists

If there are many entries available, the list is displayed page by page. Browse the pages using a navigation tool placed on the left below the list.

The individual buttons allow you to:

  • «« – go to the first page,

  • « – go to the previous page,

  • » – go to the next page,

  • »» – go to the last page,

  • Load all – display all remaining entries,

  • Go to page – enter a specific page number to display directly.

Some of the buttons, like Go to the last page and Go to page, might be hidden. This depends on FormFlow permission settings that administrators can change. Similarly, the Load all button might not be available if there are too many entries.

You can set the number of items displayed on one page: open the application settings and edit the value in field Rows per page.

image183

Information on which entries are displayed on the current page is placed next to the navigation tool. The exact number of entries matching the current filter is only displayed for lower amounts (the threshold is set by the administrator). You can click Update icon to update the page contents.