Records
Documents stored in the Records management can be placed in records. A record is handled as a process, which means it has its own form and passes through a workflow, it is assigned to a user to process it, may be submitted for approval, and at the end of its life cycle it is finished and archived. It is assigned to an entity, it has its file number, file plan code, retention code and retention period.
The record form is used to attach messages or documents to the record and for all actions applied to the record during its life cycle.
Apart from common records, the Electronic records management can also register standardized records. They are specialized records related to one or more process types. Their structure is preset and organized into logical parts. They are processed the same way as common records.
Where to find records
Creating a new record
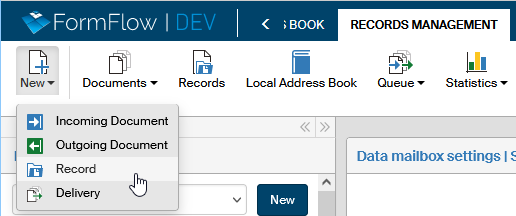
There are several ways of creating a record. One of them is using the Electronic records management interface directly: go to the RECORDS MANAGEMENT tab, click New and select Record or Standardized record. A new form opens, and you can start filling it out.
If you need a new record for an incoming or outgoing message you are just handling, you can create it directly from the message form. In the form header, click the Insert into record tab and then the button Create new record. The application creates the record and places the document you are processing in it. To start entering other details, click Display record to open the form.

Existing records
You can look up records in progress and finished records in two places in the Electronic records management.
On the RECORDS MANAGEMENT tab, click Records to display the list of existing records you are authorized to see.

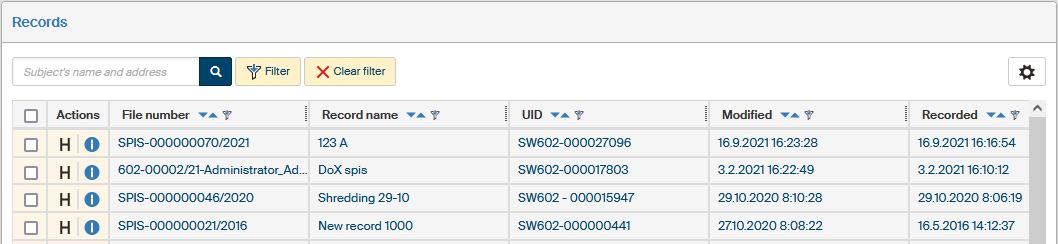
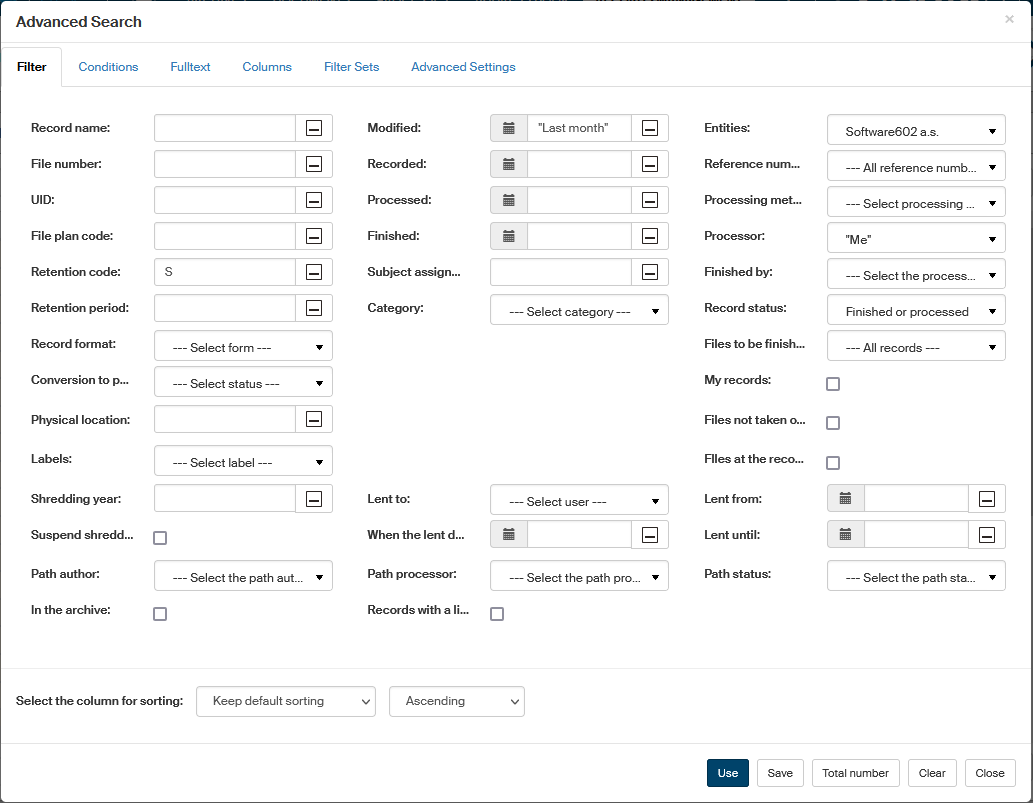
You can click the Filter button above the list to narrow it down using various properties including processing status: for example, selecting Finished or processed in the Record status option will only display the records with the process finished. Similarly, you can look for records in progress or records you are processing (check My records).
Another option of looking up existing records is the Processes tab. This tab also offers options to narrow down the search:
-
click To Be Processed by Me to filter out the processes/records waiting for you to process them (they are “on your desk”);
-
click In Process to display the processes/records where you are the officer, even if they are on someone else’s desk at this point.
In both cases you can also click Filter to set up filtering by other record properties.
For more details on displaying and filtering processes, see chapter Filtering.
Record form description
Creating a new record
There is a group of buttons placed in the upper right corner of the form:
-
The
 Relations button opens a window where you can create parent and child relations to the document.
 -
The
 Document sharing button allows you set up sharing the record with other users. Sharing is described in chapter Sharing documents and records.
 -
Use the
 Print form button to print out the form. Printing is described in chapter Printing documents and records.
 -
The H (Record history) button displays the record history, which is a list of changes that took place in the record from its creation.
-
Use the
 Close form button to close the record window for the moment. If you have made any changes, remember to click Save in the lower part of the form first to confirm them.
The tabs in the record header (Hand over and Path) relate to its workflow. The tabs are described in chapters Record handover, Taking over a record and Record path.
Record identification and description
The upper part of the form contains several controls for creating the record description.
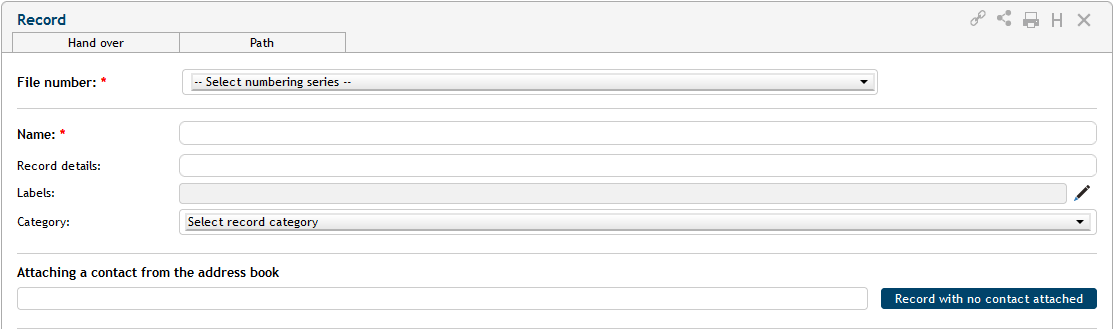
File number is used as a record identifier. Use the File number option to select the numbering line to be used for the record.
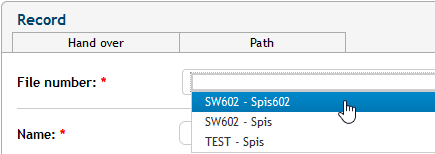
Then click Assign file number to confirm the selection. If you manage records for more than one entity, be careful when selecting the file number. If you confirm a wrong file number, it is not possible to take the action back, and you would have to cancel the record. The file number determines the record entity, and it is not possible for such a record to contain documents from another entity.

In the following fields, enter the Name (mandatory) and Record description (optional), used to identify the record better.
You can also attach Labels to the record (click ![]() and select a label or more labels from the list).
and select a label or more labels from the list).
Click Category to assign one of the preset categories to the record. To change your choice, click ![]() at the end of the line to remove the category and choose another if needed.
at the end of the line to remove the category and choose another if needed.

If the record has been handed to you by a different user, you need to confirm or reject the takeover before you start making any changes. If it is the case, the corresponding buttons are displayed in the upper part of the form near the file number. For more details on taking over records, see chapters Record handover and Taking over a record.

Assigning a contact
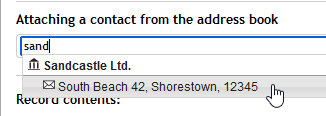
A record may but does not have to be assigned a specific address book contact. You can use autocomplete to look up the contact. Enter a few characters from a contact name in the field Assign an address book contact. A list of matching contacts is displayed when at least three characters are entered. Enter more characters to refine the search.
You can click ![]() to cancel contact assignment and repeat the selection.
to cancel contact assignment and repeat the selection.

Click Edit contact to load the contact details in a separate address book window where you can add or edit them. You can also create a branch for the contact.
If the record does not relate to a specific contact, do not fill in the field Assign an address book contact at all. Select Record without a contact assigned instead.

Record contents
There can be any number of documents (messages or separate files) and other records attached to a record.
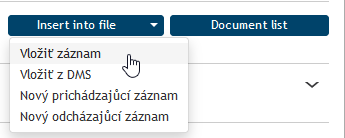
Section Record contents contains the button Insert into record. Click it to select how to insert a document in the record. The options are inserting it from a computer drive, from the document folder or from an incoming or outgoing document. For details how to insert from the DMS, see chapter Inserting documents.
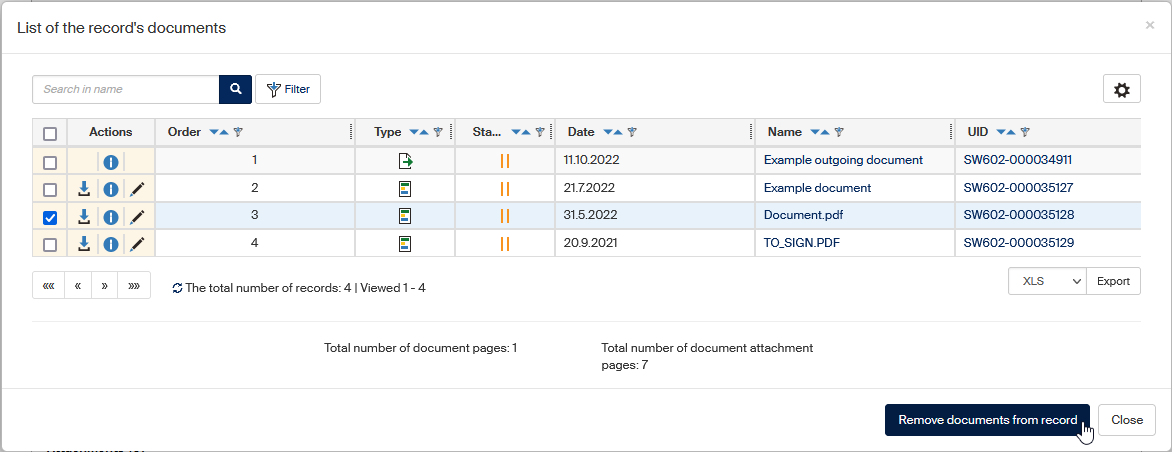
Click Document list to display a new window with all the documents and records currently attached to the record or those that used to be attached to it in the past. It is organized similarly to the Document list as described in chapter Document list: there are controls for filtering documents and display setting in the upper part and the document list itself, as a table, below them.
The checkboxes in the leftmost column in the table have a different purpose here: they do not display the bulk operation window but are used to select documents to remove from the record. Complete the operation by clicking Remove documents from record, placed on the right above and below the table.
Comments
Every user can add their own note for the record in the Comments section and, if they choose, attach an attachment or more to the comment.
In the default state, before any comments are added, the section might be displayed “collapsed”. To insert the first comment, click the ![]() button on the right to expand the section.
button on the right to expand the section.

You can use the same button later to collapse the section again.

-
New comment – input field where you can enter the comment text.
-
Insert attachments to comment – click the button to display a file selection dialog and look up the attachment file on your computer drive. You can also use the mouse to drag & drop files from your file manager to the comment section.
-
Attachment – opens a dialog where you can load the attachment in the browser or save in a file.
-
 Remove attachment – removes the attachment from the comment.
To attach more than one file, repeat the procedure.
Record processing
The Record processing section contains the details related to the record and the procedure of processing it. The document creation date and who created it (Created by) are read-only details. The person processing the document (Processed by) is also transferred from the document properties and cannot be changed directly, only by handing the record over to someone else, as described in chapter Record handover.
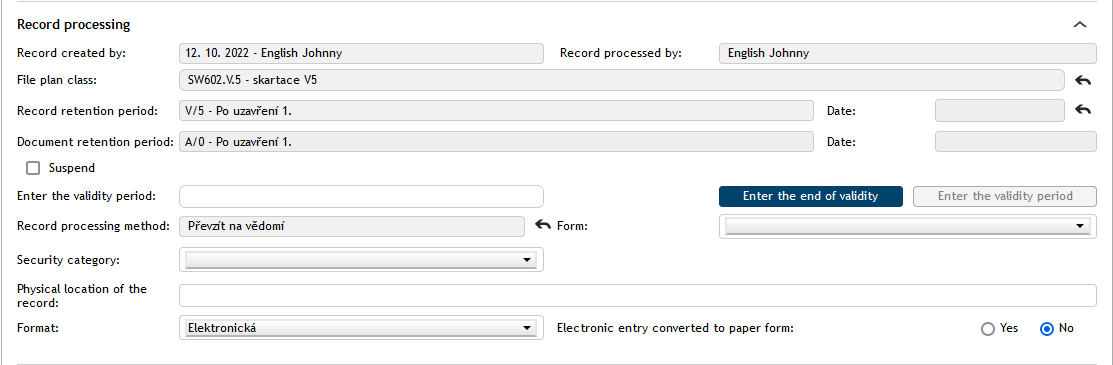
Most of the following fields are optional, fill them in as you need.
Select file plan class / File plan class – to select a file plan class, enter at least 3 characters from its name and the form displays the matching options. Or press the space key three times to display all file plan classes. To display the last ten file plan classes used, enter three asterisks (*).
For clarity, the autocomplete list includes file plan titles written in bold and marked with the ![]() symbol. You cannot select these titles (they are deleted from the form after selection). File plan classes are displayed in a tree structure based on their level and with an arrow icon
symbol. You cannot select these titles (they are deleted from the form after selection). File plan classes are displayed in a tree structure based on their level and with an arrow icon  .
.
To change your selection later, click ![]() .
.
If the File plan class has only one retention policy assigned, the Record retention policy is prefilled automatically based on the class; if there is more than one, select the corresponding policy from the list. The retention policy specifies how to deal with the record in the future: whether it will be shredded or archived.
The Retention policy includes a Retention code (A – archive, S – shred, V – undecided) and the retention trigger, which is the moment from which the retention period is calculated. Based on the retention trigger, enter one of the following:
-
User-defined date – enter the Date.
-
After the end of validity – enter the Validity date or Enter validity year, placed below. You can switch between these two methods of entering the validity end using the buttons Enter validity date and Enter validity year.
-
After the record is finished – in this case there is no need to enter any dates, the retention period starts when the record is finished/processed.
You can edit both the File plan class and the Retention policy later by clicking ![]() .
.
The field for Document retention policy is only displayed when a document is placed in the record. The highest retention policy value from the documents inserted is used. For more details, see chapter Inheriting record retention periods when adding or removing documents.
Suspend shredding – if this field is checked, the record will not be placed in a shredding procedure. When such a form is reopened, a note on shredding operation suspension and the date is displayed. It is also possible to filter such records. If a record does not have shredding suspended but contains at least one document with suspended shredding, neither one will be included in a shredding procedure.
Record processing method – specifies how this record is processed. Select the processing method from a list of preset options. To change your selection later, click ![]() .
.
The Form option specifies what form of the document is stored here: e.g. original, copy, summary, etc.
Lent to – use this field to look up a user this document was lent to. You can enter the first three characters of the name, then the autocomplete function will list matching users. When a user is selected, the form will display the fields Lent from, Lent until and Returned. Enter the lending time interval in the first two fields, then enter the return date in the third when the document is actually returned. All lendings are saved in the record history.
The optional field Physical record location can be used to write down where the physical record is archived.
The Record format entry is used to specify whether the record is analogue (paper) or electronic. The following field can be used to note that the Electronic entry has been converted to paper form.
Finished by – the group authorized to finish the record (records center), based on the record workflow setting.
Handling records
Record handover
The person who created the first version of the record is automatically responsible for processing it. But this role can be handed over to another person. The handover is not complete until the recipient confirms it. Another option is to assign the record; in such a case the change is valid immediately, the recipient does not need to confirm it and cannot reject the record. Only users with the corresponding permission are authorized to assign records directly (and have the corresponding button displayed in the form).
To hand over or assign a record for another user, open the Hand over section in the form header. First enter the username (or a part of it) of the person who will receive the record in the field Hand over to user and select the user from the list of matching options.

Click Hand over to user or Assign to user to confirm your selection. The selected user will be informed and if it was a handover, they will need to confirm it. Then they take over the responsibility to process the record. If the user rejects the takeover, the record will return to you.
If the record has been assigned, the change takes place immediately.

| Handing the record over means you give up all responsibility for its processing permanently. To present the record to another user for additions, comments, etc. and then continue processing it yourself, use the workflow in section Record path, as described in chapter Record path. |
Taking over a record
If someone has handed a record over to you for processing, you will find it on the PROCESSES tab in folder To Be Processed by Me. Open the record form. The upper part of the form now displays a prompt to take over the record. View the record and decide whether you want to take it over.
If you select Confirm takeover, click the button to enable the form controls. You have just taken over responsibility for the record, and you can start processing it.

The button Cancel takeover will still be displayed in the form, and you can cancel your choice later. In such a case you will need to confirm the takeover rejection manually. Remember that changes made to the form in between will be present in the form even after the rejection.

If you choose not to take over the record, click Refuse takeover. A field is then displayed where to enter your reason for not taking over the record. Then click Refuse and return to confirm the rejection. Electronic records management will return the record to the original author along with the reason you entered.

Your reason for rejection will be displayed to the record author in a blue rectangle every time they open the record. The reason message can be hidden by clicking the cross button on the right.

Inserting documents
Manage the attached records and documents in section Record contents; you can also look up and add more entries here. The button Insert into record offers the following four options:
-
Insert document – to insert a Records management service (RMS) document.
-
Insert from DMS – to insert a document from a FormFlow document folder (DMS).
-
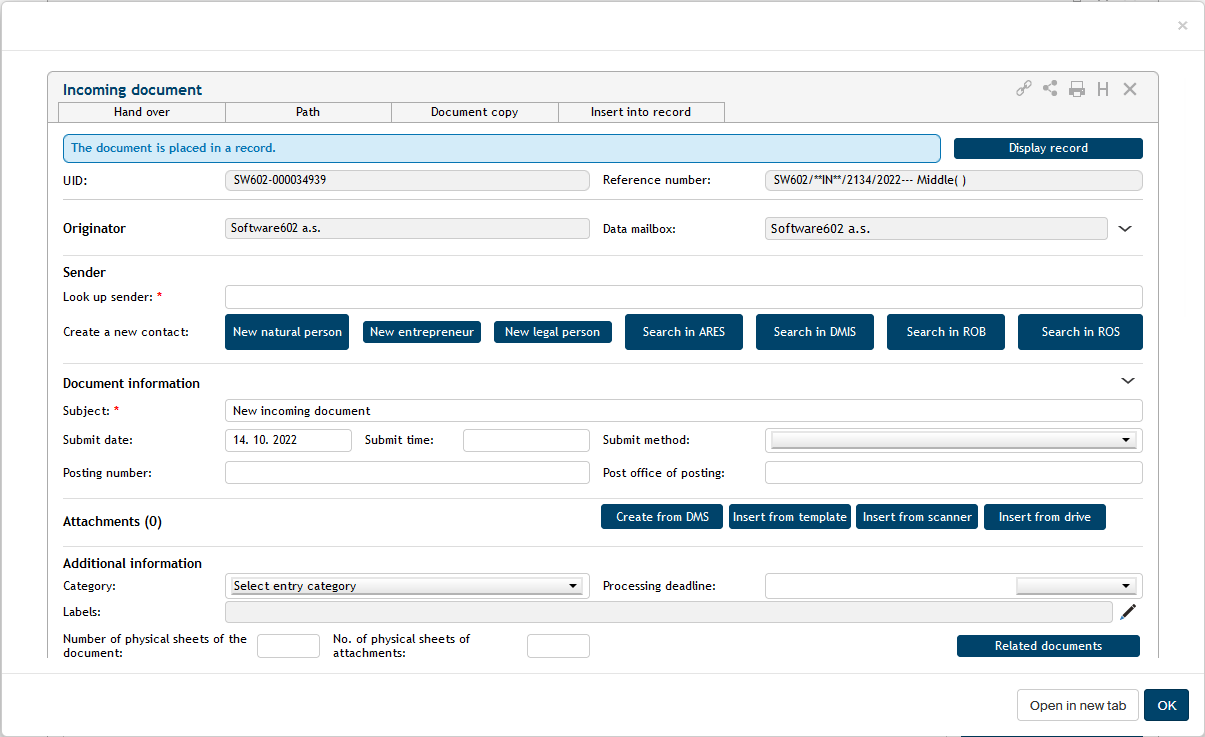
New incoming document – to insert from a new incoming document form.
-
New outgoing document – to insert from a new outgoing document form.
To display a list of documents already placed in the record, click Document list.

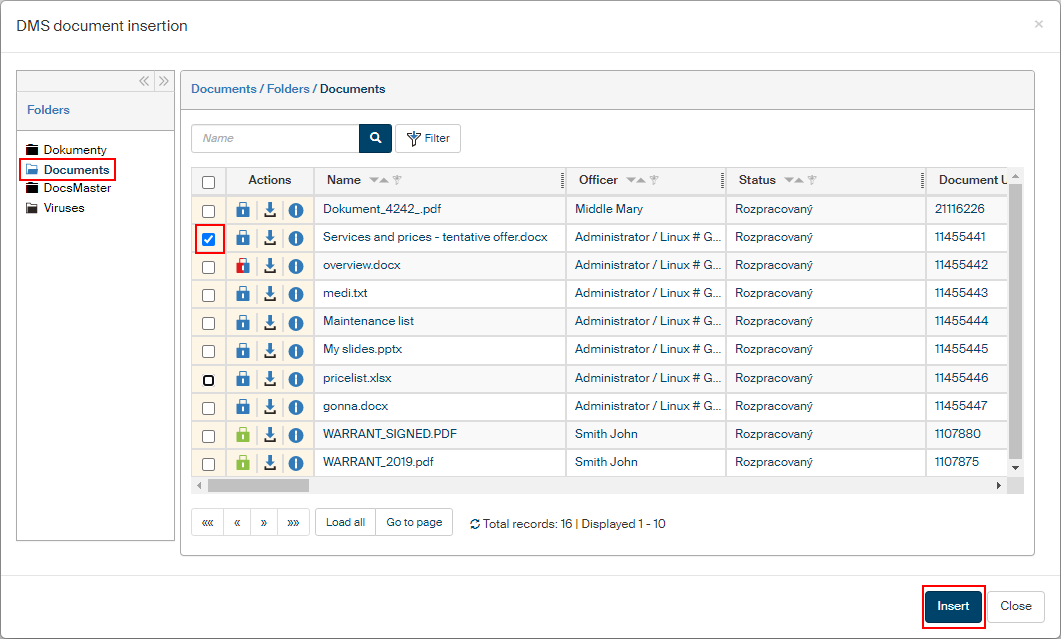
Insert from DMS
Use Insert from DMS to load a document from one of FormFlow document folders. The modal window Document list is displayed first.
-
The left side displays the document folder structure. Select the required folder and click it. You can narrow down or minimize this part of the screen using the double arrow icons in its upper right corner.
-
On the right, look up the file(s) you want to insert in the form and check the boxes in the left-most column to select them.
-
Click Insert to place the selected files in the form.
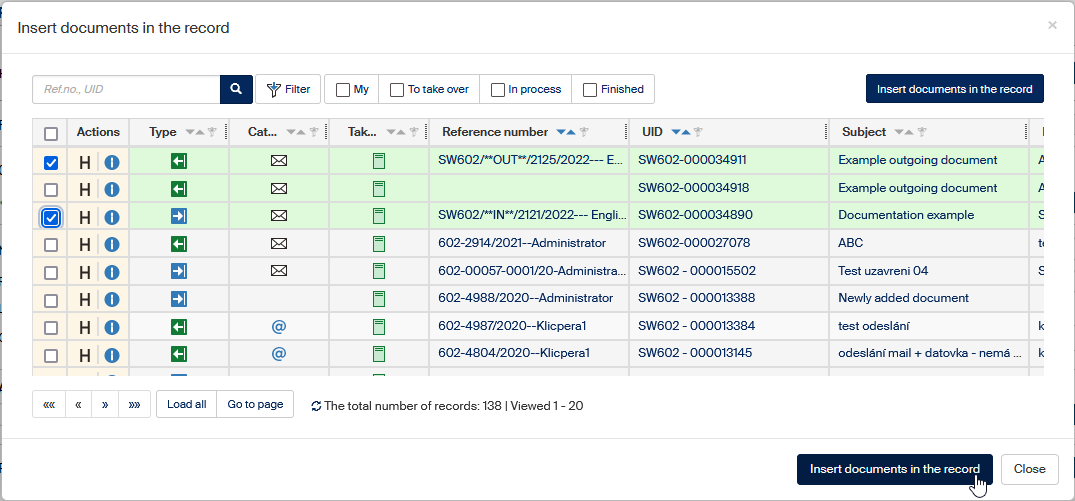
Insert from RMS
Click Insert document to open a window with a list of Electronic records management documents. It is organized similarly to the Document list as described in chapter Document list: there are controls for filtering documents and display setting in the upper part and the document list itself, as a table, below them.
Use the checkbox on the left side of the table to select a document or documents and click Insert documents in the record to complete the operation.
If one or more of the selected documents is already in a record, you will receive a notification after the insertion and, if the record management type is set to document linking, the document will not be placed in the record.
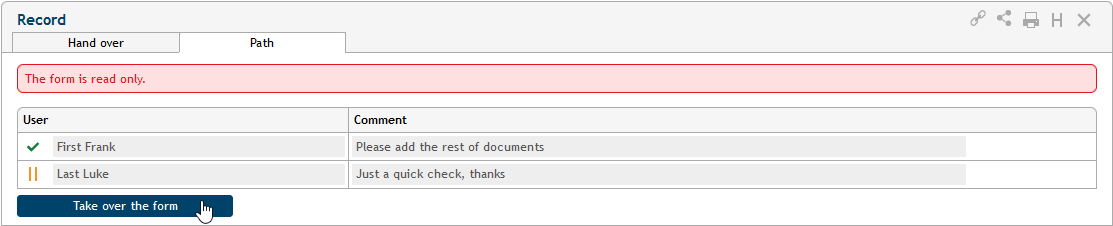
Record path
Although there is only one person responsible for processing the record at any point in time, more users can participate in the processing during the record’s lifecycle. Set up a record workflow to present the record for statement to a list of selected people.
Open the Path section to prepare the workflow. The corresponding tab is located in the upper part of the form.
Every table row corresponds to one user. Select who will receive the form for statement in the User column: enter the name or a part of it in the field and select the user from the list. You can enter text in the Comment column; it will be displayed to the user.

You can set up the record this way to be presented to more than one person. Use the + buttons to add as many list entries as you need and select more users to receive the record in turn. You can click – to remove any rows you do not need.
When the workflow is set up, click Start workflow to submit the record to the first user on the list. The record will be displayed in their folder To Be Processed by Me, and they will be able to edit it: add some details or notes, attach a comment, etc. Then the user clicks the button Forward to next, placed in the upper part of the window next to the workflow, to submit the record to the next person on the list.

If a user who is part of the workflow finds there is something lacking in the record, they can return it to the person who processed it before them. Use the button Return to previous to return the document. They cannot change the workflow any other way.
There are icons on the left of usernames indicating the workflow progress: user marked ![]() has already given their statement, user marked
has already given their statement, user marked ![]() has it on their desk right now.
has it on their desk right now.
When the record receives statements from all people on the list, it will return to the user processing it.
The author can also click Take over the form to stop the workflow before it completes and return the record to their desk. Then they can continue processing it or, if needed, change the workflow, or create a new one.
Record processing
Processing a record means completing and finishing the whole form.
The person responsible for the processing is always the user listed in field Record processed by. This person is authorized to digitally sign the record and mark it as processed, taking responsibility for the record correctness and for completing all requirements. To leave the record processing to someone else, hand the record over to them (see chapter Record handover).
One of these situations may arise when finishing a record:
-
A person who has the record on their desk is finishing the record.
-
A preset person or one of preset people is finishing the record.
The current user is finishing the record
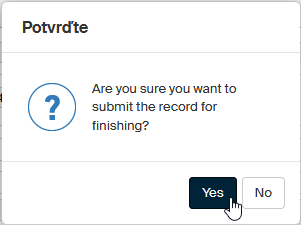
The person who has the record “on their desk” can finish the record if they are authorized to do it. The user clicks Finish…
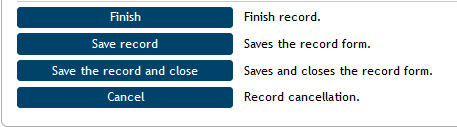
…then confirms the query and the record is finished.
Handing the record over to a selected user
Based on FormFlow administration settings, there might be a specific person or list of persons preset and authorized to finish the record.

In such a case, if you are not one of the authorized users, you cannot finish the record yourself. Instead of Finish, the form contains the field Hand over for finishing. Use this field to hand the record over to one of the authorized users.
In the list Hand over for finishing, you can use autocomplete to look up a user. Confirm the handover by clicking the button Hand over for finishing.

| The list is only available if the current entity contains an organizational unit of Record finishing type. If such an organizational unit does not exist, anyone can finish a record. |
More record options
Save
If you make any changes in the record, click one of the buttons Save record or Save the record and close in the lower part of the form to save the changes. The changes are then transferred to the Electronic records management server.
Cancel
If the record has been created by mistake or there is no need to process it for another reason, you can cancel the document. The record will still be registered in the Electronic records management with a note of the cancellation.
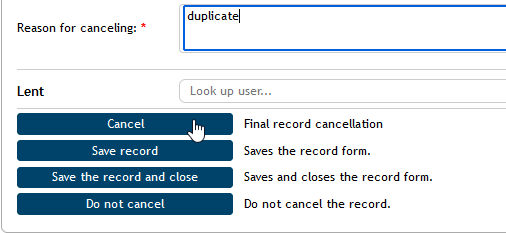
To cancel a record, click Cancel in the lower part of the form. Then attach a text comment in field Reason for canceling. Continue by clicking Cancel. If the form requires confirmation by an electronic signature, a signature selection dialogue is displayed first, and then the record is canceled.
Inheriting record retention periods when adding or removing documents
When you place a document in a record or remove a document from a record, the retention policy and the documents' retention policies are recalculated. A record has its own retention policy, but in fact takes the highest retention details from the inserted documents (the value for the start of retention period and for the shredding year are recalculated). The following rules apply:
-
The whole record must have the same retention period as the inserted document with the longest retention period.
-
The retention code for the record must correspond to the inserted document with the strictest retention code based on the scale A > V > S. The highest retention code value is used along with the highest numeric value.
-
All retention triggers for all inserted documents (or the retention trigger from the document with the highest numeric value, if there is only one) apply to the record.
The forms now also contain the Suspend button. If it is checked, the shredding process for the whole record and its contents is suspended. Neither the record nor the documents placed in it will not be included in a retention procedure as long as it is checked.
Shredding suspension can be set for the whole record or for individual documents. If shredding is suspended for at least one document inserted in the record, it is suspended for the whole record.
Finished record options
You can view finished records.
If you need to handle a finished record, you need to reopen it. There is a Reopen button available to the author (processor) of the record. The record then returns among the records in process, and you will find it on the PROCESSES tab, under the button To Be Processed by Me.