ERMS forms
Select ERMS forms from the menu to display a list of forms used by the Electronic records management. When FormFlow is installed, the default forms are already configured for basic use. Each form template can only be configured once. It is not possible to create two or more configurations for the same template.
Form list
The right part of the ERMS forms screen contains a list of all forms created for use in the Electronic records management.
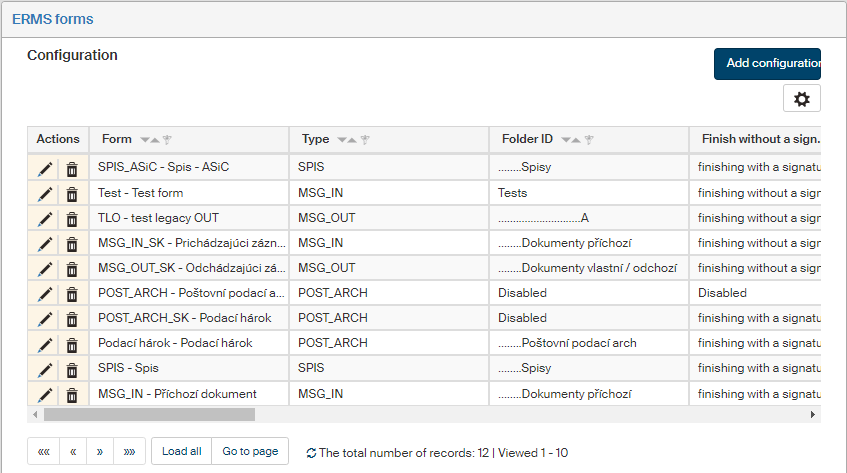
Use the buttons in the Actions column to manage the entries:
-
Click
 Edit form configuration to change the form configuration.
 -
Click
 Delete configuration to remove the form configuration.
Creating or editing a form
Click Add configuration to open a window where you can set up a new form configuration.
-
Form – select a form template in this field.
-
Type – enter one of the following types:
-
MSG_IN = incoming document,
-
MSG_OUT = outgoing document,
-
SPIS = record,
-
POST_ARCH = bulk posting form,
-
SKART = shredding procedure,
-
EXT = other form not matching any of the previous types.
-
-
Folder ID – select a folder where the new form will be placed. FormFlow must be set up so that the selected form is available to fill out in the selected folder. It is only necessary to select the folder if the form is available in more than one folder. If the form is only available in one folder, you do not need to set this parameter.
-
Finish without a signature – indicates whether it is allowed to process a document/file without an electronic signature. This parameter only applies to the following form types: MSG_IN, MSG_OUT, SPIS and POST_ARCH.
-
Default values – select whether to automatically fill in the default values for the following fields: the default file plan code, retention code, retention period, retention policy and processing method. The default values must be set up for this feature to work. This parameter only applies to the forms of MSG_IN and MSG_OUT types.
-
Convert to PDF – whether form attachments can be converted to PDF files. The PDF conversion service must be properly configured for this feature to work. This parameter only applies to the forms of MSG_IN and MSG_OUT types.
-
PDF signature – enable or disable electronic signing of PDF type attachments. This parameter only applies to the forms of MSG_IN and MSG_OUT types.
-
Signature analysis – enable or disable analysis of electronic signatures. To run electronic signature analysis, access to SecuSign must be configured. This parameter only applies to the forms of MSG_IN and MSG_OUT types.
-
Form forwarding – select how forms are forwarded; the options are: Forwarding based on FormFlow rules and Forwarding based on membership in a group assigned to the entity. This parameter only applies to the forms of MSG_IN and MSG_OUT types.
-
Conversion controls – display or hide the controls for attachment conversion by right of office. This parameter only applies to the forms of MSG_IN and MSG_OUT types.
-
Preview settings – enter the parameters for attachment preview. Separate the three values with the pipe
|character.-
1st value: F=frame W=window
-
2nd value: V=vertical H=horizontal
-
3rd value: size in % or pixels. This parameter only applies to the forms of MSG_IN and MSG_OUT types.
The default value is:
F|V|50% -
-
Set section – the value of this parameter is transferred to the form to element
dzhp_set_sections. The parameter allows users to change the form’s behavior, which must be programmed using FormApps Designer. This parameter only applies to the forms of MSG_IN and MSG_OUT types. -
Search type – this parameter applies to old forms where search could either use the autocomplete function or the search would only start after clicking the “magnifying glass” button. Newer forms do not use this parameter and only support search using autocomplete.
-
Outgoing mail room – sets whether an outgoing document will be sent using the mail room or not. This parameter only applies to MSG_OUT.
-
New parameter – key, New parameter – value – use these two fields to create a new parameter to be applied to user edits in the form template. Both fields must be filled in.
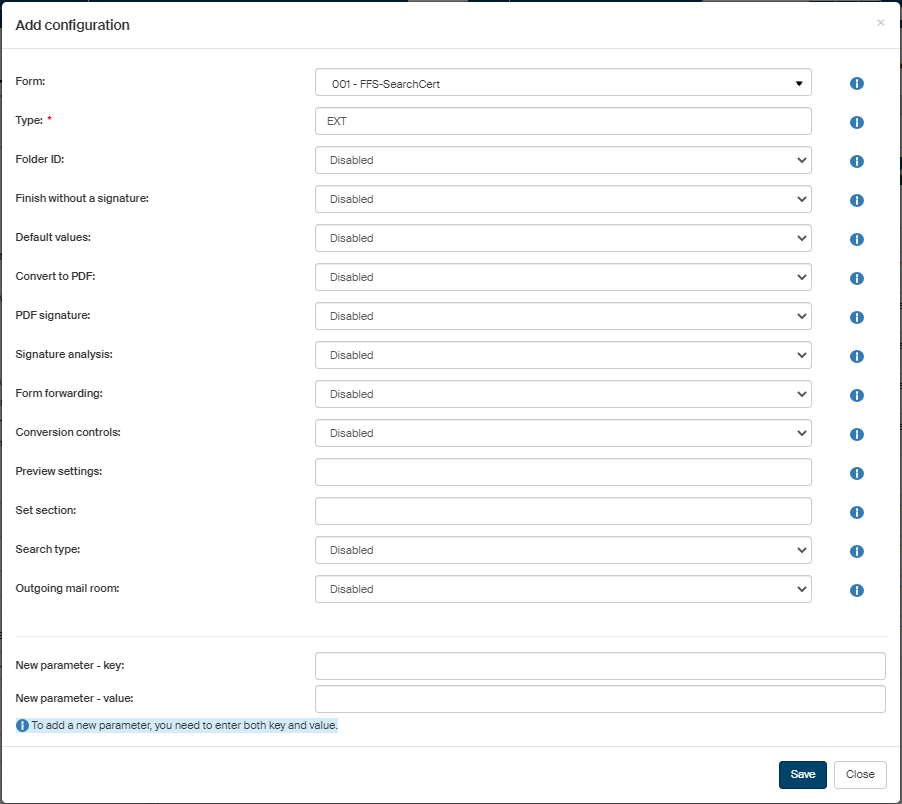
Then click Save to confirm the new form configuration.
A similar dialog is displayed if you click the Edit form configuration button. The dialog is then titled Edit configuration and prefilled with the current parameters.