Document search options
To find a specific document easily, use the filter placed above the document list in the folder or category (as described in chapter Filtering).
Folders
Click the Folders toolbar button to display the FormFlow folders structure containing individual documents. You can browse the list of documents placed in the individual folders, insert new documents, edit their details, etc. The FormFlow administrator manages the folders and their structure and also decides which ones you are authorized to see.
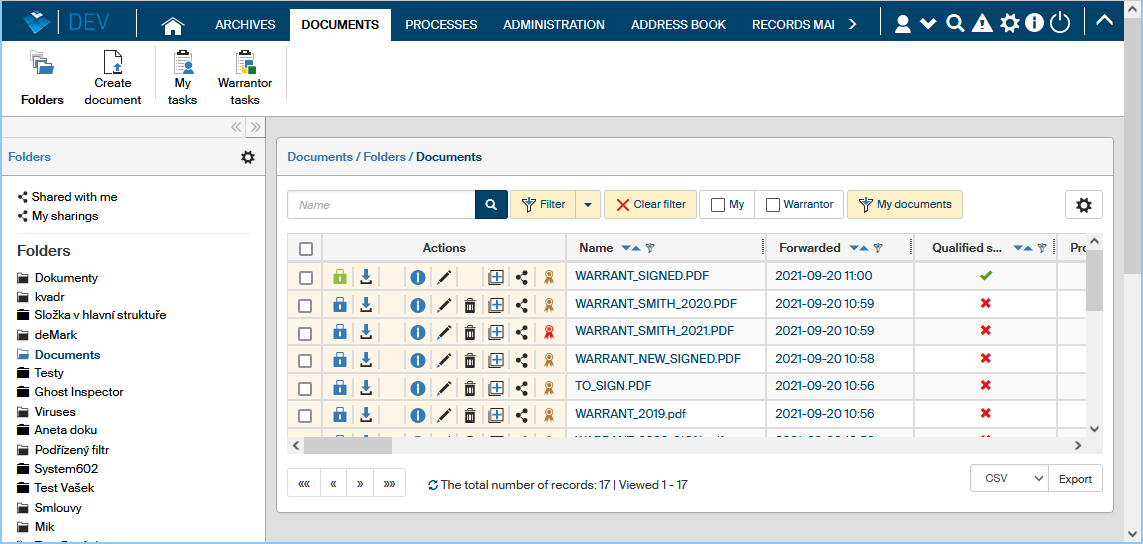
Click a folder name to display a list of contained documents on the right. Your filter settings (described in chapter Advanced settings) determine what is displayed when you enter the folder: whether documents matching a preset filter, an unfiltered document list (all documents in the folder), or the message "Use a filter to display data". In such a case you need to set a filter first to display any documents.
There is a double arrow icon placed on the right of the left-side panel, above the cogwheel icon. Use it to adjust the Folders panel width as you need or hide it completely. The left arrow will make the panel narrower, the right arrow wider.

Besides the list of folders, the Folders section in the left panel contains the link ![]() Shared with me. Click it to display the documents that some else has shared with you and gave you access. Sharing is described in chapter Document sharing.
Shared with me. Click it to display the documents that some else has shared with you and gave you access. Sharing is described in chapter Document sharing.
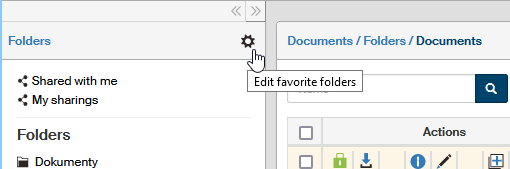
Click the cogwheel button ![]() Edit favorite folders to create or edit the list of your favorite folders.
Edit favorite folders to create or edit the list of your favorite folders.
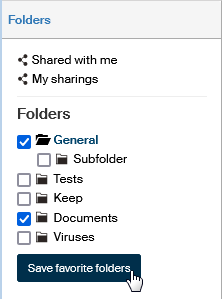
A checkbox is then displayed next to every item in the folder list. Check the relevant boxes and then click Save favorite folders. The checked items will be displayed as toolbar buttons.
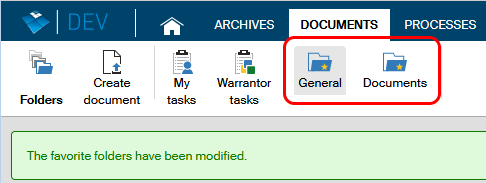
When you click Save favorite folders, two new buttons with appropriate description will be added to the toolbar. You can click them to display the list of documents from the corresponding folder in the main window. To remove a toolbar button, use the opposite procedure: uncheck the box in the folder list.
Creating a new document folder
Here you will find only a brief description of the key settings for users with administrator rights (for details, see the Administrator’s Guide): To create a new document folder, proceed as follows: ADMINISTRATION> Documents button> Document folders command> in the Administration of document folder window press the Create a folder button.
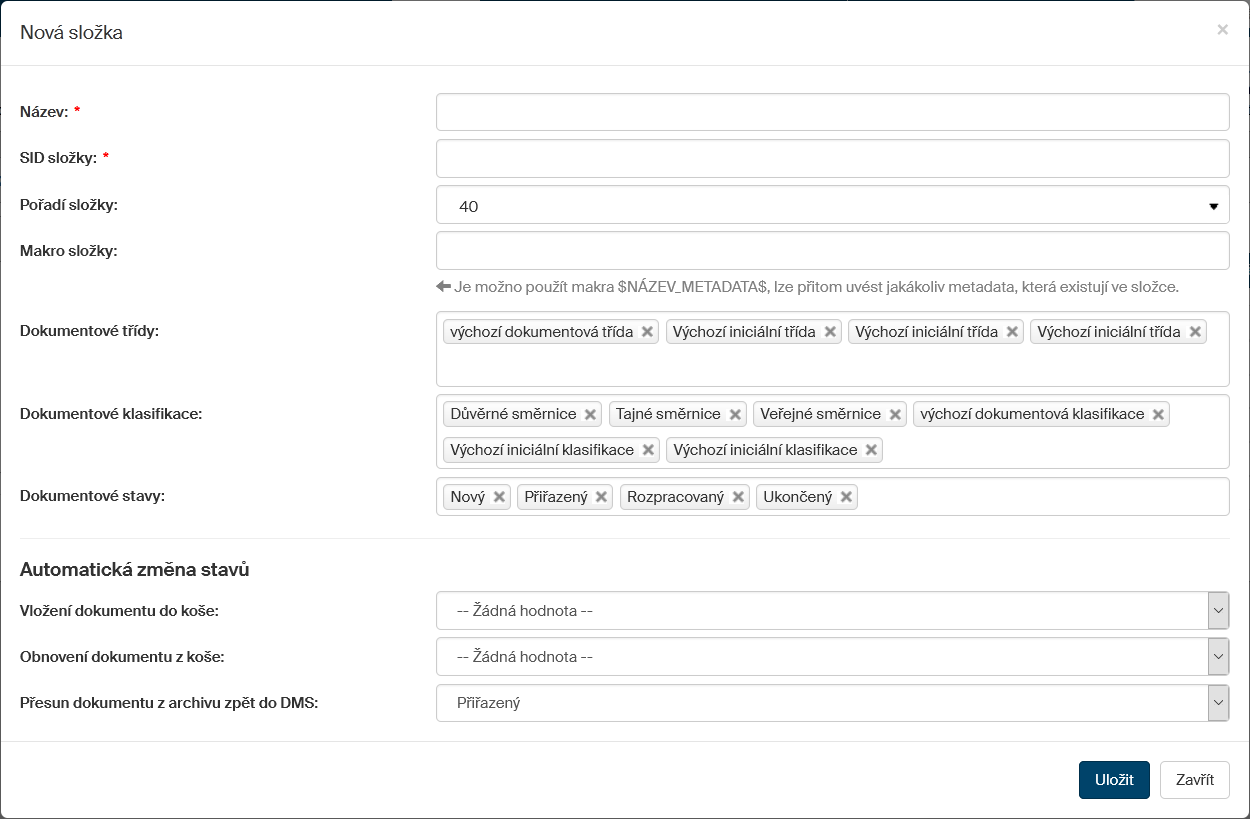
In order for users to upload documents to a folder, they must have the necessary permissions set. Go to . In the Administration of document folders window, select Main folder, then in the window on the right, locate your folder entry and in the Actions column, click the Set permission button. Set permissions for users or their groups.
Click the Assign processes to folder button to enable the selected processes for that folder.
|
When working with documents, the archive is automatically moved when the status changes to Closed. When removing a DMS document from the archive, its state is changed according to the settings of the DMS folder in which it is located, the change can be made only to states of the Assigned or Work in progress type. When creating a DMS folder, you will be prompted to select the status to assign documents when they are returning from the archive. |
Tasks
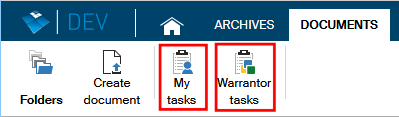
Apart from the Folders button, the DOCUMENTS tab on the ribbon contains at least two more buttons: My tasks and Warrantor tasks. Use these buttons to display lists of documents regardless of the folder they are in, but those that require your attention.
-
The button My tasks displays only the documents that are waiting for you to process them (they are assigned to you directly). The list contains all corresponding documents regardless of which folder they are in.
-
The button Warrantor tasks has a similar function to My tasks, but it displays all the documents whose warrantor is a group in which you are a member.
After selecting one of these two buttons, you can filter the list further, as described in chapter Filtering.
Documents in the trash
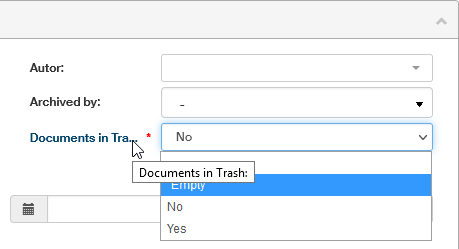
For documents, it’s useful to know how to find documents moved to the trash. Click the Filter button to open the Advanced Search window. If you set the Documents in Trash option to Yes, you will see in the document list window only those documents that are "thrown in the trash".
You can restore documents from the Trash to the default folder by clicking the Restore from Trash button in the Actions column.
