General processes
Form (process) folders
Forms are available in FormFlow on the PROCESSES tab. To find the relevant ones more easily, they are usually sorted into folders that can have a tree structure similar to the folder structure on a computer drive.
In FormFlow form management, you can edit the folder structure and set up user and group access to individual subfolders. To edit these properties, go to ADMINISTRATION tab, click Processes and select Process Management.
The folder structure is displayed on the left, while the right part contains details of the selected folder and editing controls.
| The document section of FormFlow (the Documents tab) has its own folder structure independent of the process folders. |
Creating a new folder
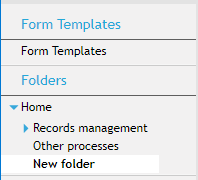
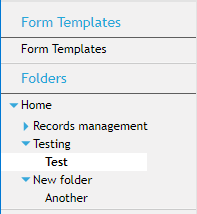
The root form folder is Home. All other folders will be its subfolders.
To create a new subfolder, do the following:
-
On the ADMINISTRATION tab, click Processes and then Process Management.
-
Select the folder in which to place the new folder from the structure on the left.
-
Then go to the tabs near the top of the right side and click Create a subfolder.
-
Name the new folder in the field Subfolder name.
-
To allow anonymous users access the new folder, check accessible by an anonymous user.
-
When creating new folders, the parent folder permissions are typically applied to the new folder too – the checkbox copy permissions from the parent folder is checked by default. To set up the permissions from scratch, uncheck the option.
-
Click Create a subfolder.
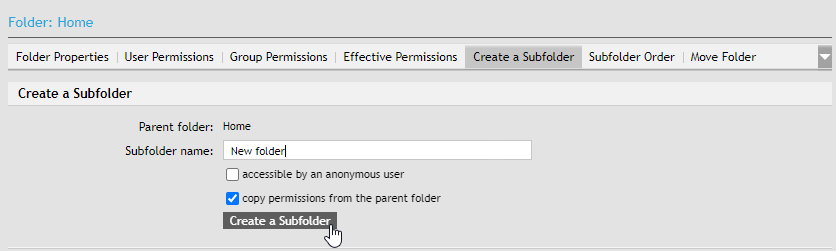
The new folder is now created, and you will be notified by a message in the upper part of the window. The new folder entry is now visible in the tree structure on the left.
The window now displays the tab Folder properties. The tab is described in chapter Folder properties.
Form folder structure
You can organize the process forms by placing them in a suitable folder structure. When adding a new folder, it is always created as a subfolder to the current folder.
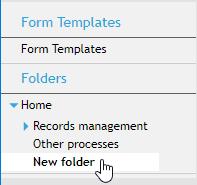
Select the current folder with a mouse click – its name will be highlighted in the tree structure. On the image above, the current folder is New folder. We will create a Test folder now as its subfolder, using the procedure from the previous chapter.
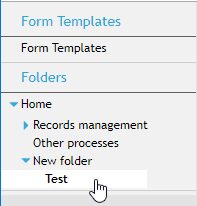
You can create as many sublevels as you need.
Viewing and ordering the folder structure
In section Subfolder order, you can view the subfolder structure and change their order in lists.
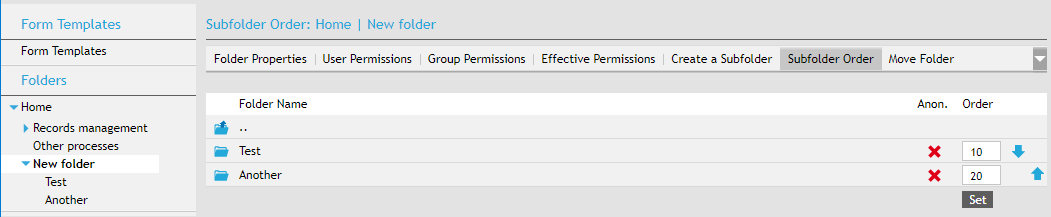
The left part of the window displays the same folder tree as in the Forms section. The current folder is highlighted.
You will find the contents of the current folder on the right – the list of subfolders for the current folder, if there are any. Click a folder name to switch to the folder – its contents will be displayed. To display other folders than a subfolder, look up and click its name in the menu on the left.
There are color symbols in the Anon. column:
-
A green checkmark
 means that anonymous users can access this folder.
 -
A red cross
 means that anonymous users are blocked from accessing the folder.
The Order column contains number fields and up and down arrows. Use these controls to change order of subfolders in the list. The subfolders are ordered by the numbers in the fields. Change the numbers and click Set to reorder the list by the new numbers.
Or you can move individual items up and down the list using the blue arrow buttons.
Folder properties
Basic details of the current folder are available in section Folder properties.
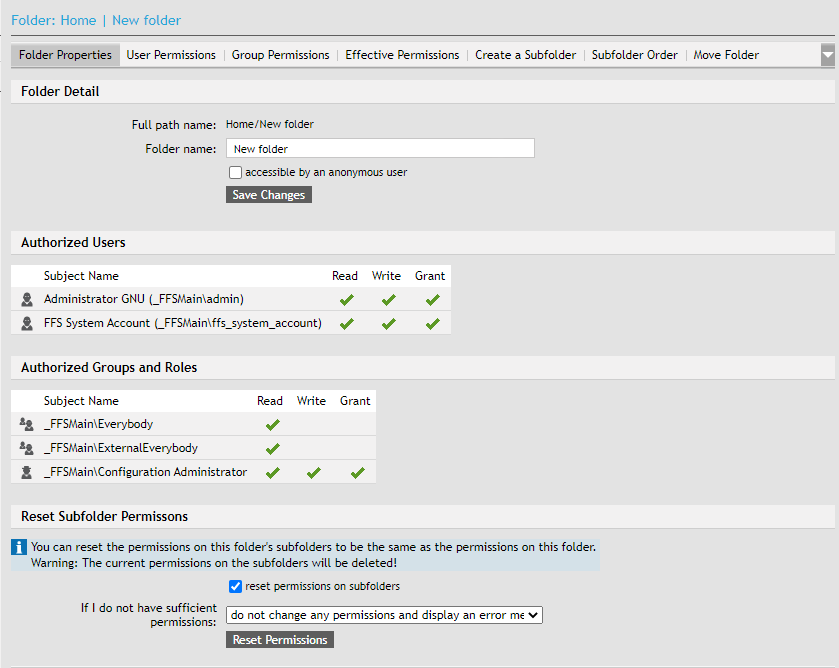
Folder detail provides information on the Full path describing its location in the folder structure, and there are two fields available, Folder name and the checkbox accessible by an anonymous user. Both the controls are active, and you can use them to rename the folder or change access to users not logged in.
The lower section lists access permissions to this folder for logged-in users and groups (the table Authorized users does not display the users who received access permissions by group membership only).
You can also reset permissions on this folder’s subfolders to match this folder’s current permissions.
| If the folder contains subfolders, their current permission settings will be rewritten! |
To change the subfolder permissions, check Reset permissions on subfolders and click Reset privileges to confirm. Before confirming, you can select an option in the field If I do not have sufficient permissions to set how to deal with the situation if you are not authorized to make all the permission changes on all subfolders.
User access to the folder
Users can have the following access permissions to a folder:
-
None – the user has no access to the folder (it is not visible to them at all).
-
Read – the user can read the folder (the user can see the folder and fill in forms placed in it).
-
Read and grant – the user has read permission to the folder and is also authorized to grant the read permission to other users.
-
Read and write – the user has read permissions to the folder and the permission to write in it (the user can add forms to the folder).
-
Read, write and grant – the user has all the permissions described above – read, write and grant the permissions to others.
User permissions to the folder
Select a folder and click User Permissions to open a tab where you can set up user access permissions to this folder. The upper part contains the controls for a complex filter to look up the users you need.

Select the permission from the option list in the list of users (after you have filtered the list using the filtering tools above). The permissions are described in chapter User access to the folder.
Check make changes on subfolders too to apply the permission changes in the whole folder subtree.
Confirm by clicking Save changes.
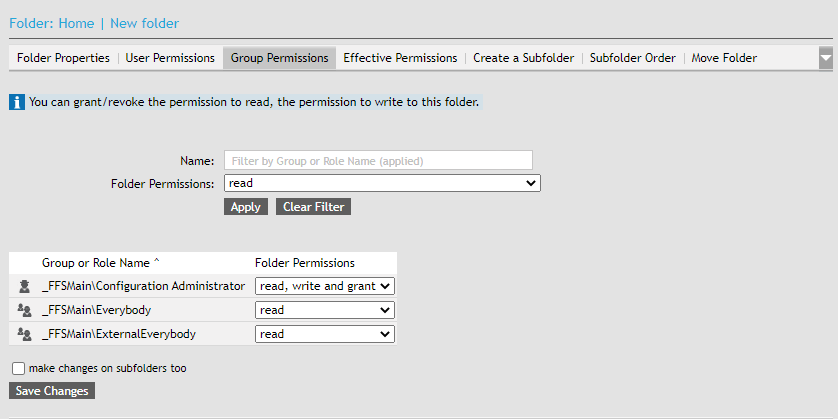
Group permissions
Group permissions are set up the same way as individual user permissions. Click the Group Permissions tab. The screen contains the same controls and items as user permission settings, and they have the same meaning – the only difference is that they apply to all group members.
Effective permissions
The Effective Permissions tab displays a list of users and their permissions; unlike the Folder Properties tab, this list includes user permissions based on the users' group membership.
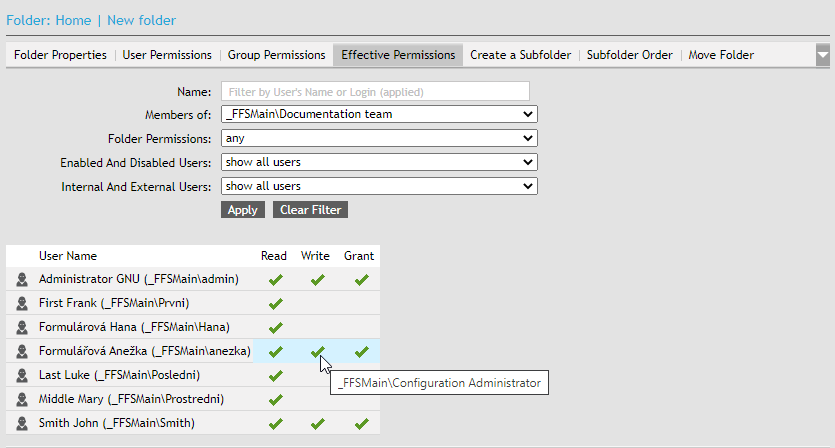
The three columns after the username refer to the folder permissions – Read, Write and Grant. The icon means that the user has this permission. Move the mouse above the icon to display a tooltip with information how (where) the user gained the permission.
An example above shows that the user has gained the Write permission by being in the Configuration Administrator role. This way you can look up now and why a user has specific permissions.
Moving a folder within the structure
You can move a folder and its contents (including subfolders) to another place within the folder structure. The following example shows a Test folder that we would like to have as a subfolder of Testing.

Do the following:
-
Select the folder by clicking the left mouse button.
-
On the right, click the Move Folder tab (in a narrow browser window, you might need to expand the tab menu using the arrow button).

-
In the list Move this folder to, select the folder in which to place the moved folder.
-
Click Move folder.
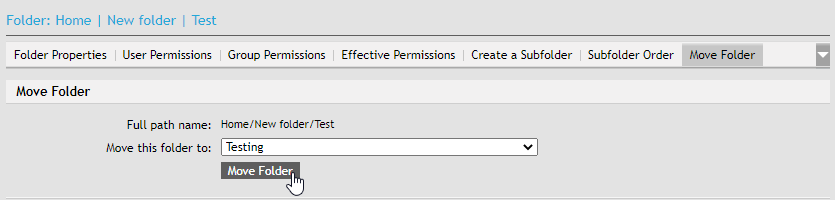
The folder has moved to the new place, as you can see from the folder structure.
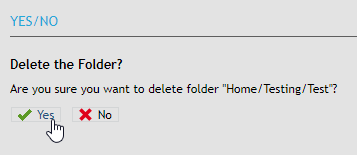
Deleting a folder
You can delete a folder you do not need anymore.
-
Click the folder you want to delete.
-
On the right, click the Delete Folder tab (in a narrow browser window, you might need to expand the tab menu using the arrow button).

-
A query Delete folder is displayed; click Yes to confirm the deletion.
|
The folder to delete must be empty. If it has any subfolders, a message will be displayed instead noting that the folder cannot be deleted. Empty the folder first and then repeat the action. 
|
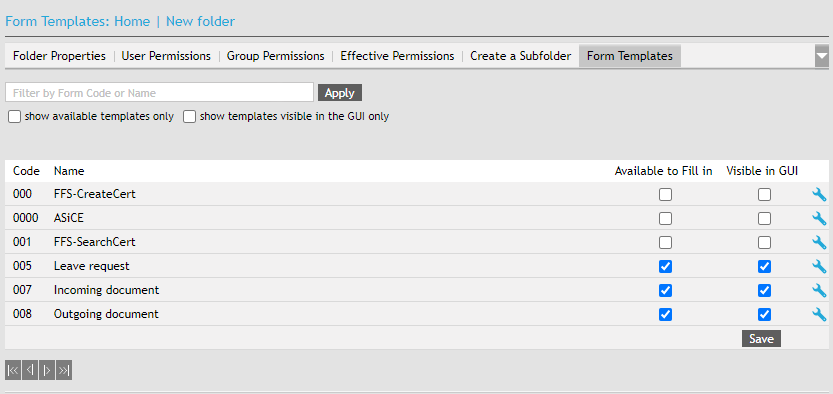
Templates
Open the Form Templates tab to set which form templates installed in FormFlow will be available in the folder. Creating the templates is described in chapter Installing a form template to FormFlow.
| If you have a narrow browser window, you might need to expand the tab menu using the arrow button to reach this tab. |

The tab displays a list of all installed templates. Check the box in column Available to fill in to enable the template in this folder. Check the box in column Visible in GUI to include the template in the list of templates available in the folder (from the button Create process).
Form template list
To display the list of all form templates available in FormFlow, open the ADMINISTRATION tab, select Process Management from Processes and then select Form templates from the menu on the left.
The form list is a table where every row corresponds to a form template. You can filter the list by the name or code and/or by checking one or more of the checkboxes:
-
versions released in production mode
-
versions released in test mode
-
my forms only
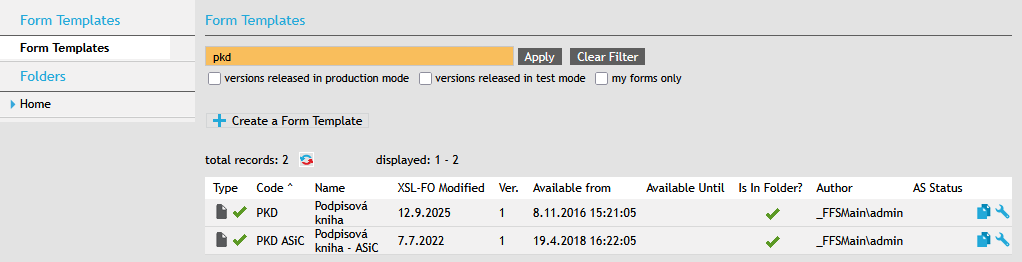
The form table contains the following columns:
-
Type – there are two form types, marked by the following icons:
-
 data collection form (without document workflow),
 -
 workflow form.
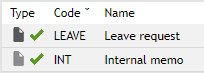
A green checkmark
indicates that the form has been released to use. -
-
Code – form template identification.
-
Name – form name.
Click one of the above entries to open the form template to fill it out.
-
XSL-FO Modified – date of the last change in the template FO file.
-
Ver. – form template version number.
-
Available from and Available to – time period when the form template in the given version is available to users (of there are no entries, availability is not limited).
-
Is in folder? – indication whether the form is available for filling out in at least one folder; placing templates in folders is described in chapter Templates.
-
Author – name of FormFlow user who installed this form template version.
-
AS status – this column only applies if FormFlow is still using Archival storage. If there is an archival folder set for the template, this column displays “doc”. If document versioning is set up, “doc+version” is displayed. Will not be supported in future FormFlow versions.
-
Click the
 icon with the tooltip Create a new form after this one to display a dialog where you can create a new form template based on the template where you click the icon. This way the new template will have the same settings as the old one – especially all steps and flow rules. Other settings including permissions, skip rules etc. will be copied too.
 -
The icon
 , with the tooltip Edit the form detail, will open the form template editing screen – adding and deleting versions, flow settings, etc.
Installing a form template to FormFlow
Procedure overview
A new form template (an FO file) must be installed to FormFlow before users can start filling it out. The form template can be further developed and new versions made available later. Users download or open the form template from the server as a form and fill it out. FormFlow attaches unique identification to each downloaded form.
This is the general procedure for creating a form template:
-
Specify the name and code for the FormFlow form.
-
You can select the numbering schema.
-
Insert the form file published in the Form Designer.
-
Optional settings for an advanced installation.
Steps for the initial form creation:
-
Create the form.
-
Create the version.
-
Save the definition file.
-
Install the version.
-
The form will only be available to users when it is released.
-
To make the form available to users, it needs to be placed in one or more folders.
The detailed steps
Take the following steps to add a new form template:
-
Open the ADMINISTRATION tab, click Processes and select Process Management.
-
On the left, click the Templates section.
-
A list of form templates available in FormFlow is displayed. Click Create a Form Template.
-
A dialog is displayed where you can enter the template details.
In section Form identification, enter the form code and name.
-
Form code – each form template has its own code entered when installing the template. This code is used as identification for the form template, for the form in the process, approved form, finished form, etc. The code must be unique – no two form templates can have the same code.
-
Form name – each form template has its own name entered when installing the template. The name can be changed dynamically based on the form data. The name entered during installation is often only displayed for the form template – filled out forms, forms in process and finished forms can use a name composed of data filled in the form (if the form is designed that way).
In section Form Privileges, set whether the form will be available to anonymous users.
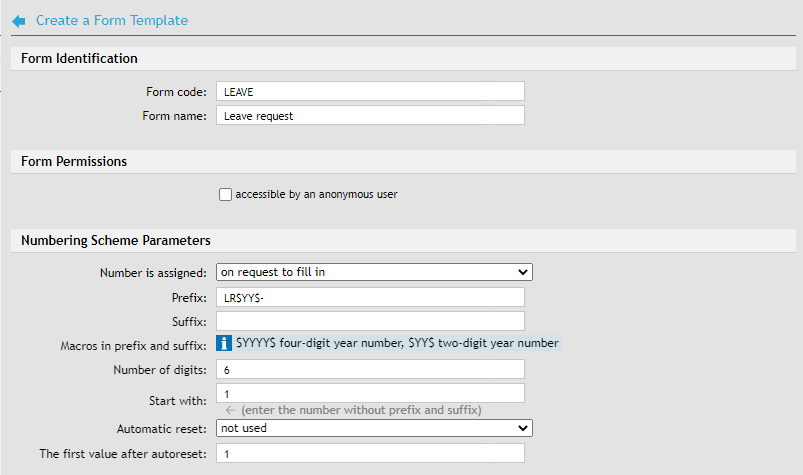
In section Numbering scheme parameters, set up how forms created from the template will be numbered
-
The field Number is assigned specifies when the number based on the numbering schema will be assigned to a form. There are three options: when a user requests a form to fill out, when the form data is first saved and when the form is completely filled out.
-
Strings entered in Prefix and Suffix will compose the leading and final part of the form identification. There are macros for the year number available: $YYYY$ (will be replaced with a four-digit year number) or $YY$ (last two digits of the year number). If the year is 2012, the first string will be replaced with 2012, the other one with 12.
-
You can select the number of digits in the order number assigned to the form – enter the number in field Number of digits. The default is 6 digits.
-
The first value assigned is defined in field Start with (the default value is 1).
-
Form numbering can be restarted with the new year, starting with the value specified in The first value after autoreset (the default value is again 1) or not restarted at all – based on the setting in Automatic reset.
The form template available to users can be later changed. When creating the template, the form version number is set to 1. Look up the form template file in field XML form definition (click Browse to open the file selection dialog or drag the file using the mouse in the space above the field).
You can also adjust how the template is applied using the two checkboxes use an advanced installation of the XML form and Detect elements with xs:type specified.
If you have exported template properties (FormFlow settings for a form template) from another form, you can apply them here. Insert the property file in section Create form template by importing template properties. To set a different form code and name than is used in the attached file, enter them in the following fields.
When everything is set, insert the form template to FormFlow by clicking Create form.
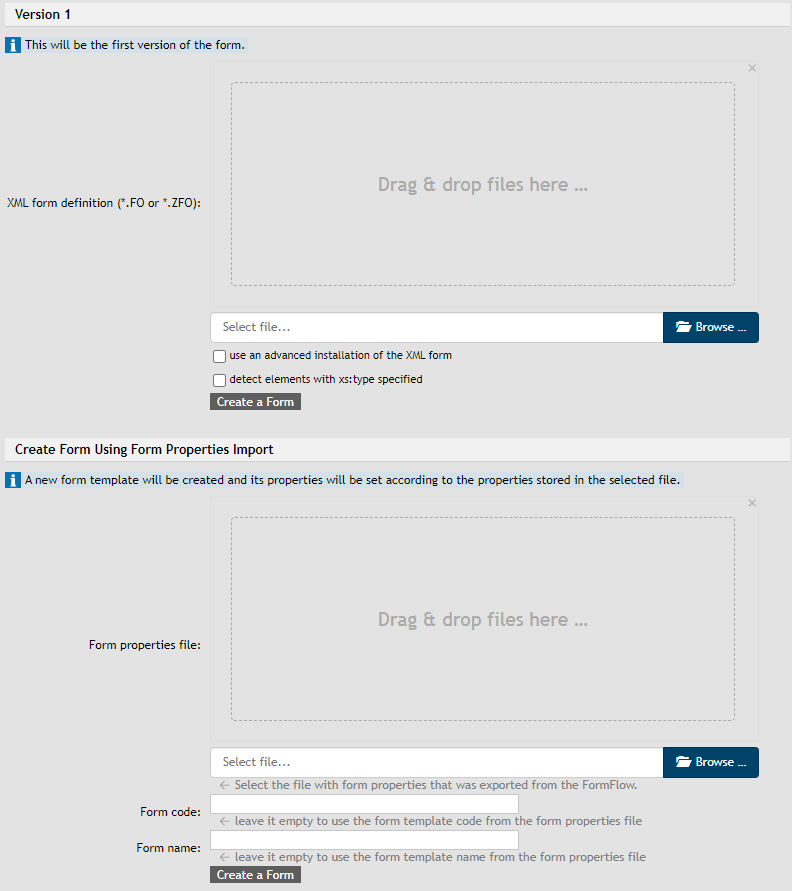
At this point, the following happens:
-
the form itself is created,
-
the first version is created (no. 1),
-
the definition file is saved,
-
the version is installed.
The form is only installed now – it will be available to users when released. Note that the fields Available from and Available to are empty.
Before releasing the version, it is recommended to set up its properties in more detail, especially the workflow (if it is a flow form). Creating the workflow is described in chapter Creating form flow in practice, more settings are described in the following chapters Managing the form template – general overview and Editing the basic form details.
Creating a form template based on another form
For easier set up you can insert a new form by copying all the properties (users, signing steps, etc.) from another form that is already set up. To copy form properties, go to the form list () and click one of the icons on the right, Create a new form based on this form.
Managing the form template – general overview
Select a form template from the list and click Edit the form detail to open the form template and version management screen.
Select one of the sections from the tree structure on the left. Here is an overview of the sections available; they are described in more detail in later chapters:
-
Detail – opens the screen with basic details; they mostly correspond to those entered when creating the template, as described in chapter Installing a form template to FormFlow . There are some additional options, the fields are editable.
-
Privileges – lists the permissions to the form template, granted to verified (logged-in) users and groups. The Privileges section is described in chapter Form permissions.
-
Users – in this section you can grant or withdraw permissions from users, including the read and write permissions, permissions to display filled-out forms, to delete filled-out forms, to empty the trash and to edit finished forms.
-
Groups and roles – in this section you can grant or withdraw permissions from groups, including the read and write permissions, permissions to display filled-out forms, to delete filled-out forms, to empty the trash and to edit finished forms.
-
Effective privileges – this section displays the resulting user permissions based on their group membership.
-
Form takeover – in this section you can define form takeover teams.
-
-
Anonymous – use this section to set up if and how anonymous FormFlow users can use this form.
-
Document flow – displays general overview on the form flow including a table listing all the signing steps and their rules.
-
Initiators – the section lists form recipients in the first signing step (flow initiators). They were authorized to read the form, which means they are able to fill it out in the first signing step and sign it (i.e. place it in the approval process).
-
Effective initiators – the list of effective initiators also includes the users who gained the initiator permission by being a member in a group with the corresponding permission.
-
Substitutes – a list of users who will be forwarded the form if the recipient in the current signing step is absent.
-
Status setup – during the flow, the form status can automatically change based on the current signing step; the list of statuses is available in this screen.
-
Groups to report – use this section to create a list of user group or roles relevant to this form processing. If the current user is a member of one of the groups listed, the information is saved in the form and the form can use it to adjust its behavior.
-
Skip rules – lists the rules used when a signing step can be skipped in a form with multiple signing steps.
-
Signing step n – the following structure is available for each signing step defined:
-
Detail – contains general information including global substitutes for this signing step.
-
Substitutes – you can set up substitutes for individual recipients in this section.
-
Recipients review – allows checking which recipients will receive the form from a specific forwarder based on existing rules.
-
Processing time – settings for reminders and notifications before the form processing deadline expires in this step (if it differs from the general setting for the whole form).
-
Rules – list of existing rules used to determine the form recipient in the next step.
-
-
-
Form statuses – status is a form label that can be used to look up and sort processes. Form status is displayed in a list of processes in columns Form status and Status – latest change, which displays the date and time of the last status change.
-
Processing time – set up reminders and notifications before the processing deadline expires. This setting applies to the whole form, if it is not set differently for a specific step.
-
XML elements to store – to save an element, enter its name and type (one of the types string, date and time, money or integer).
-
PDF signature visualization – when attaching electronic signatures to PDF files, you can also attach an image symbolizing the signature.
-
Import & export – save the form template properties in a file and upload them later as needed (to rewrite existing properties).
-
Notification e-mails – notification e-mail setting specific for this form.
-
Notification events – set up events that trigger sending notification e-mail messages.
-
Signatures in documents – If the Qualified storage (previously Long-term digital archive) module is installed, you can set up sending e-mail reminders if one of the signatures in documents attached to a form in progress is about to expire. For more details, see chapter Signatures of documents in progress.
-
Versions – displays the overview of form template versions.
-
Create a new version – insert a new form template version (from a file).
-
Version n – the following structure is available for each version:
-
Detail – version information and a field where you can enter a description.
-
Opening method – set up the application to be used when opening the form.
-
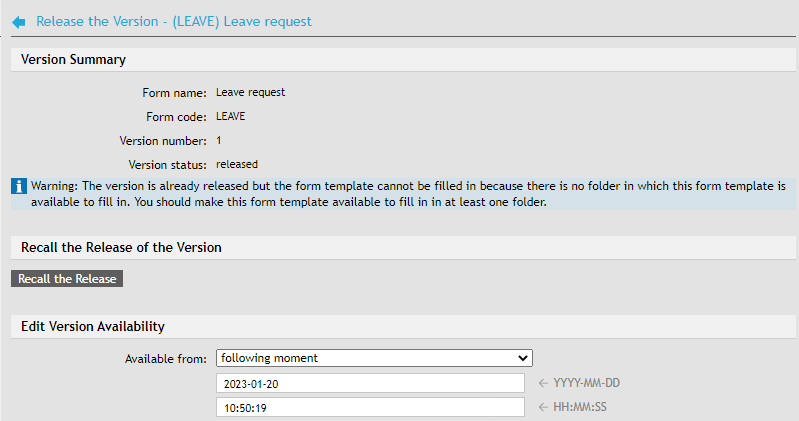
Release – make the form template version available to users and limit its validity from-until specific dates.
In the Mode field, select whether the version will be released in a test or production mode. Test forms can be filled in just as production ones, but they are visibly marked as TEST.
-
Replace – upload a new definition file for the form to replace the current one.
-
Install – uninstall or reinstall the form template version.
-
Data – lists created database objects and data handlers for the version.
-
Attachments – attachment parameter settings.
-
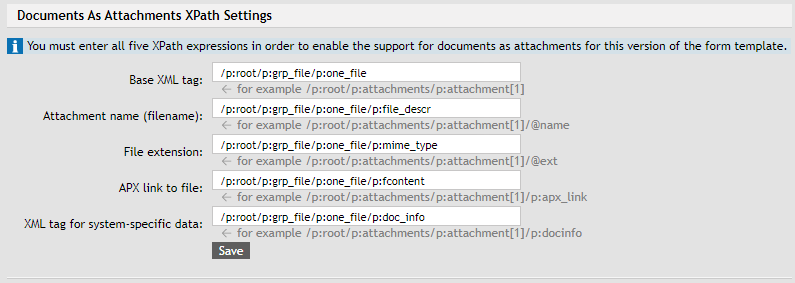
Documents as attachments – parameter settings for attachments that are also documents in the document section of FormFlow.
-
-
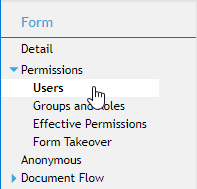
Form permissions
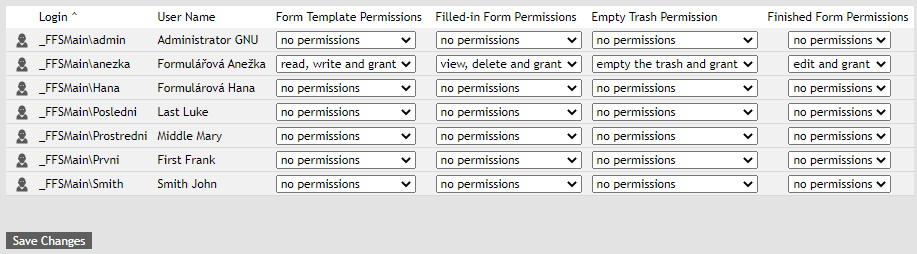
In section Permissions, you can configure the access permission of users, group and roles to the form. Sections and are organized the same way; both allow editing access permissions of the corresponding subject type. Section displays an overview of the resulting user permissions granted to them either directly or based on their group and role membership. These sections are described in more detail later in this chapter.
In section , you can set up teams that will collaborate on form processing.
Sections Users, Groups and roles and Effective permissions all contain a filter of users (or groups and roles) at the top of the page which you can use to look up specific subjects. You can filter by the subject’s properties (name, domain, group membership, etc.) and by permissions granted for this form.
Click Apply to look up users (in sections Users and Effective permissions) or groups and roles (in section Groups and roles) matching the filter settings.
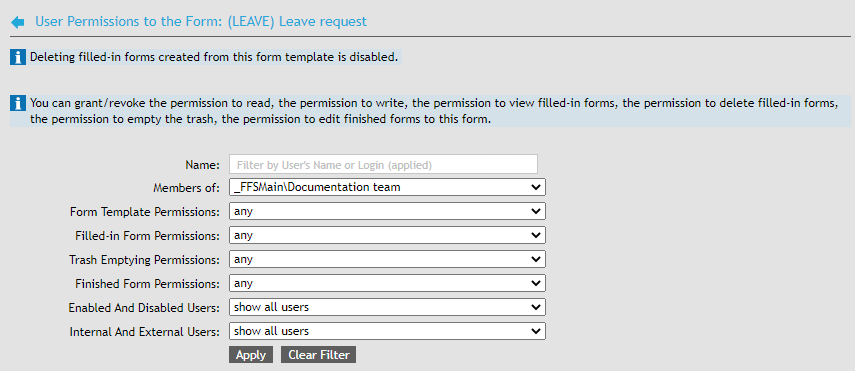
Matching users, groups or roles are displayed below the filter as a table. The columns contain the current permission settings. Change the permission settings by selecting a different permission combination from the list. Then click Save changes to confirm your selection.
Form takeover teams
In section , you can set up takeover teams for the form. When a user is part of a team, they can take over an unfinished form from another team member or take over a flow form in the first signing step, that is, at a point when the form has not been signed yet.
Being a team member authorizes a user to take over a form, but not to continue the workflow; form flow is still defined by its rules only. This means that if a user is a member of a takeover team but not included in flow rules for the form, the user can continue filling out the form and then the user who can continue the flow will take over the form again.
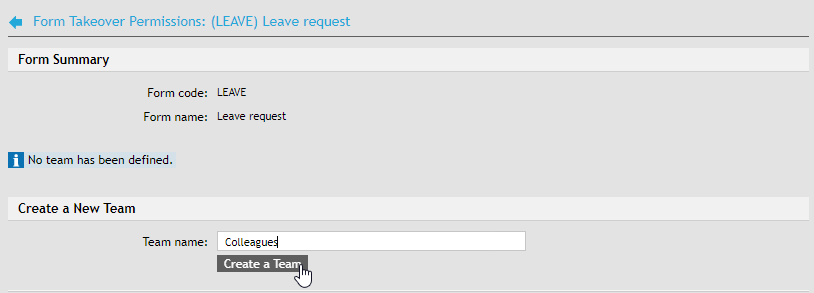
Creating a team
Open the section Form takeover and click Create a new team.

Enter a name in Team name and click Create a team to place the team on the list.
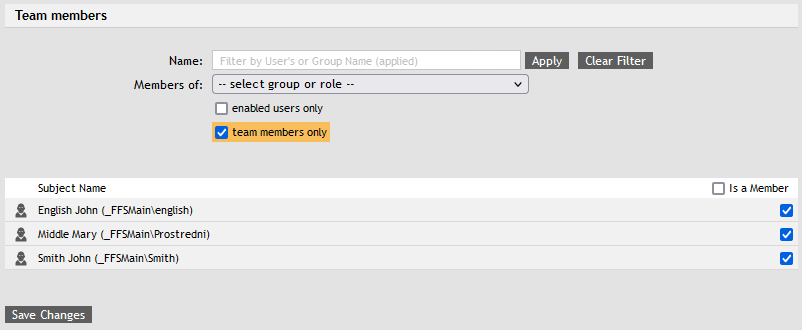
Team members
Now specify the team members. In the team list, click  Edit members of this team.

In section Team members, check the box in column Is a member for the users you want to add to the team. Select Save changes to create the team and make it available. You can also edit this section later to change team members as needed.
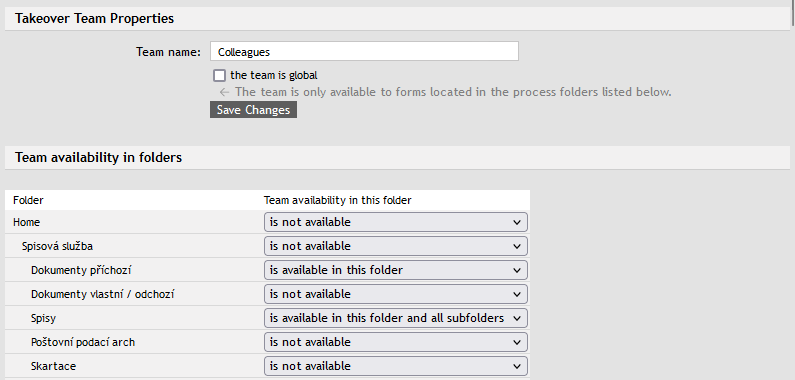
Global and local teams
By default, a team is global, which means it is available in all process folders. If team members are supposed to only take over forms placed in selected folders (for example when a different team is meant to take care of other folders), select the button Modify this team in the team list.

In the Team properties dialog, uncheck the box the team is global and save the setting.
A list of existing folders is displayed. Set up the team availability for individual folders as needed and save the setting again.
Signature visualization in PDF attachments
An electronic signature in a PDF document does not need to be just a lump of data attached to the file. For easier orientation, it can be also displayed on the page as an image, optionally with some additional text (e.g. the signature date or name of the signing person). Use this section to set up the signature appearance for all PDF files attached to forms based on this template.
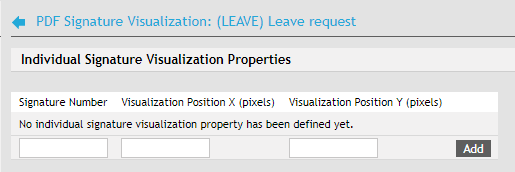
Individual Signature Visualization Properties can be used to adjust the location of individual signatures in the document so that their images do not overlap. This way you can specify e.g. that the second signature will be placed to the right of the first one, the third one below them, etc. To add a new entry, fill in the following in the table:
-
Signature number – signature order number.
-
Visualization position X (pixels) – horizontal location of the image (in pixels).
-
Visualization position Y (pixels) – vertical location of the image (in pixels).
Click Add to insert the entry. To change an entry, click  to delete the row and fill in the details again.
In section PDF attachment signature visualization properties, set up the general characteristics that will be used for all the signatures.
-
Current image – insert an image to enable signature visualization.
-
remove image – check and click Save changes to confirm. Visualization will be disabled.
-
New image – insert a path to an image file to be used for visualization. If an image has been set up before, it will be replaced by the new one.
-
Image width, Image height – required size of the inserted image.
-
Page – page number to place the signatures. Positive numbers (1, 2, 3, …) refer to pages from the beginning of the document, negative number from the end backwards (-1 is the last page, -2 the page before last, etc.).
-
Visualization text – text displayed along with the signature visualization image. There are several macros (placeholders) available that will be replaced by actual signature information:
-
[SigningCertSubject_CN] – the signing subject’s “common name”;
-
[SigningCertSubject] – the signing subject’s description;
-
[DateTime] – current date and time.
-
-
Visualization comment – this text is not displayed anywhere; it only serves as a private note for this setting.
Form processing deadline
You can set a maximum waiting time for every signing step in the form. FormFlow can remind users of the approaching deadline and/or send a notice to their superior or other responsible person.
There are two locations in form management where you can set up the conditions:
-
General form setting in the form detail .
-
For a single signing step in the form detail .
Both the tabs contain the same setting controls.
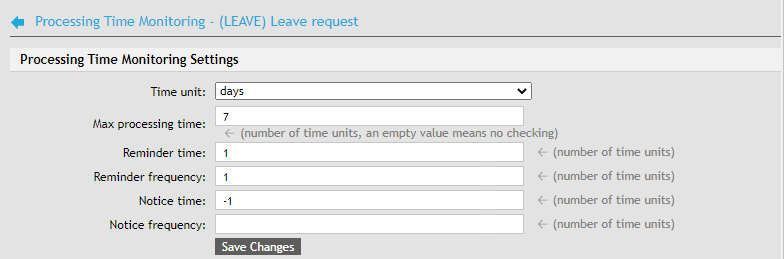
The controls are the following:
-
Time unit – select days or hours; time entries below will use these units.
-
Max processing time – if the field is empty, processing time will not be monitored. Set a number (of time units selected above) to set up a deadline.
-
Reminder time – when to send a message to the user processing the form:
-
not set – no reminder will be sent;
-
0 – a reminder will be sent on the last day/hour before the deadline;
-
1 – a reminder will be sent on the day/hour before the last day/hour of the deadline;
-
−1 – a reminder will be sent a day / an hour after the deadline;
-
−2 – a reminder will be sent two days/hours after the deadline, etc.
-
-
Reminder frequency – the reminder can be repeated in regular intervals:
-
not set – only one reminder will be sent (at Reminder time);
-
0 – additional reminders will be sent every day/hour until the form is processed;
-
1 – additional reminders will be sent every other day/hour until the form is processed, etc.
-
-
Notice time – when to send a notice to the user/users selected below in section Notice e-mail recipients. Enter a number in the same way as in Reminder time.
-
Notice frequency – the notice e-mails can be repeated in regular intervals. Set up the frequency the same way as in Reminder frequency.
Reminders and notices are e-mail messages sent to a user to the address they have entered in their setting. You can edit the message wording (its subject and body) in the notification e-mail setting either in general for all the forms, or specifically for a single form:
-
REMIND_PROCESS_FORM is a reminder for the user who is processing the form;
-
NOTIFY_FORM_HAVE_TO_BE_PROCESSED is a notice for other subjects specified below.
In section Notice e-mail recipients, set up the list of users of groups who are not processing the form right now but will be notified of inactivity – e.g. the user’s superior or a person responsible for this task. Use the filter to look up the persons you need (based on their name or group) and check Is recipient for each user or group to receive the notice e-mail.
Click Save changes to confirm the settings.
Notification e-mails
Each form template can have its own notice e-mail wording, different from the general texts set up for the whole FormFlow.
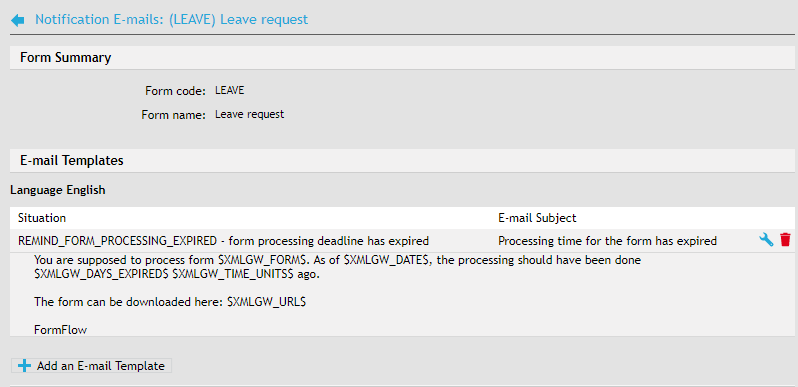
Open the section Notification e-mails in form management to set up form-specific texts.
Click Add an e-mail template to start creating a new notice. In the following dialog, select the language version for the notice (Language) and when to send it (Situation). Click Create an e-mail template to confirm.
The template is now created and FormFlow displays the fields to enter the message subject and body. Like with the general notifications, you can use macros here; their list is available directly in the page.
Click Save changes to confirm the setting.
Existing templates are displayed on the Notification e-mails tab. If needed, you can click to edit them or to delete.
Notification events
In addition to the usual events when notification e-mails are sent to users, you can set up e-mails to be sent on other events.
Click Add a notification event to create a new entry. Select the event type and click Create event to confirm.

The next step is selecting who will receive the notice.
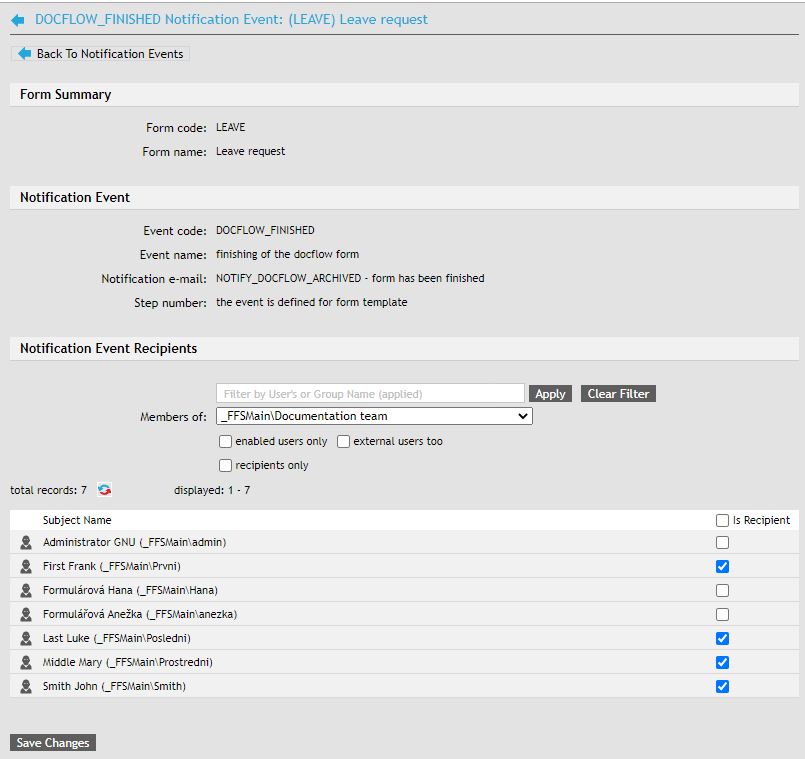
Use the filter to look up users by their name, group membership or other properties. In addition to specific names, the list of possible recipients contains several predefined roles, such as the author, initiator or form recipients.
Check the box in column Is recipient for each user to be sent the notice.
Click Save changes to save the notification event.
You can view existing events on the Notification events tab. If needed, you can click to edit them or to delete.
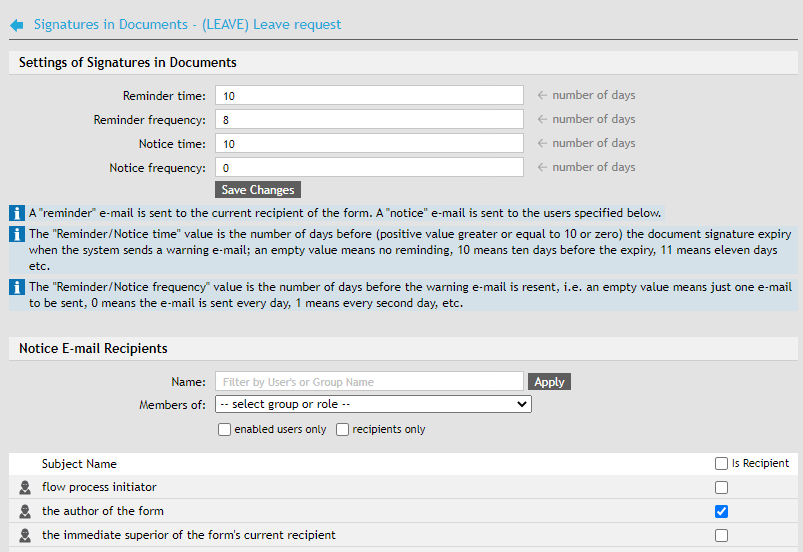
Signatures of documents in progress
Section Signatures in documents is only available if the Qualified storage module (previously Long-term Digital Archive) is installed. Use the section to set up sending e-mail reminders if one of the signatures in documents attached to a form in progress is about to expire.
At the top of the screen, set up the time and frequency a reminder (to the current form recipient) or notice (to any users set below) will be sent. The times values are set in days.
If you have set up to send notices, go to the section below to set up users who will receive the notices. Use the filter to look up users or groups and check the box in column Is recipient next to those who will receive the notice e-mails. You can select both specific users and users in a specific relation to the form (the flow initiator, form author, current recipient’s immediate superior).
Editing the basic form details
-
Go to to manage form templates.
-
On the left, select Templates.
-
Click the button
Edit the form detail. -
On the left, select Detail.
Form detail
The Detail section contains basic form information, most of which can be filled in when creating the form. These details include for example the form name and code and the numbering schema parameters.
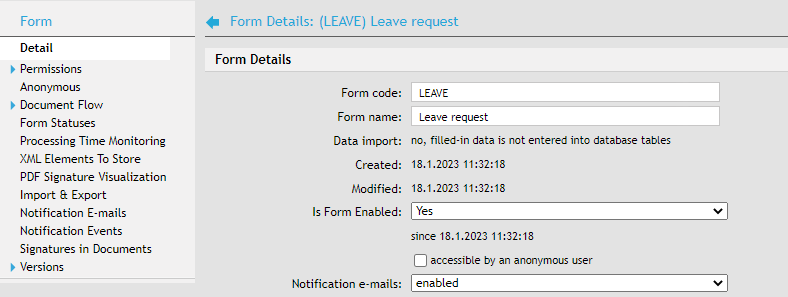
Form details:
-
Form code – each form template has its own code entered when installing the template. This code is used as identification for the form template, for the form in the process, approved form, finished form, etc. The code must be unique – no two form templates can have the same code.
-
Form name – each form template has its own name entered when installing the template. The name can be changed dynamically based on the form data. The name entered during installation is often only displayed for the form template – filled out forms, forms in process and finished forms can use a name composed of data filled in the form (if the form is designed that way).
-
Data collection – states whether data is imported from the forms to database tables.
-
Created, Modified– the dates of template creation and last edit.
-
Is form enabled – only enabled forms will be available to users. If set to Yes, the date when the form was made available is also displayed.
-
accessible by an anonymous user – specifies whether anonymous users can use the form.
-
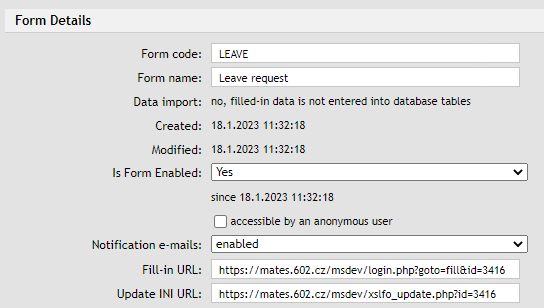
Notification e-mails – enables or disables all notification e-mail for the whole form. For more details on setting up notification e-mails, see chapters Notification e-mails and Notification events.
-
Fill-in URL – URL that can be used as a link to fill out the form (e.g. in a notification e-mail).
-
Update INI URL – URL containing a short XML document with the current form version number. When using Form Filler to fill out the form, Filler can use the file to check whether it is using the latest version and update it if needed.
The next several fields can enable or disable some user actions:
-
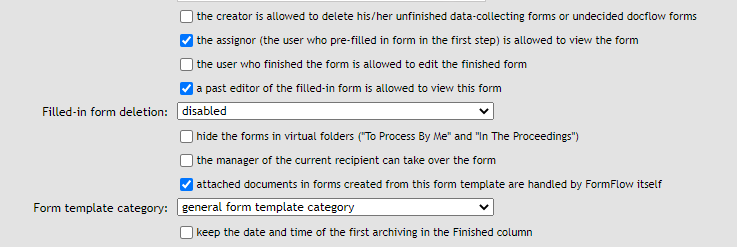
the creator is allowed to delete his/her unfinished data-collecting forms or undecided docflow forms;
-
the assignor (the user who pre-filled the form in the first step) is allowed to view the form;
-
the user who finished the form is allowed to edit the finished form;
-
*a past editor of the filled-in form is allowed to view this form;
-
Filled-in form deletion – if enabled, users with the corresponding permission can delete a form after it has been filled out.
-
hide the forms in virtual folders (“To Process By Me” and “In The Proceedings”) – suitable for forms that stay unfinished for a long time and would clutter the processing lists.
-
the manager of the current recipient can take over the form;
-
attached documents in forms created from this template are handled by FormFlow itself – if checked, FormFlow will modify the attachment XML data as needed and edit the list of entries for the form in the DG_UFDO table. If not checked, FormFlow will not modify the form XML data for attachment documents and will not automatically create or delete entries in the DG_UFDO table.
-
Form template category – there are three template categories: “General”, “Creation” and “IN/OUT” (incoming or outgoing document). It is used when inserting documents from the document section in a process to select which processes will be available for the document. For example, a document that has already passed a process of another type cannot be placed in a “Creation” process type anymore.
-
keep the date and time of the first archiving in the Finished column – if checked, the date and time in the Finished column will not be updated if the form is later reopened and finished again.
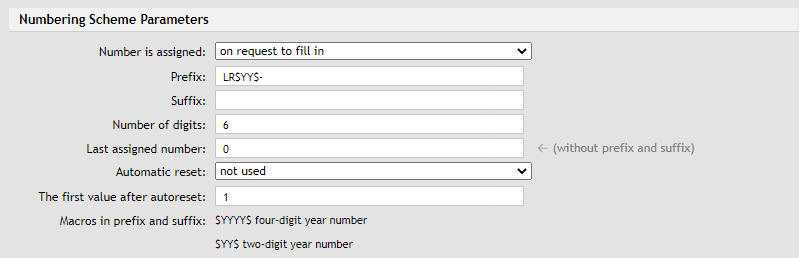
Section Numbering schema parameters is used to set up the numbering method for forms created from this template. The parameters cannot be changed if there are forms already created from the template.
-
The field Number is assigned specifies when the number based on the numbering schema will be assigned to a form. There are three options: when a user requests a form to fill out, when the form data is first saved and when the form is completely filled out.
-
Strings entered in Prefix and Suffix will compose the leading and final part of the form identification. There are macros for the year number available: $YYYY$ (will be replaced with a four-digit year number) or $YY$ (last two digits of the year number). If the year is 2012, the first string will be replaced with 2012, the other one with 12.
-
You can select the number of digits in the order number assigned to the form – enter the number in field Number of digits. The default is 6 digits.
-
The value Last assigned number indicates which values will be used for the next forms created. The value 0 means that the forms will be numbered from 1 up.
-
Form numbering can be restarted with the new year, starting with the value specified in The first value after autoreset (the default value is again 1) or not restarted at all – based on the setting in Automatic reset.
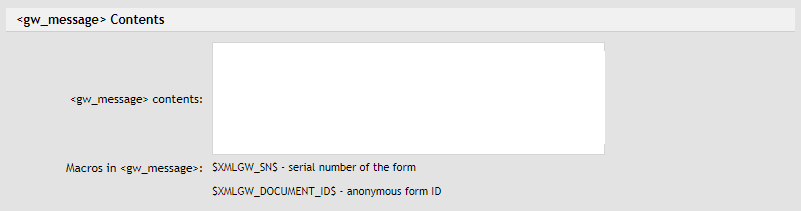
In section <gw_message> contents, you can set up a template for the text that will be placed in the <gw_message> XML tag. This text is sent as a response from FAS or FormFiller, if a response in XML or XSL-FO format is requested. There are available macros listed below the field: $XMLGW_SN$ (form serial number) and $XMLGW_DOCUMENT_ID$ (anonymous form identification number).
Archive parameters – if the form archive is in use, you can set up its properties for this form here.
Settings for AIP package – check to Create AIP packages (Archival Information Package). It is an internal package in XML format used to store information on the documents contained in it. The format is defined by the OAIS model and is intended for long-term archiving.

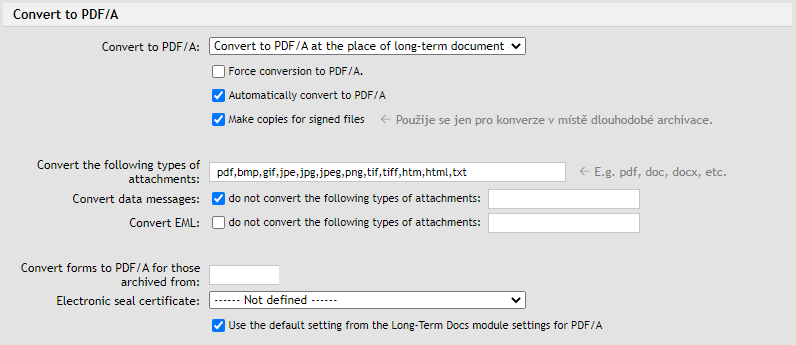
Section Convert to PDF/A is only available if the Qualified storage module (previously Long-term digital archive) is enabled in FormFlow with conversion to the PDF/A archival format enabled. Options set here will apply to all forms created from this template.
-
Convert to PDF/A – check to enable conversion to PDF/A archival format for documents attached to these forms.
-
Force conversion to PDF/A – if checked, all form attachments will be converted to PDF/A, regardless of settings in the form itself.
-
Make copies for signed files – in the case when the input is already signed. This setting will only apply to conversions in qualified storage (long-term archiving) location.
-
Automatically convert to PDF/A – this option applies to older form types that do not contain indication whether to convert their attachments to PDF/A. Check to convert all forms based on this template automatically. If the option is not checked, you will need to send the selected forms for conversion manually. In newer forms, this option is ignored and documents are converted based on information included in the form.
-
Convert these attachment types – list of file types to be converted to PDF/A. Other file types will be ignored on conversion.
-
Check or uncheck the options Convert data messages and Convert EML to select whether to also convert incoming data messages and e-mail. You can also exclude selected attachment file formats from each of the options.
-
Convert forms to PDF/A for those archived from – only convert form attachments for forms newer than the given date.
-
Certificate of an electronic seal – a certificate to use when sealing the converted documents. Select one from the list of certificates saved in the Qualified storage settings ().
-
Use the default setting from the Long-Term Docs module settings for PDF/A – the above setting will be ignored and the global setting used instead, as set in .
The LTD section is only displayed if the Qualified storage (previously Long-term Digital Archive) is enabled in FormFlow and long-term document preservation based on the PAdES, XAdES or CAdES standard is enabled. The options set here apply to all forms created from this template.
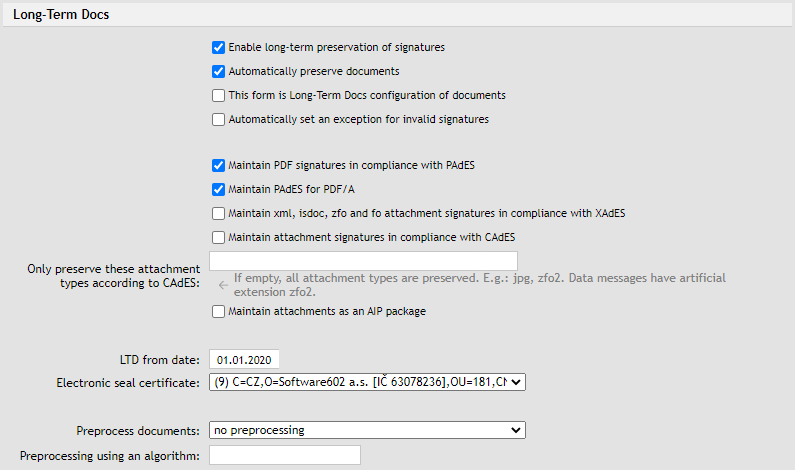
-
Enable long-term preservation of signatures – check to place documents attached to these forms in the long-term verifiability process.
-
Automatically preserve documents – this option applies to older form types that do not contain indication whether to include their attachments in long-term preservation. Check to preserve attachments from all forms based on this template automatically. If the option is not checked, you will need to include the selected forms in long-term verifiability manually. In newer forms, this option is ignored and documents are preserved or not based on information included in the form.
-
This form is LTD configuration of documents – to enable long-term preservation for e.g. DMS documents, at least one template must be selected as LTD configuration. The template then will be used to place DMS documents in long-term preservation.
-
Automatically set an exception for invalid signatures – if checked (LTV_RULE_EX_IS_IMPLICT_FORM = 1), a document with some signatures invalid will receive status 3 – waiting for an exception, but the exception is immediately granted by the system and the document is processed in the next run.
If all signatures in the document are invalid and either LTV_DP_FORM = 1 (automatic) or 2 (waiting for a confirmation) preprocessing is set, this document is analyzed with an algorithm (the lowest suitable is 02_all) and sealing is planned. There is no reason to preprocess if there is no seal.
If LTV_DP_FORM = 2 (preprocessing waiting for a confirmation), the document receives a new status LTVS_PREPROCESSING_WAITS_FOR_RULE_EXCEPTION. If a user sets LTV_RULE_EXCEPTION_UDAT = 1, the document will enter preprocessing.There are two statuses that wait for an exception: LTVS_PREPROCESSING_WAITS_FOR_RULE_EXCEPTION, LTV_RULE_NOT_MET.
CZP convertibility, column LTV_DP_CZP_CONVERTIBILITY_FORM , default value 1, is not in GUI.
If there are some signatures invalid in the document, typically a qualified signature followed by an unqualified one, or a qualified signature followed by changes, it is better to seal with a time stamp instead of a plain time stamp, otherwise it would not be CZP convertible. It is therefore recommended to use a seal if preprocessing is set. Applies to pdf only.
If Enable long-term preservation of signatures is checked, an additional group of options is enabled to set which document types the preservation process will apply to:
-
Maintain PDF signatures in compliance with PAdES – if checked, the process will preserve attachments of PDF type.
-
Maintain PAdES for PDF/A – if checked, the process will preserve attachments of PDF/A type.
-
Maintain xml, isdoc, zfo and fo signatures in compliance with XAdES – if checked, the process will preserve the listed attachment types.
-
Maintain attachment signatures in compliance with CAdES – check to preserve all other document types by applying an external signature.
-
Maintain attachment as an AIP package– if checked, the AIP package is preserved as set by the XAdES standard, when a signature is applied to the hashes of all relevant documents.
-
Data message reauthorization – check to reauthorize data messages that do not meet the CAdES standard.
Only a data message that meets the CAdES standard can be placed in the long-term archive. There are older data messages that do not meet the CAdES standard. These data messages can be sent for reauthorization that analyzes the document, validates it and provides the data message with a signature that meets the CAdES standard. For more information, see the DMIS operation rules (Provozní řád ISDS). If you check this option, data messages will be analyzed before entering the long-term preservation process and the messages that meet reauthorization criteria will be submitted to reauthorization. Only then the document will be long-term preserved. For this feature to work, data mailbox access details must be entered in the settings. -
LTD from date – documents will be long-term preserved starting with this date.
-
Certificate of an electronic seal – select one of the seal certificates available in FormFlow to be used in this form.
-
Preprocess documents – if checked, you can enter a preprocessing algorithm name to apply to documents before entering long-term preservation. Settings in the field Preprocessing using an algorithm will apply. For more details on preprocessing, see chapter Document preprocessing.
Click Statistics to display an overview of the number of documents from this form that entered long-term preservation, sorted by file type.

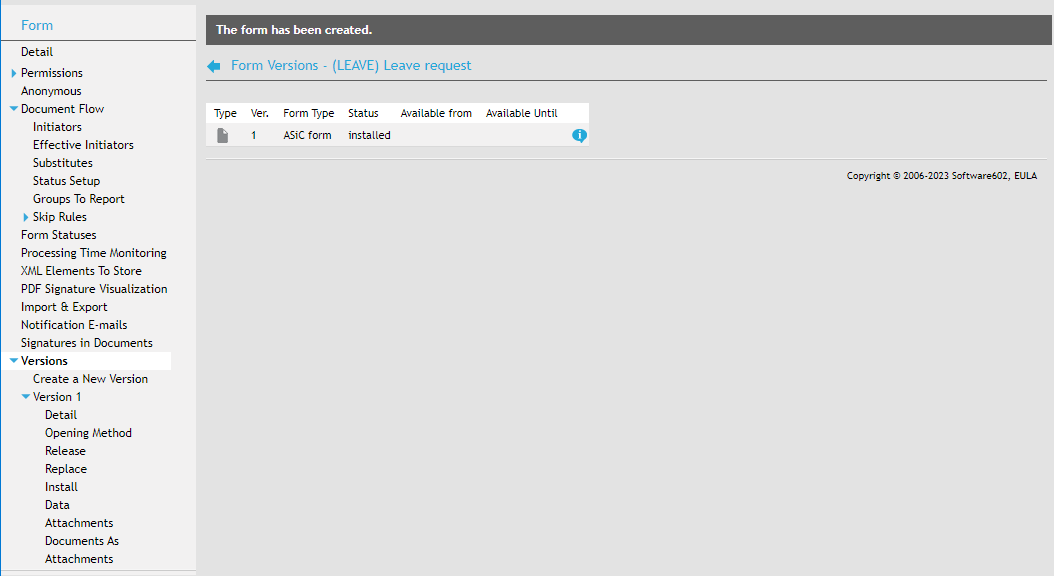
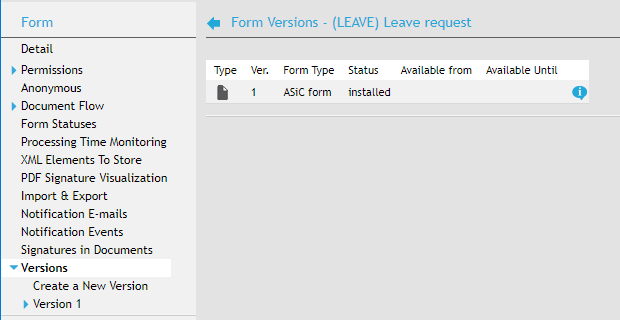
Form statuses
Form version status is displayed in form management, in the Detail section for the version.
-
Created – a template with this status has its form version definition (usually XSL-FO) and XSD schema uploaded to FormFlow.
-
Installed – during installation, the corresponding user SQL tables are created ( if data import to SQL tables was set when creating the form).
-
Released – once the form is released, FormFlow will make the form (or the new version) available to users. The version can be released either at the click of the corresponding button or at a specific time.
-
Released in test mode – the form template is available to users just as in the Released status, but it is marked as TEST.
Displaying the form status
The form status is displayed e.g. in form management, in section Install. The screen also offers the buttons to display the form’s XML sources:
-
Version definition – display the definition source text.
-
Version XSD schema – display the XSD schema source text.
-
Version XSL-FO – display the XSL-FO source text.
For XSL-FO forms, the first and third entry display the same XML source. In rare situations, an XSD schema can be used as definition too.
Creating a new version of the form template
Click Create new version to display a dialog to create another version, save the definition file and install the version. The corresponding new SQL tables are also created.
When a new form version is introduced:
-
With each new form version, new database tables are created.
-
When the new version is released, FormFlow will still accept the older version, but the data will be saved in the old version tables.
Form version information
The section contains information specific to the form version. They are identification details (Form name and Form code, Version number) and status information (Version status and dates of creation, availability, version release or latest template change). These details are read-only.
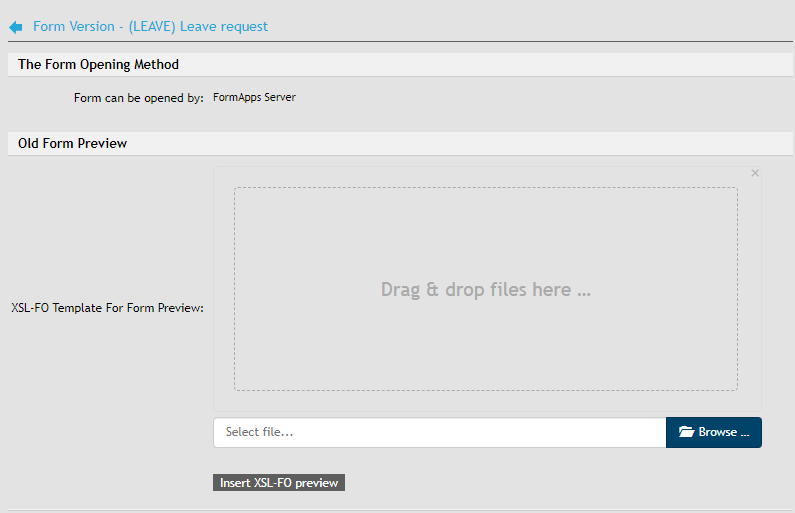
Opening method
You can set which application will be used for the form in section Opening method. Information on the application that can be used to open the form (either Form Filler or FormApps Server) is included in the form template. It is listed in Form can be opened by. If the form is suitable for both the applications, you can choose in Select a new way of opening the form which one will be used. If you keep both options available (option “Form Filler or FormApps Server”), the form will be opened in the application the user has set as default in their FormFlow preferences.
This section also contains settings for old forms – those that are not ready yet to be opened using FormApps Server. For forms older than a specific date (based on the moment the form was first opened to fill out), opening using Form Filler can be forced regardless of other settings. This date is set globally for the whole FormFlow in section System Parameters; you can adjust the setting for this specific form version:
-
Global configuration – displays the current global FormFlow setting.
-
Configuration to use – select whether to use global or individual setting for this form version.
-
Time boundary to use the Form Filler to open forms – if you have selected individual setting in the previous field, set the date and time here.
It is also possible to provide old forms at least a preview in FormApps Server. The preview is created using a suitable form that will load the data from the original form and display it. In the following field Form template for preview, select the form template to use.
Replacing the current version
The Replace function will replace a previous XSL-FO file without creating a new version. Replacing a form template is useful if the data record has not changed. If there is a new element in the data record, the form template will still be replaced when using this method, but no change will be made to the user SQL tables.
Attachments
XPath expressions to elements that carry attachment details can be set up separately for each form section. This fields will be filled in automatically if the elements in gw_document are filled in.
This mechanism can be used to set up several repeat sections at the same time. The setting is available in section Attachments for the corresponding form version in form management. Click Add a new attachment to insert a group of attachment definition settings.
-
XPath name – name this group of settings.
-
doc_xpath_content – the path to the part of the repeating section that contains the attachment.
-
doc_xpath_mime_type – the path to the part of the repeating section that contains the attachment mime type.
-
doc_xpath_name – the path to the part of the repeating section that contains the attachment name.
-
doc_xpath_repe – the path to the part of the repeating section that wraps the repeating section.
-
doc_xpath_cades_content – the path to the part of the repeating section that contains an external signature.
-
doc_xpath_cades_mime_type – the path to the part of the repeating section that contains the external signature mime type.
-
doc_xpath_cades_name – the path to the part of the repeating section that contains the external signature name.
-
doc_xpath_ltv_accept – the path to the part of the repeating section that indicates whether to long-term preserve the document. Allowed values for this repeating section item are 0 and 1.
-
doc_xpath_convert_pdfa – the path to the part of the repeating section that indicates whether to convert the document to PDF/A – allowed values for this repeating section item are 0 and 1.
-
doc_xpath_pdfa_ltv_accept – the path to the part of the repeating section that indicates whether to long-term preserve the PDF/A document – allowed values in the repeating section item are 0 and 1.
-
doc_xpath_pdfa_name – the path to the part of the repeating section that contains the name of the PDF/A file.
-
doc_xpath_pdfa_content – the path to the part of the repeating section that contains a new PDF/A file.
-
doc_xpath_pdfa_mime_type – the path to the part of the repeating section that contains the PDF/A file mime type.
-
doc_xpath_sb_sign_accept – the path to the d:sb_sign_accept element (item for placing/taking out the attachment from the group of documents to be signed) in the repeating section.
-
doc_xpath_sb_signed – the path to the d:sb_signed element.
-
Check signatures of work-in-progress documents – if checked, signature expiry check will be also run for forms that are still in the approval process. Based on notification settings, selected users might receive automatic notifications.
-
ID_DOCU XPath – XPath to the attachment in the form. This is the path where to search for attachments during extraction to long-term preservation and when creating AIP packages.
Click Update attachments to start a new form attachment transfer to archive, e.g. after making changes. Click Delete this attachment to remove this attachment section from the form. Click Save changes to confirm any changes on this page.
Deleting a form template
A form template can only be deleted if no users have downloaded it yet and no forms have been created from the template.
-
Start by canceling the form template release. In form management (see chapter Accessing the form settings), open the form detail, click the Release section on the left and then, on the right, click the Recall the release button.
-
Then open the Install section and, on the right, click Uninstall the version.

-
Click Yes in the confirmation dialog; the Remove version button is then displayed. Click it to remove the form template including the SQL tables.

| If a user has already downloaded or even filled out the form, you will need to delete the corresponding data from the SQL tables first. |
SmartForms
Forms created in the web-based version of Designer are called SmartForms. You can insert these forms in FormFlow as collection forms.
Save a form designed in Web Designer as a .zip file and upload it to FormFlow as a form template file instead of the usual .zfo.
Then set up the form template in the same way as for other forms.