Classes and ranks
Each document is assigned one class and one rank. They are used as a basis to granting user permissions to view or edit documents.
| When inserting a document in FormFlow, a class and a rank must always be assigned to it. If you save a document without specifying a class and a rank, the application will assign default ones automatically when saving the document. To prevent a document from receiving a class or rank not available in their folder, we recommend setting up a default value for the “Document class” and “Document rank” metadata that is available in the folder (setting up metadata properties is described in chapter Creating and editing a metadata item, assigning classes and ranks to folders is described in chapter Creating a new folder). |
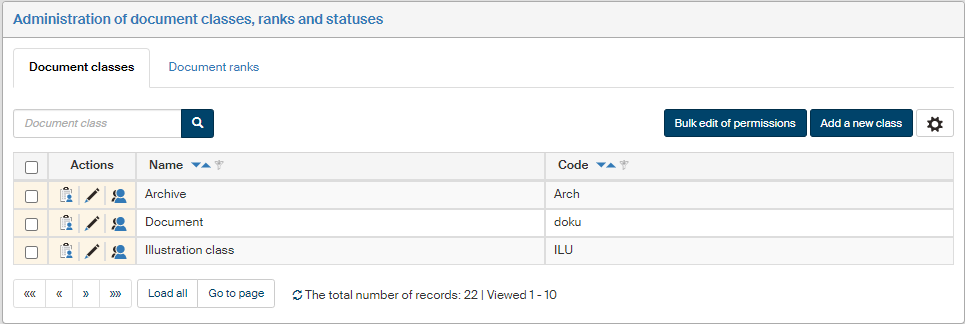
You can edit the list items for the two properties in section Administration of document classes and ranks. Click one of the two tabs in the header to select which property to edit.
Click  placed on the right above the list to display the filtering and sorting limit settings for this table. The settings are described in more detail in chapter Grid administration.
The setting process is the same for both document classes and document ranks; this chapter contains instructions for both of them.
Existing classes or ranks are displayed in a table. Every table row corresponds to one class or rank.
Check the box in the left-most column to select classes or ranks and edit their permissions in bulk – when you have selected the items to edit, click Bulk edit of permissions. This dialog is described in chapter Setting up class and rank permissions.
The Actions column contains a set of buttons to edit the entry, followed by Name (text displayed in lists when selecting the class or rank) and Code (unique string).
The actions available are as follows:
-
 Set permissions – displays a dialog where you can grant or remove permissions to (from) users, groups or roles.
 -
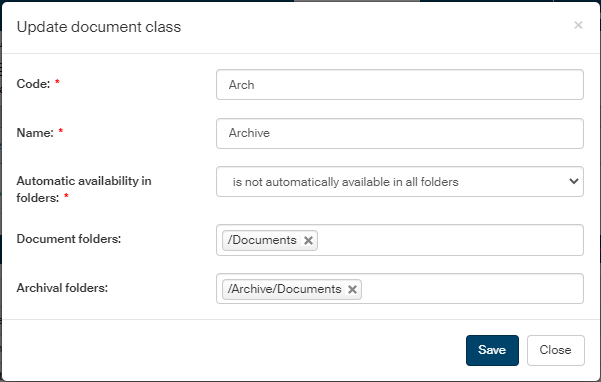
 Edit the document class or Edit the document rank – displays a dialog window with fields where you can edit the class or rank Name and Code and its assigned folders.
 -
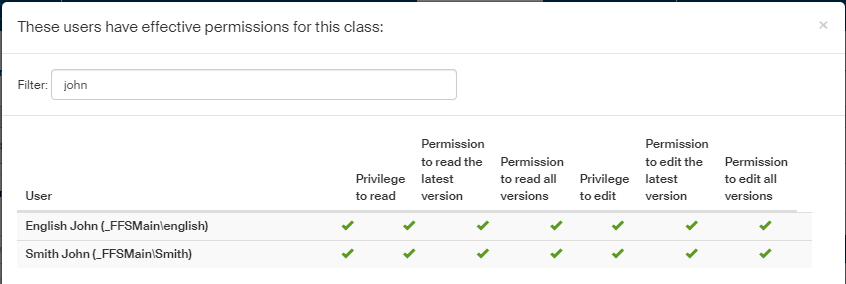
 Show effective permissions – displays a window with a list of users who were granted a permission or permissions, either directly or through membership in a group or role. The assigned permissions are displayed as a green check mark in the corresponding column.
 -
 Delete the document class or Delete the document rank – removes the entry.
Creating a new class or rank
To create a new document class or rank, click the Add a new class or Add a new rank button placed above the list of existing classes and ranks.

A dialog window is then displayed; enter the Code and Name for the new class or rank.
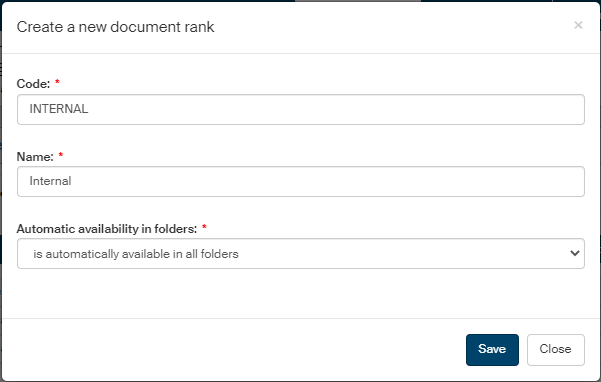
If you keep the option Automatic availability in folders set to "is automatically available in all folders", the new class or rank will be available to all documents regardless of the folder where they are placed.
If you select the option "is not automatically available in all folders", the dialog will display additional fields Document folders and Archive folders. In these fields, select from the list of existing document and archive folders those where the class (rank) should be available.
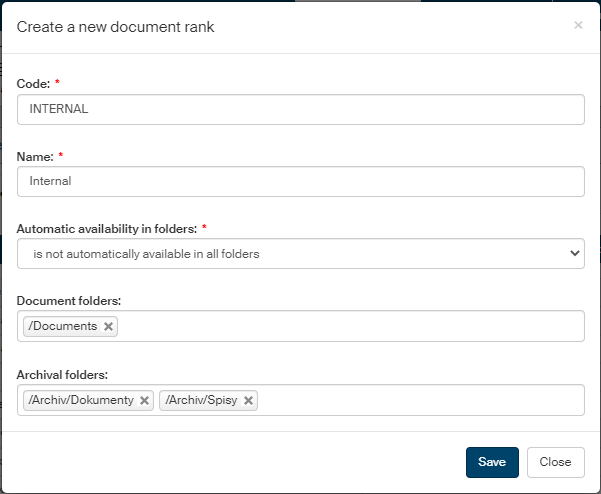
If you select "is automatically available in all document folders" or "is automatically available in all archive folders", only the field Archival folders or Document folders will be displayed to select the folders for the corresponding category.
Click Save to confirm the settings. The new entry is then added to the list of existing classes or ranks. Now click the Set permissions button in the Actions folder next to the new entry and set access permissions to users or groups as needed.
Setting up class and rank permissions
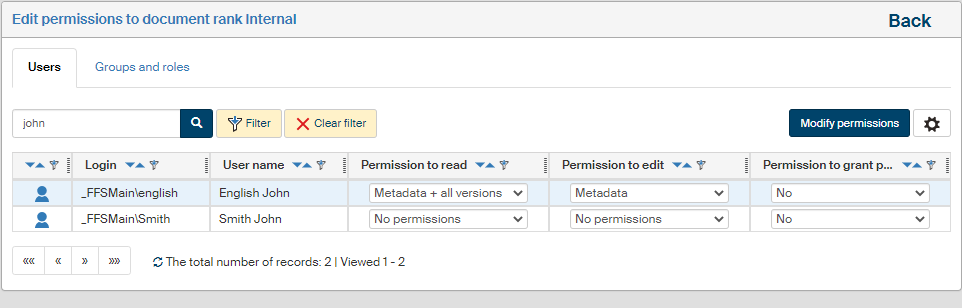
Click Set permissions for a document class or rank to display a table where you can assign access permissions to individual users or whole groups and roles.
If you select the checkbox for several items in the list of classes or ranks and then select the button Bulk edit of permissions, a similar dialog will be displayed but the settings will apply to all selected classes or ranks. In such a case, the dialog header shows the text “Modify privileges for document classes” or “Modify privileges for document ranks” and, next to it, the button Show selected classes or Show selected ranks, which you can use to display a dialog window with a list of classes or ranks this setting will apply to.

For the rest of the setting, proceed the same way whether setting up a single entry or several at once:
Use the tabs in the upper part of the page to switch between a list of users and a list of groups and roles. A filter is also placed above the list, and you can use it to look up individual entries.
Edit the individual permissions for every entry (user, group or role) as needed.
-
There are several levels to Permission to read and Permission to edit; select one of the following:
-
Do not change – select to keep the current permission setting;
-
No permission – no permission is granted to a document with this class or rank;
-
Metadata – grants the permission to read/edit the metadata for a document with this class or rank;
-
Metadata + latest version – grants the permission to read/edit the document metadata or the document itself, but only its latest version;
-
Metadata + all versions – grants the permission to read/edit the document metadata or any version of the document;
-
-
Permission to grant permissions – select from Yes/No to grant the permission to grant the same privileges to other users.
Then click the Modify permissions button placed above the list of users or groups to confirm any changes. Return to the list of classes or ranks by clicking the Back link in the upper right corner.
If you want to check the overall permissions assigned to a user (i.e. permissions assigned both by being a group/role member and individually assigned permissions), return to the list of classes or ranks and, in the Actions column, click Show effective permissions.