Form list
When displaying a list of process forms in a general folder or one of the Tasks lists, they are displayed as a table with a similar structure and controls.
You can set the number of items displayed on one page: open the application settings and edit the value in field Rows per page.
Browsing the form list
If the number of forms is larger, the list will be displayed by page. You can browse the pages using the navigation tool placed on the left below the list.

If there are preset filters set to be displayed as labels, you will find them above the list, next to the filter controls (e.g. the button "today"). Filter set settings are described in chapter Filter sets.
Before searching for an item in the process list, check for any filters you may have set before. If it is set (the Filter and Clear filter buttons are highlighted in yellow), click Clear filter to cancel filtering.

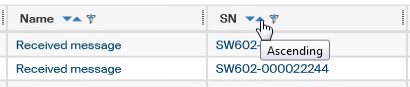
If there are not too many entries (the threshold is again set by the FormFlow administrator), you can order or filter them based on one of the table columns. You will find the corresponding controls in the header of each column. Set the order by clicking ![]() Descending or
Descending or ![]() Ascending.
Ascending.
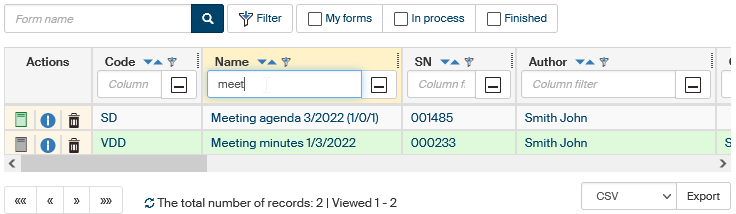
A so-called column filter is available for quick filtration. Click the ![]() button in the column header and use the field displayed to enter a text to search for (or a part of it). The list will only display documents matching this filter.
button in the column header and use the field displayed to enter a text to search for (or a part of it). The list will only display documents matching this filter.
| For a more precise search, use the filter tools described in chapter Advanced search. |
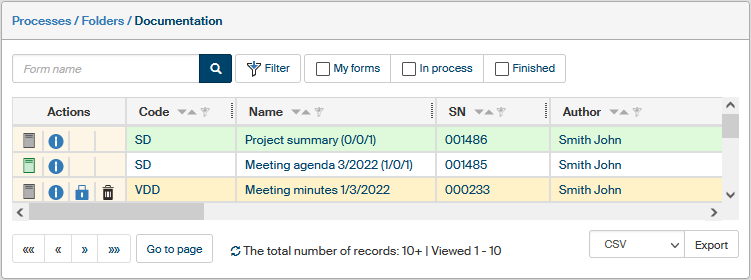
Items displayed in form lists
There are several controls available on every row of the table listing form processes. They are placed in the Actions column on the left.
-
 Open form – use the button to open the form. You can also open a form by clicking on the text in other table columns. A gray button means a form in progress, the shade specifies the form type:
-
dark gray means a workflow form, that is, a form that goes through an approval process,
-
 light gray means a collection form.
For finished forms, the button color signifies the process result:
-
 green means an approved process,
 -
 red means a rejected process.
-
-
 Go to folder – this button is available if the list displayed is not Folders (e.g. To Be Processed By Me). Use the button to switch the display to folder list and display the folder containing this form.
 -
 Form details – opens a window with basic form details. For a more detailed description, see the next chapter Form details.
 -
 Take over the form - displayed for the forms that are not "on your desk" right now, but you can take over them and process them.
 -
 Move to trash - removes the form from the folder to Trash.
The individual table columns correspond to form metadata – you can use the filtering settings to adjust which ones to display, as described in chapter Columns.
-
The Code column displays the code for the form template; it was set by the administrator when placing the form template in the server library.
-
The Name column displays the form name.
-
The SN displays the form’s serial number.
-
The Author contains the name of the form author, that is, the person responsible for processing the form.
-
The Current Recipient column displays the user who is processing the document right now (it is "on their desk").
-
The Processed by column displays the name of the user who approved or rejected the form process.
-
The Finished By column displays the name of the user who archived the form.
-
The Created column displays the date and time the form was created.
-
The Saved / Finished column displays the date and time the form was finished and saved or when the last change took place.
-
The Comment column can display a text of a comment if there is one in the form.
-
The Form status column displays the current form status.
-
The Status – latest change column displays the last date and time when the form status changed.
-
The Step column displays the number of the workflow form’s current signing step. If the form is already closed, the step number where the form was approved or rejected is displayed. The column is empty for collection forms.
The list rows can have various background colors based on the form status in relation with you:
-
green – the form is “on your desk” and waiting for you to process it;
-
yellow – the form is in progress and on someone else’s "desk", but you can take over the form (click the lock button);
-
white – all other forms are displayed without any highlight: those already finished or forms that you can view but not manipulate them.
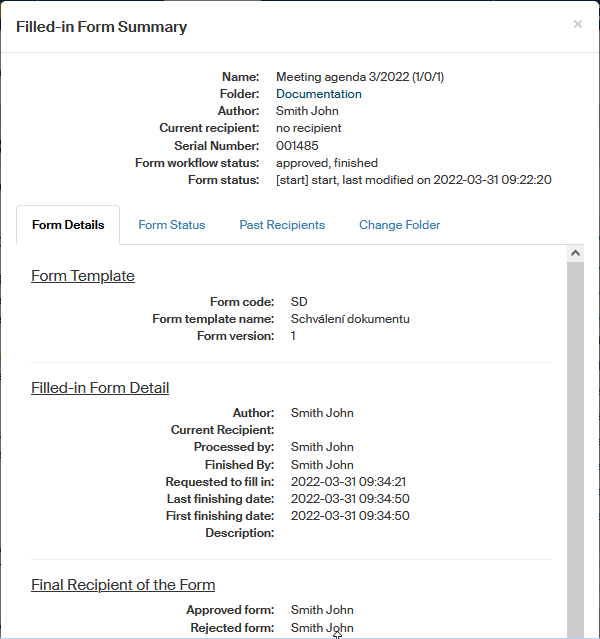
Form details
Open the form detail window by clicking the ![]() button placed in the Actions column in the same row in the form list.
button placed in the Actions column in the same row in the form list.
The upper part of the window displays the form’s basic information, such as the name, location, serial number and the author.

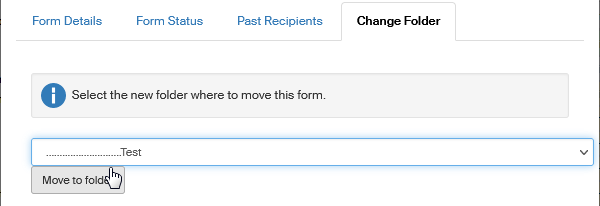
Below, the window is separated into several tabs: Form Details, Form Status, Past Recipients and Change Folder.
The Form Details tab
The Form Details tab display additional details on the form template this form was created from and also on this specific form. The section Final Recipients of the Form specifies to which user the form will be forwarded when approved and which user if the form is rejected.
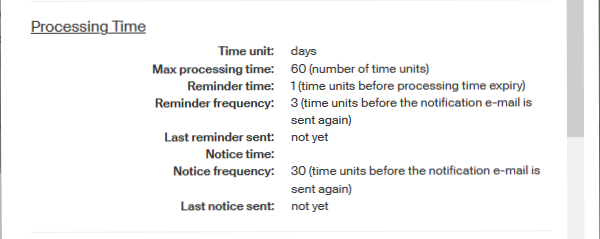
The following section, Processing Time, displays times related to the processing of this form. The field Time units specifies the times units used in the other entries in this section. They can be either hours or days.
Max processing time specifies how fast (in how many time units) the form should be processed.
Before the processing time passes, FormFlow can send an e-mail reminder to the user processing the form. The reminder can be repeated. This setting is described in entries Reminder time and Reminder frequency, while Last reminder sent displays the time a reminder was sent.
If the user processing the form still does not process it, FormFlow can send an e-mail notification to more users, typically a superior or other responsible person. There are similar details displayed for notifications as for the reminders: Notice time, Notice frequency and Last notice sent.
The next section is the form’s Signature Path. The path lists the individual recipients who take part in form processing.
The section also contains the Review recipient button to check that the current form recipient is present. If the current recipient is absent, using this button will forward the form to their substitute. Similarly, if a substitute has not processed the form yet and the original recipient’s absence has ended, the form will be handed back to the original recipient.

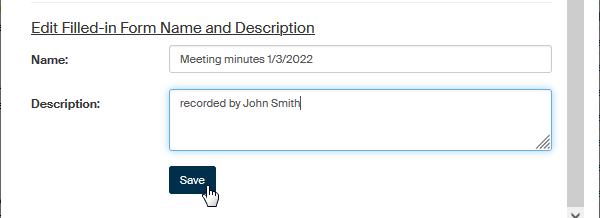
If you have the corresponding permissions, the dialog contains an option to rename the form or adjust its description. Click Submit to confirm the change.
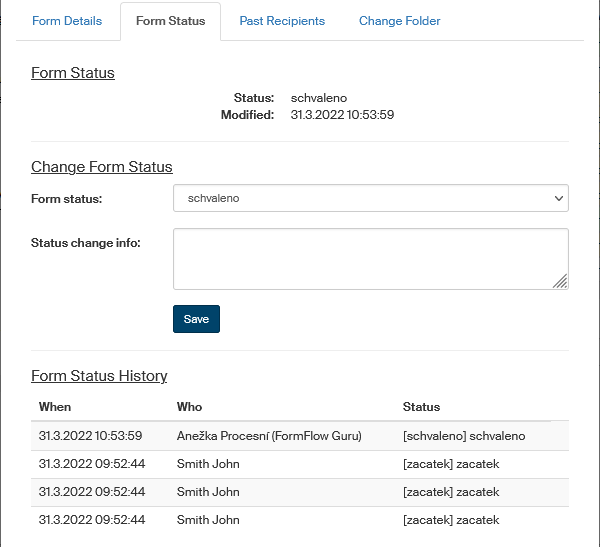
The Form Status tab
The Form Status tab gives you the option to review the current form status, the form status changes (its workflow) and view the status history. This tab is not displayed for all forms.