Document list
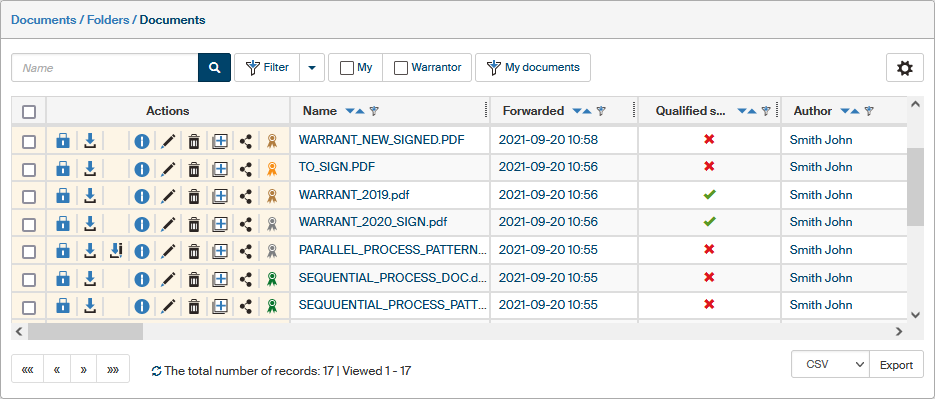
Documents from a selected folder are displayed as a table, where every row corresponds to a single document and every column one of the document details.
Browsing the document list
If there are many documents in the folder, the list not displayed whole at once but by page. Browse the pages using a navigation tool placed on the left below the list.

If there are preset filters set to be displayed as labels, you will find them above the list, next to the filter controls. Filter set settings are described in chapter Filter sets.

If there are not too many entries (the threshold is again set by the FormFlow administrator), you can order or filter them based on one of the table columns. You will find the corresponding controls in the header of each column. Set the order by clicking ![]() Descending or
Descending or ![]() Ascending.
Ascending.

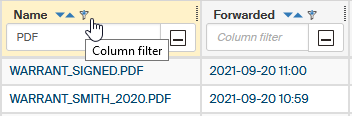
A so-called "column filter" is available for quick filtration. Click the ![]() button in the column header and use the field displayed to enter a text to search for. The system immediately displays only those documents that match the filter (contain the entered text in the given column).
button in the column header and use the field displayed to enter a text to search for. The system immediately displays only those documents that match the filter (contain the entered text in the given column).
| For a more precise search, use the Filter button and the filter tools described in chapter Filtering. |
Available document actions
The document table contains several controls for the documents.
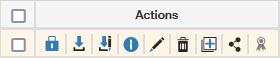
There is a checkbox placed on the far left. Use it to select documents for bulk operations. If at least one box is checked, the right side of the screen will display a floating window, Bulk operations, with a menu of available operations including bulk ones. This window is described in chapter Bulk operations.
More icons and controls are placed in the Actions column near on the left side of the table.
The lock button can be in one of several colors that correspond to the document status: whether it is available for editing or locked by a user or a process. The meanings of each color are listed below; the description is also available as a tooltip, if you point your mouse cursor to the button:
-
 the document is locked for qualified storage – the long-term preservation process.
 -
 the document is locked by a process – it cannot be edited.
 -
 the document is locked by a process and also by me. You can click the lock symbol to mark the document locked by a process only and the symbol will change its color to black.
 -
 the document is locked by a process and also by another user.
 -
 the document is locked by me, you can click the lock symbol for a document saved by you to unlock the document and the lock symbol will change to blue (the document is not locked).
 -
 the document is locked by another user.
 -
 the document is locked by another user, but I am authorized to unlock it. You can click the lock symbol to unlock the document and the lock symbol will change to blue (the document is not locked).
 -
 the document is not locked; you can click the lock symbol for a document saved by you to lock the document and the lock symbol will turn to yellow (the document is locked by me).
Other buttons in the Actions column are included if the user has corresponding permissions; they have the following meanings:
-
 Download – downloads the document onto your computer and saves it in the file download folder. You can use an application associated with the file type to open the file in read-only mode, without editing.
 -
 Download for editing – downloads the document onto your computer and saves it in the file download folder. You can use an application associated with the file type to read and edit the file – only available for some document types.
 -
 Document information – opens a window with several tabs displaying all details of the document – see chapter Document information.
 -
 Edit document metadata – displays a window where you can edit the document metadata – see chapter Document metadata.
 -
 Move to trash – removes the document from the folder to the Trash folder. Only applies to documents you can access; otherwise the button is not displayed.
 -
 Create a document and copy metadata – opens a window where you can create a new document with the same metadata as the selected document.
 -
 Share document – an option to share a document with another user – displays a dialog where you can assign view permissions or edit permissions to another user or group of users – see chapter Document sharing.
 -
 Signature status - lists the digital signature status: Valid, Partially valid, Invalid, Not validated, No signatures. Click the symbol to display a window with signature details (if the document is signed).
The table columns with the description of individual documents (Name, Created on … etc.) correspond to document metadata. You can set which columns to display (Filter – the Advanced search window – the Columns tab), which is described in more detail in chapter Columns in chapter Advanced search.
Click the contents of a table cell to display a window with a preview of the document, if it is available for that file type. If preview is not available for a given file type, it will be offered for download instead.
| You can select in Application settings whether to open document previews in the same window or in a new browser tab. |
Exporting a document list
A list of documents based on the current filter can be exported to a file and then processed in other software. The export controls are not in the Bulk operations window but below the table of documents. Select the target format in the first field, then click Export to confirm the operation. The system will offer you the resulting file for download.
If you select one of the formats CSV, PDF, XML, XLS, XLSX and HTML, the export result will be a single file in the selected format, containing a table of metadata for documents matching the current filter.
If you select the ZIP format, the resulting export will include a metadata list in CSV or XLSX and a folder with the actual files.
Exporting large lists
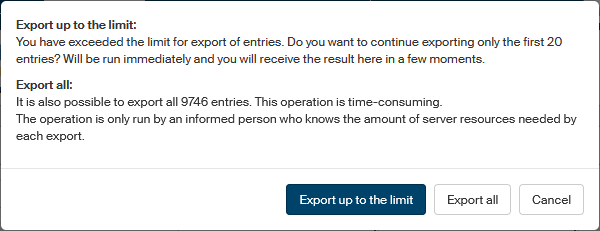
Because exporting large lists can consume a lot of time and FormFlow resources, it is generally only allowed to export list up to a certain number of entries. The administrator can give selected users the permission to export lists of any size. If you have been given this permission and attempt to export a list larger than the usual limit, FormFlow will display the following dialog to select the next step.
-
Export up to the limit – will only export a limited number of entries, up to the limit set in FormFlow. The resulting file will be available for download immediately.
-
Export all – will export all entries matching the current filter. You can find the resulting file in your settings, on the tab My exports (described in chapter My exports). Use this option with caution, because exporting a list with many entries may increase the server load.