Archive metadata administration
Open the Archive metadata administration screen () to create and edit the list of archival metadata to be filled in for archival items based on the archive folder where they are stored. To learn how to create and edit the folder structure, see chapter Document folders.
The screen Archive metadata administration is split into two sections. The left one displays the existing archive folder structure. Click a folder name to display a list of metadata kept for items stored in this folder.

Metadata list and editing
The list of metadata is displayed on the right. There are several controls available to edit the metadata.
Check the box in the left-most column to select metadata and edit their permissions in bulk – when you have selected the metadata to edit, click Bulk edit of permissions. This dialog is described in chapter Setting up metadata permissions.
Click Change order of metadata in GUI in this folder in the middle above the list to open the metadata designer window for the folder. The dialog is described in chapter DMS metadata designer.
The Actions column buttons provide the following features:
-
 Set permissions – displays a table where you can grant or remove permissions to (from) users, groups or roles. For more details, see chapter Setting up metadata permissions.
 -
 Set XPath – displays a dialog Edit XPath to metadatum xxx on folder yyy for the selected metadata item. Use the dialog to create a new XPath entry; the steps include process selection (only processes available in the document folder are listed) and entering the XPath itself. You can set the entry as enabled or disabled. If you are setting up a metadata entry in a document folder containing subfolders, you can select whether to copy the properties from the folder to its subfolders.
 -
 Edit the list – only available for metadata of list data type. The button displays a dialog where you can edit the list items. For more details, see chapter Editing a list.
 -
 Edit the metadatum – displays a dialog window where you can edit the properties of this metadata item. For more details, see chapter Creating and editing a metadata item.
 -
 Show effective permissions – displays a window with a list of all users how were granted a permission or permissions to the metadata item, either directly or through membership in a group or role. The assigned permissions are displayed as a green check mark in the corresponding column.
 -
 Delete the metadatum – removes the entry. The default metadata set cannot be deleted and this button is not displayed for them.
Click  Grid administration on the upper right above the list of metadata to display a dialog where you can adjust the filtration and sorting limits for this table. The settings are described in more detail in chapter Grid administration.
Adding a new metadata item in an archive folder
It is possible to add more metadata in archive folders.
-
Open the screen Archive metadata administration and select the folder where to edit metadata.
-
Click the Add metadata button placed on the right above the list of existing metadata.
-
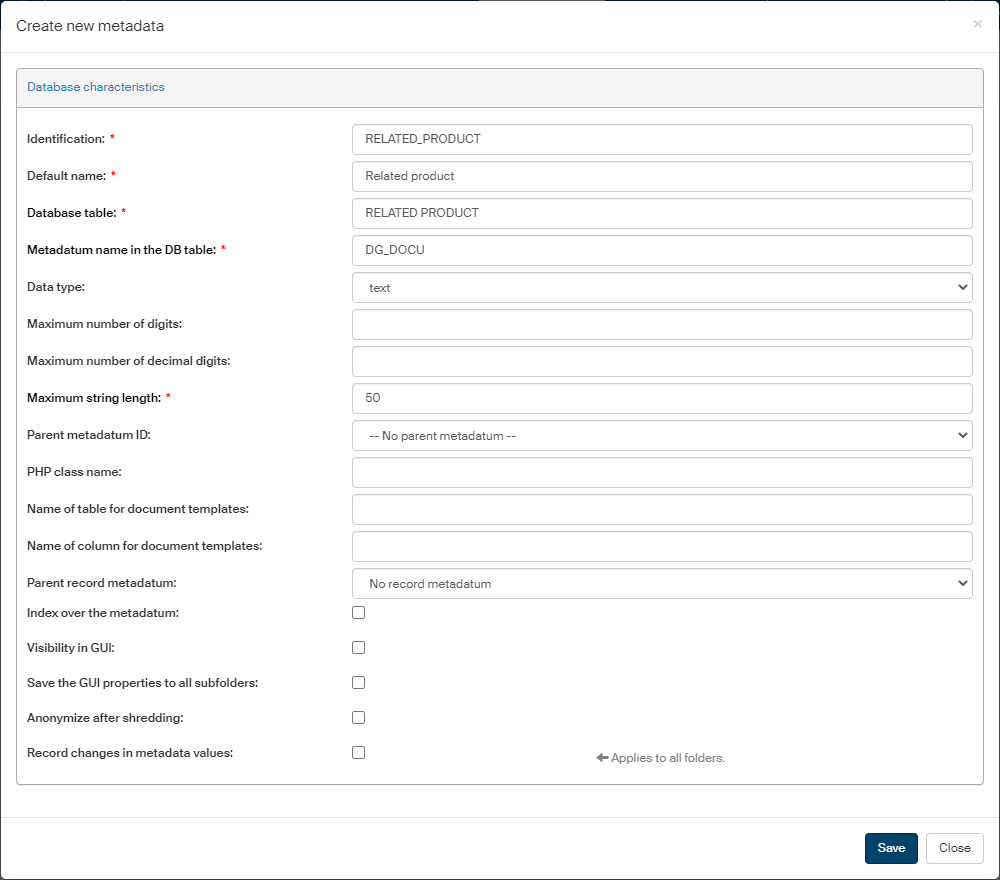
Clicking the button displays the window Create new metadata where you can enter its properties.
The basic display shows the Database characteristics section where you can set up how the metadata item will be stored. The entries marked with an asterisk are mandatory; some of them depend on the data type selected.
-
Identification – unique string that identifies the metadata item (mandatory).
-
Default name – the name displayed in lists.
-
Database table – name of the database table where to store the metadata item.
-
Metadatum name in the DB table – name for the metadata item to be written in the database.
-
Data type – based on the selected data type, filling in some of the following entries might be required.
-
Maximum number of digits, Maximum number of decimal digits – these entries are mandatory if the data type is “number”.
-
Maximum string length – this entry is only mandatory if the data type is “text”.
-
Parent metadatum ID – the metadata item can depend on the value of another metadata item; if it is the case, select the other metadata item here.
-
PHP class name – class name in an external PHP script where e.g. a list can be stored.
-
Name of table for document templates, Name of column for document templates – these entries are not in use.
-
Parent record metadatum – metadata items can be structured in such a way that one or more metadata items are parts of a parent metadata item. In such a case enter the parent metadata item here.
-
Index over the metadatum – this is entry is for reference only. If it is checked, it means there is an index over this metadata item in the database and can be used for searching.
-
Visibility in GUI – if checked, an additional column, GUI characteristics, is displayed in this dialog window. The data in this section is used to set up how the metadata item is presented to the users.
-
Save the GUI properties to all subfolders – the metadata item is also applied to all subfolders to the current folder.
-
Anonymize after shredding – metadata with this entry checked is hidden after the document has been shredded.
If you have checked Visibility in GUI, the metadata setup window is displayed as shown here:
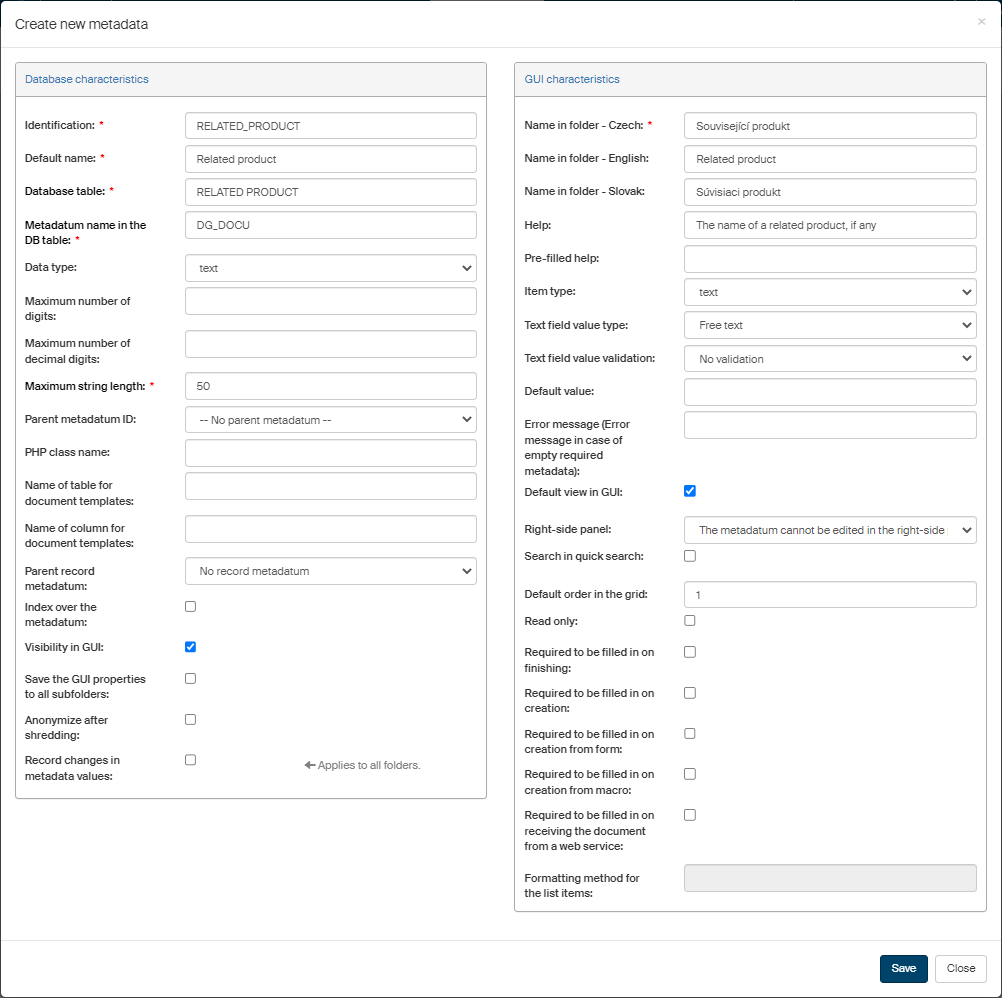
The Database characteristics table is moved to the left and another column, GUI characteristics, is displayed on the right and offers the following entries:
-
Name in folder – Czech/English/Slovak – metadata name as it will be displayed to the users. You can set up a different name for each language version.
-
Help – instructions how to fill in the field (not displayed anywhere yet).
-
Pre-filled help – help text displayed directly in the metadata item field.
-
Item type – item data type as presented in the GUI.
-
Text field value type – if there is “text” selected in the Item type field, you can select one of several options in this field (Free text, Identification number, Tax identification number, E-mail, Telephone, URL) to adjust how the metadata item is displayed and/or validated.
-
Text field value validation – if the Item type is “text”, then you can, based on the Text field value type setting, request validation of the metadata value filled in by the user. The options are “No validation”, “Soft - warning only” and “Strict - error thrown”. On the strict setting, it will not be possible to save a metadata item if it is filled in incorrectly.
-
Default value – the value to be used if the field is not filled in.
-
Error message in case of empty required metadata – if this metadata item is mandatory and a user leaves the entry empty, the text entered in this field will be displayed.
-
Default view in GUI – if not checked, the item will not be displayed when inserting a document, filtering, etc.
-
Right-side panel – select which panel/dialog window will display the metadata item for filling in.
-
Search in quick search – if checked, this item will be searched when using the quick search field.
-
Default order in the grid – column order for this metadata item in the document table when the folder is displayed.
-
Read only – if checked, this item will only be available for viewing, not editing.
-
Required to be filled in on finishing – if checked, it will not be possible to finish a document until this item is filled in.
-
Required to be filled in on creation – if checked, it will not be possible to insert (create) a document until this item is filled in.
-
Required to be filled in on creation from form – the metadata item must be filled in when creating a document using a form in the FormFlow interface.
-
Required to be filled in on creation from macro – the metadata item must be filled in when creating a document using an MS Office macro (ECM extension).
-
Required to be filled in on receiving the document from a web service – the metadata item must be filled in when creating a document by sending it to FormFlow using a web service.
-
Formatting method for the list items – how to display them in the form, e.g. %KEY% - %VALUE%.
-
To create the entry, click Save.
A similar window is displayed if you click Edit the metadatum in the list of existing metadata. Use it to edit the existing metadata entry as needed.
Setting up archive metadata permissions
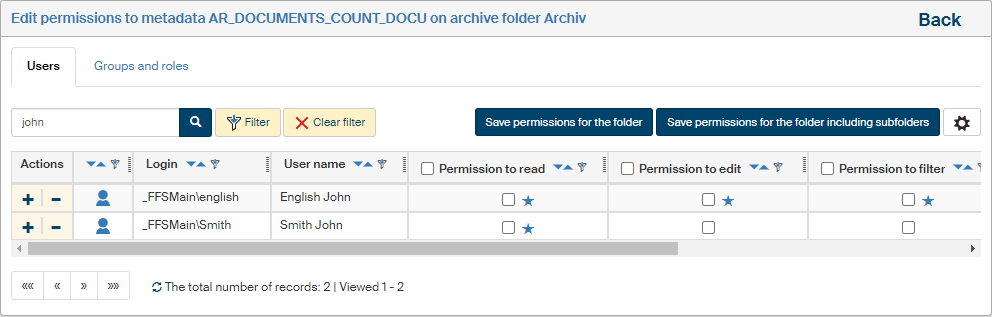
Click Set permissions next to a selected archive metadata item to display the window Edit permissions for to metadata… where you can assign access permissions to users (the Users tab) as well as whole groups and roles (the Groups and roles tab).
If you select the checkbox on the left in the Archive metadata administration window for several items and then click the Bulk edit of permissions button, a similar dialog will be displayed but the settings will apply to all selected metadata items. In such a case, the dialog header shows the text Edit permissions to selected metadata and, next to it, the button Show selected metadata, which you can use to display a dialog window with a list of metadata this setting will apply to.

For the rest of the setting, proceed the same way whether setting up a single item or several at once.
Use the tabs in the upper part of the page to switch between a list of users and a list of groups and roles. A filter is also placed above the list, and you can use it to look up individual entries.
Check or uncheck the individual permissions for every entry (user, group or role):
-
Permission to read;
-
Permission to edit;
-
Permission to filter (using the metadata item);
-
Permission to sort (based on the metadata item);
-
Permission to create (the metadata item);
-
Permission to delete (the metadata item);
-
Permission to grant permissions (to the metadata item).
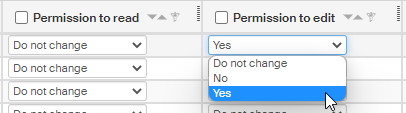
You can click  to check all the fields and assign the user, group or role all the permissions at once, or
  to remove all permissions at once.
When bulk editing metadata permissions, there are three options available for each permission: Yes, No and Do not change.
Then click the Save permissions button placed above the list of users or groups to confirm any changes. If you check the option Edit permissions in subfolders first, the permission changes will also apply to subfolders to the current archive folder.
Return to the list of metadata by clicking the Back link in the upper right corner.