Shipment list
There is a new button available on the RECORDS MANAGEMENT tab: Shipments. Click the button to display a page listing all shipments available to you.

This means that the following shipments are displayed:
-
You are the processor for the MSG_IN or MSG_OUT document contained in the shipment (= you have permission to edit the shipment).
-
You are not the processor for the MSG_IN or MSG_OUT document contained in the shipment, but you are authorized to view the document (= you have permission to view the shipment).
-
You are authorized to view “Shipments that cannot be sent”. This group includes anyone in the “Administrators” group as well as users listed in the entity properties (administrators can change this setting).
Other shipments will not be displayed.
The list of shipments displays all MSG_IN and MSG_OUT forms, or their individual shipments, that have been received in FormFlow created for sending. You can simplify the view using saved sets of filters (for more details, see chapter Filter sets).
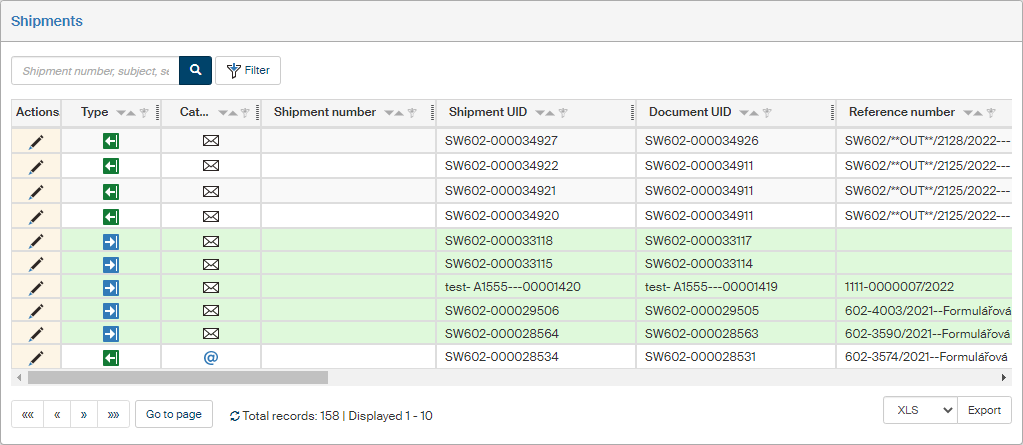
The Actions column contains the button ![]() Edit message for each of the shipments. Click it to open the corresponding detail:
Edit message for each of the shipments. Click it to open the corresponding detail:
-
For shipment MSG_OUT forms, the shipment detail is displayed in a modal dialog.
-
For classic MSG_OUT and MSG_IN forms, the corresponding form is displayed.
The icons in the Type column indicate whether it is an incoming or outgoing shipment:
-
 Incoming shipment.
 -
 Outgoing shipment.
The icon in the Type column indicates the shipment form:
-
 – traditional paper mail.
 -
 – DMIS data message.
 -
 – e-mail message.
The other table columns list the following shipment details:
-
Shipment number – identifier of an already sent or received shipment. This identifier is assigned by the delivery service, and it can be e.g. a data message ID or a posting number.
-
Shipment UID – unique identifier used for shipments since version 10.2.2.
-
Document UID – unique identifier for the document sent or received with the shipment.
-
Reference number – reference number for the document sent or received with the shipment.
-
Subject – subject (title, …) of the document sent or received with the shipment.
-
Sender – for received shipments, the company name or name and surname from the address book entry for the sender. For sent messages, the name of the entity who sent the shipment.
-
Sender address – for received shipments, the sender address from the address book entry (e-mail address, data mailbox ID, postal address, …). For sent shipments, the address of the entity who sent the shipment (e-mail address, data message ID, postal address, …).
-
Recipient – for received shipments, the name of the entity the shipment was addressed to. For sent shipments, the company name or name and surname from the address book entry for the recipient the shipment was addressed to.
-
Recipient address – for received shipments, the address of the entity the shipment was addressed to (e-mail address, data mailbox ID, postal address, …). For sent shipments, the address from the recipient’s address book entry (e-mail address, data mailbox ID, postal address, …).
-
Sent – empty for received shipments. For sent shipments, the date and time the shipment was submitted from FormFlow.
-
Mailed – date and time the shipment was handed to a mailing service.
-
Delivered – date and time when the shipment was delivered to the recipient’s electronic or postal mailbox.
-
Received – date and time the recipient has verifiably received the shipment.
-
Document processor – the user who has the document “on their desk” and is responsible for it.
-
Mailing – “Using mail room” or “Without mail room”.
-
Bulk posting form – if the shipment is listed on a bulk posting form, its name is displayed here. Click it to display the form details.
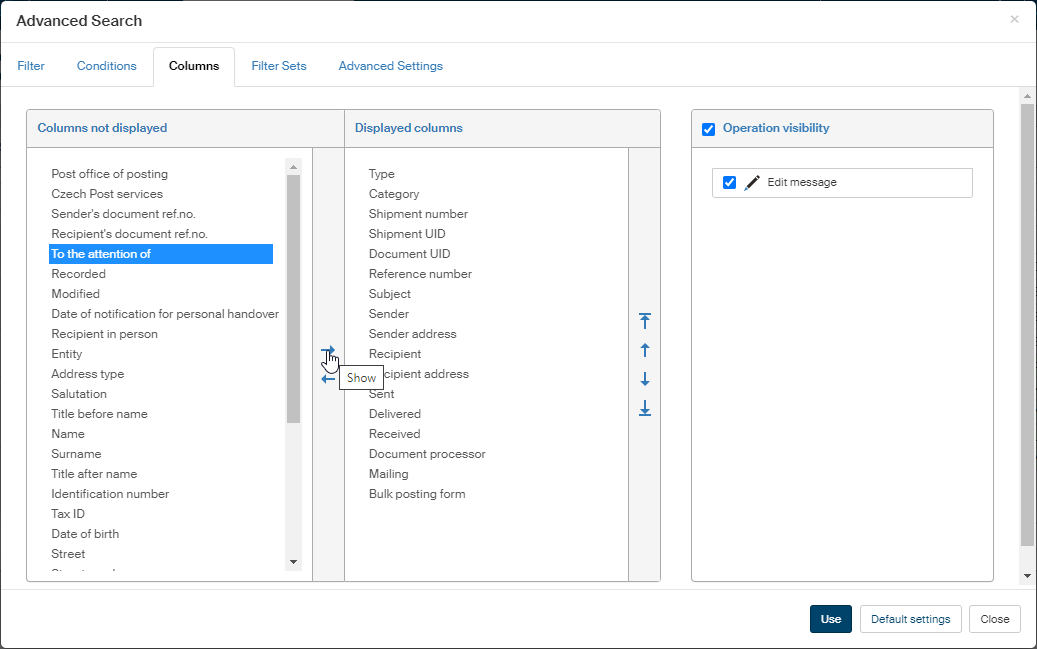
There are more columns available that are not included in the default view, but you can choose to display them. Click the Filter button. In the window Advanced search, go to the Columns tab. Use the arrow buttons to move items from section Columns not displayed to section Displayed columns.