The Document approval process
When a document is created in one of the above-described ways, the final document usually needs to be approved. Use the form Document approval to approve a controlled document.
There are two ways of running the document approval process:
-
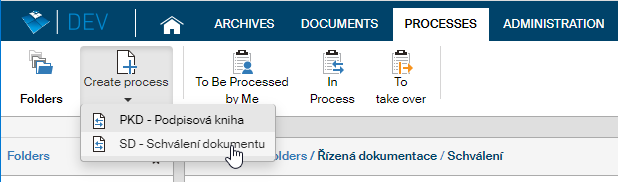
Select your working folder on the PROCESSES tab. Click Create process and select SD – Documentation approval.
You can also click Folders, then click Controlled documentation and, in the submenu, click Approval.
A form opens from the template; fill out the form as described in the following chapters.
-
Select your working folder in the DOCUMENTS tab and look up the document to insert in the approval process. Check the leftmost box on the row with your selected document to display a floating window with available operations. In section Processes in the window, click Documentation approval. Click Run to open the form and fill it out as described in the following chapters. Unlike the previous method, you do not need to look up the document for approval again – it will be inserted in the form automatically.
If the document is already part of controlled documentation, for example it has undergone the Documentation creation process, you can run the approval process as a follow-up process, without having to handle the document file and fill out any of its details.
Entering the document details
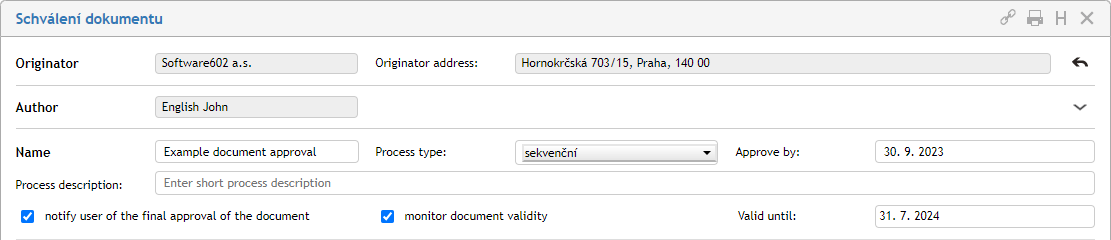
The first part of the Documentation approval form is similar to the process forms for document creation and contains the document identification data.
-
The Originator section is only present if controlled documentation is connected to records management. The section contains the organization (company, department, etc.), who owns the controlled document. If you handle documents for more than one originator, you can use this section to select which one of them owns the document.
-
The Author field lists your details as the person who starts the document process. You cannot edit this section; the details are taken from the server. You can click the arrow on the right to display some additional details – they are also read-only.
Enter process description in the next section.
-
The text from the Name field will be used as the form name and displayed in process lists in the Name column.
-
You can add more details on the process in the field Process description.
-
In Process type, select whether to run a sequential or parallel approval process (see chapter Sequential and parallel processes).
-
You can also enter a date in the Revision deadline field. When the process starts, additional fields Process start and Process end will be displayed here; they are filled in automatically.
This section also contains several parameters for the approval process:
-
The checkbox Notify users on final document approval – if checked, a notification e-mail will be sent to the approval process participants with the process result. The administrator for the Controlled documentation processes can set whether this option is available and the exact contents of the e-mail message.
-
Allow submission without attachments – if enabled by the administrator, it is possible to submit a form in the approval process even if it does not have a document attachment, only a text description. This method can be used when the subject of approval is not documentation but an operation or action.
-
Monitor documentation validity – if enabled by the administrator, checking this box will send a reminder when the documentation validity is nearing expiry. Enabling this option displays the field Validity end, where you can enter a date. If a date is not set, the validity is automatically set to 30 days. The process author will receive an e-mail message with a reminder shortly before the validity ends. The administrator can set the e-mail contents and the exact interval before validity end when the reminder will be sent.
Setting up the approval group
Set up the list of users who will approve the document in section Approvers. You can add users to this list one by one or use a preset group to add them all at once.
Choose a preset group from the list Select group. Click OK in the confirmation dialog and the system will add the group members in the approver table. If you do not want to use a preset group, leave the option set to User-defined path and add users to the approver list manually.
| If you are managing documentation for more than one originator, the list of groups available in the list depend on the originator selected for this document. |

You can adjust the contents of the approver table, regardless of whether it has been prefilled from a group or empty. The following options are available:
-
Adding another user to the revision group: Click
 in the Add column to add an empty row in the table. The row will be placed just below the row where you clicked the button. Enter the user’s name or a part of it in column Approvers – after the first few characters, the form will offer a list of matching names; select and confirm the required name.
 -
Removing a user: To remove a user from the list of approvers, use the
 button to delete the corresponding table row.
 -
Changing the order: In a sequential process, the order of approvers is important. Use the arrows in the Move column to adjust the order as needed.
-
The fields Role and Mandatory are copied from group settings (if a preset group was used). If the box in the Mandatory field is checked, the user is required to comment on the process. When the list of approvers is set up and edited manually, it is not possible to set this value. If the Role entry is not filled in, you can (but do not have to) add it – it describes the user’s role in the approver group.
Adding approvers during the process
If enabled by the administrator, it is possible to add more approvers even if the approval process has already started. In such cases, the ![]() buttons for adding more rows in section Approvers are still available for the process author.
buttons for adding more rows in section Approvers are still available for the process author.
The rest of the procedure depends on the approval process type:
-
If it is a parallel process, simply add more rows using the button
and enter the additional users/groups in them. Save the form. FormFlow then creates and sends copies of the form to those approvers that have not received them yet.
-
If it is a sequential approval process, new approvers can only be placed after the user who is handling the document at this point. Click
to add another row or rows (they are placed right after the row where you clicked the button) and enter the additional users or groups in them. Save the form. From that point on, the new list will be used when forwarding the form.
Inserting documents to approve
Add the documents for approval in section Document approval. You can select more than one file.

The procedure is the same as described above in chapter Inserting the documents for revision.

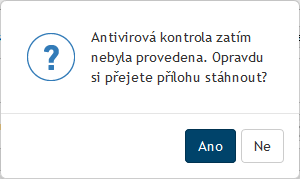
It is again recommended checking each document for viruses first.
Unlike the documentation creation processes, this form contains the button Convert to PDF. Click it to convert the inserted file to PDF form, which will be used in the approval process.
The Attachment buttons contains options to display the document in the corresponding application or save the document file on your local drive.
If an antivirus check has not completed for a document, the user will be notified about it with a query asking whether you are sure you want to handle an unchecked document.
-
The magnifying glass button
 Display attachment preview in another window displays a preview of the document contents.
The pencil button (Display metadata) displays the document metadata loaded from the document section.
The index card button (Display in DMS) opens a window displaying the document entry in the corresponding document folder.
For a better overview of the documents you can enter the Description field for each of them.
Display attachment preview in another window displays a preview of the document contents.
The pencil button (Display metadata) displays the document metadata loaded from the document section.
The index card button (Display in DMS) opens a window displaying the document entry in the corresponding document folder.
For a better overview of the documents you can enter the Description field for each of them.
To insert another file, click Insert from DMS or Insert from disk again. If there is more than one document attached, you can adjust their order similarly to the Approvers section above using arrows in the Move column.
If you have inserted a document by mistake, you can click the trash bin button (Remove attachment)to remove it from the section.
Comments and additional files
You can use the Comments section to attach a message to the form.
In section Other documents, you can attach additional files to the form to be used for reference; these files will not be included in the approval process.
Saving and submitting the form
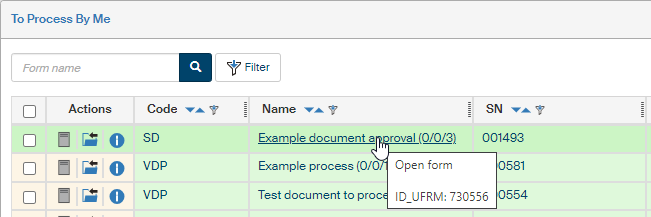
You can click Save at the lower part of the form any time during your work to save your progress. FormFlow will save all changes you have made up to that moment, and close the form. When you want to return to the form, you will find it in FormFlow in folder To Be Processed by Me.
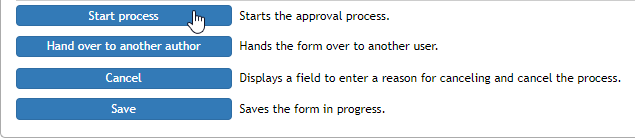
When the form is ready and contains all required details and attachments and the approver group is set up, click Start the process to run the approval workflow.
Based on the process type (parallel or sequential), the document is then forwarded either to the first person on the list or the whole approver group at once. The rest of the approval process is described in chapter The form is at the approvers.
Handing a form over to another author
Before you start the process, you can hand it over to another author. You can use this step for example when an assistant fills out the form and prepares the process for their superior. The superior then takes over the process, submits it, continues to act as its author and manages the rest of the process.
To hand over the document, click the button Hand over to another author, placed at the end of the form.

The form will display a search field to look up the new author. Select the name in field Hand over to user and click the button Hand over to user to confirm the selection.

The form will be closed, and the new user will find it in their folder To Be Processed by Me.
The form is at the approvers
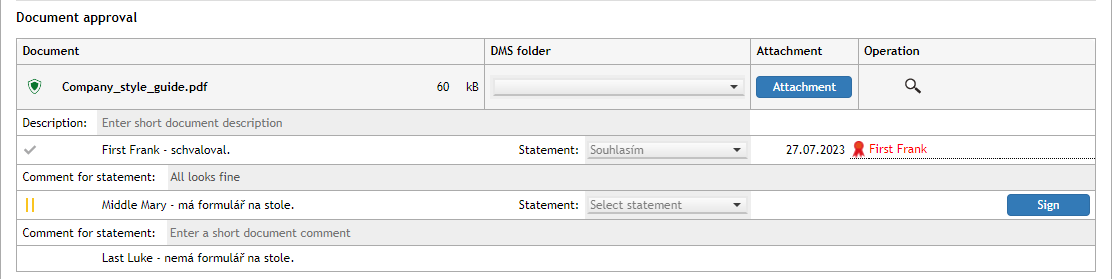
The user who received the form with a document for approval is notified by e-mail and can find the form in FormFlow in folder To Be Processed by Me. The approver can open the form, view the document and comment on it as they see fit.
The user approving the document can only edit their own entry in section Document approval, the rest of the form is only for the approver’s reference.

-
If the document is placed in a DMS folder, the Actions column displays a pencil button that will display a link to the document metadata.
-
The Attachment column contains a button to view the file in the corresponding application or download on your computer drive (for a simple preview, use the magnifying glass button)
-
Section Document approval contains a Comment to statement field for each document, where each approver can write their opinion on the document.
-
Then the approver selects one of the preset options of Statement – for example I agree or I do not agree. This statement is mandatory.
Unlike the process author, the approvers cannot see all the other process participants: in a sequential process, they can only see those who have already given their statement. In a parallel process, a separate copy of the form is created for each user, which does not display any of the other approvers.
Each approver can (but does not have to) enter their own comment to the approval process and choose to attach a reference file, which will not be included in the approval process.
Note that this process only collects statements to the documents being approved – the approvers cannot edit their contents directly.

Submitting the form to workflow again
In a sequential approval process, submit your statement by clicking Forward to next. In addition, you can choose to click Return to previous to send the form back to the user who has processed the form right before you – for example if you find their comment incomplete.
In a parallel process, simply click Confirm statement to submit your statement. The form will be closed and sent back to FormFlow.
If you do not want to submit the form yet, you can click Save to keep your progress so far. The form will stay on your desk, and you can return to it later.
Marking the approval process
During the approval process, form lists in FormFlow display a group of numbers next to the form name, marking the progress of the process. The marking pattern depends on the process type: whether it is a sequential or parallel process.

Document processing
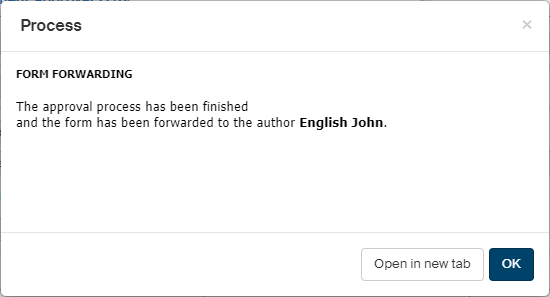
When the approval process passes through all the users in the list, the form returns to the author. The author can also choose to end the approval process early by opening the form and clicking End parallel process or Take over.

The last approver clicks Forward to next (in a sequential process) to submit the form back to the author.
The Document approval section now contains the entry Final approval. The final statement in the Statement field depends on the statements of previous approvers. If all the previous approvers' statements are positive, or they abstained, the final statement is also positive.
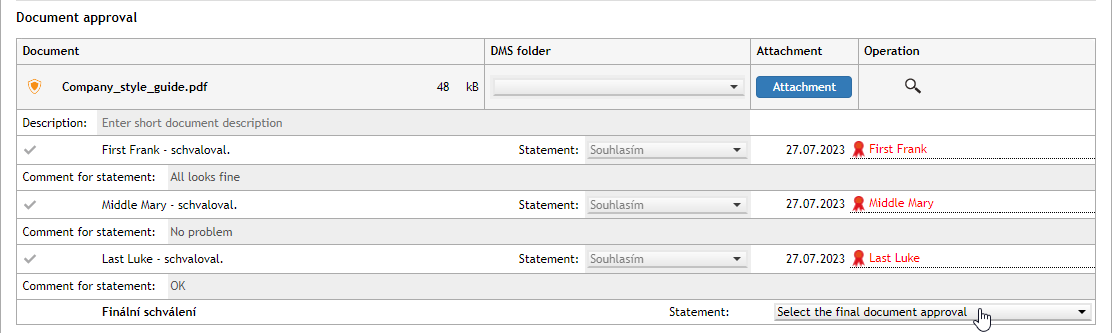
If one of the previous approvers has given a negative statement, the document will be rejected.
The approval process ends when the final version is saved to the archive. Click Finish process to archive the document, either approved or rejected, and the process is complete.
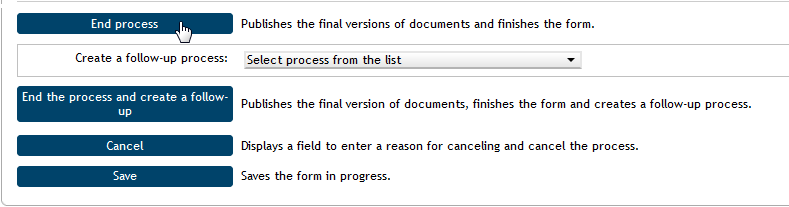
If it is convenient, you can create a follow-up process (e.g. a distribution) along with the archiving, and the recently approved document will be used in the new process. In such a case, click Create follow-up process, select the process in field Create follow-up process and then use the option For user to select the user who will be handed the new process. Then click Finish process and create follow-up process.

The document will be archived and at the same time a new form will be opened for the selected process.

To make lists clearer, process result is displayed in the list of archived documents using colored form icons:
-
 green is used for approved processes.
 -
 red for rejected processes, which means approval processes interrupted by the initiator.
 -
 gray is used for forms in progress.