Connection and synchronization using Entra ID
Creating a new connection
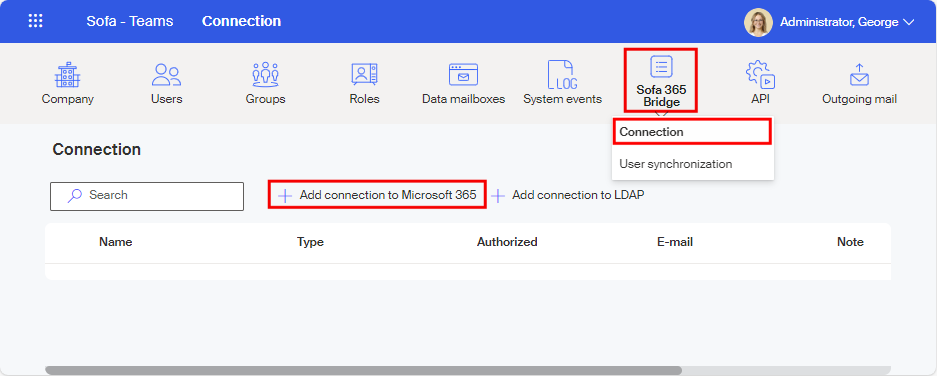
Log in to Sofa as an administrator, open the Administration window and select Sofa 365 Bridge. In the menu that opens, select Connection.
In the toolbar of the Connection window, click + Add connection to Microsoft 365.
| The Add connection to LDAP button might be hidden, it depends on Sofa settings made by Software602. |
The New connection window opens. Fill in all mandatory details. The most important are the following two fields:
-
Paste the ID you have copied in Microsoft Entra admin center window to the Tenant ID field. (See chapter How to get organization’s Tenant ID.)
-
In Type, select the Microsoft Entra ID (Azure AD) option.
Only one connection of this type can be created in Sofa. If you already have a connection of this type, this option is not available. To create a new connection to Microsoft Entra in such a case, remove the existing connection first.
Specify the other fields as you need:
-
In Name, enter the connection name that will be used when displaying the connection in lists.
-
The default Identifier is created from the Name, but you can adjust it to a preferred string.
Both these entries are used internally in Sofa and do not need to be unique. -
You can also enter any optional description in the Note field.
Select Save connection to confirm the settings.
The next step is verifying that you can connect to the remote company using the Tenant ID. If there is an issue, an error message is displayed (in this example, a non-existent Tenant ID has been entered).
The error description includes additional information, which is generally intended for Microsoft support and is not covered by this documentation. But if the error is "only" a wrong Tenant ID, the best approach would be to remove the whole connection setting and create a new one, with the correct ID.
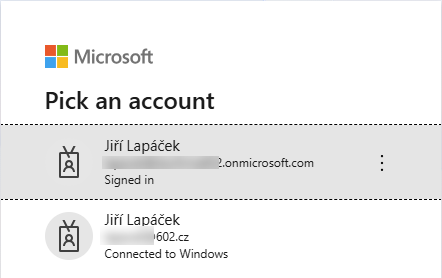
If the entered Tenant ID was found valid, you also need to be logged in to the corresponding company as its user under a Microsoft account with a global administrator’s permissions.
For the Sofa app to be successfully authorized, it needs access to some of the organization’s resources for the current user. Confirm the consent on behalf of the organization in the Permissions requested dialog. The permissions are the following:
-
Have access to the data to which the organization gives access.
-
Have ability to sign in to the organization and have access to the profiles of its users.
-
Read the details on the structure of the organization’s users and their groups.
Check the box Consent on behalf of your organization and select Accept to confirm the permissions. This will give the Sofa app access to the listed resources for all users in your organization; they do not need to confirm it each for themselves.
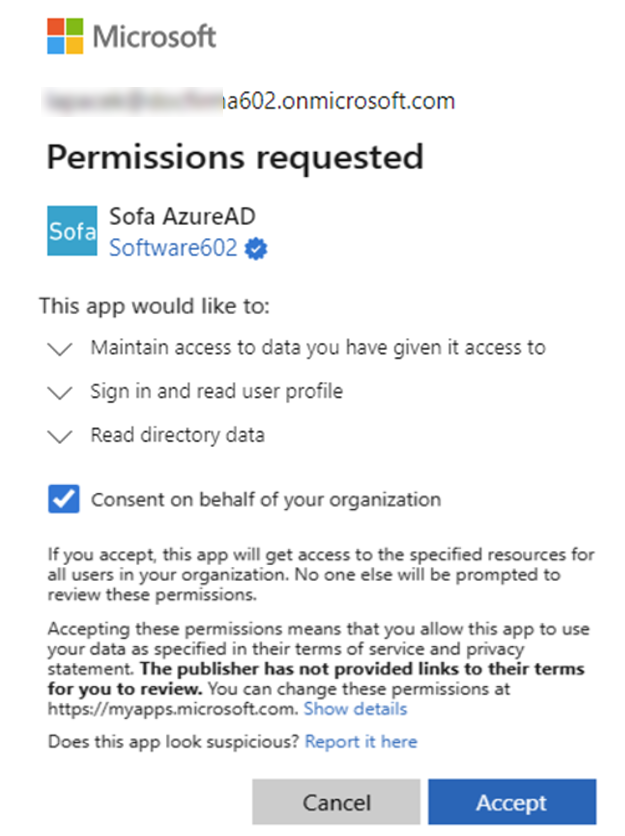
| This dialog is only displayed if some of the permissions are missing for the organization. This means primarily the first authorization, when all of them are missing, and also later, if any of the permissions is missing for some reason. |
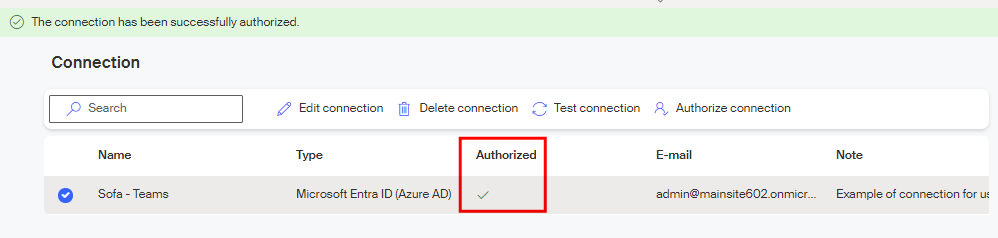
The connection is then authorized and saved. Its entry is displayed on the list in the Connection window. Successful authorization is announced by the message The connection has been successfully authorized in a green frame and also by a green checkmark indicator in the Authorized column.
Editing the Microsoft Entra ID connection
Click on a connection entry with the mouse to select it (a circle with a checkmark) and a toolbar with buttons is displayed in the upper part of the window to provide various maintenance actions.

Editing some of the connection parameters
You can edit some of the parameters for a selected connection. Click Edit connection to open a window similar to the New connection window. The entries are identical, but only the Name and Note can be edited.
The values of Identifier and Tenant ID are read only, and the connection type cannot be changed either. If needed, you can only remove the whole connection and create a new one.
Deleting a connection
To delete a whole connection entry and remove it from the list of connections, use the button Delete connection.
Confirm the query Are you sure you want to delete the connection?, then the connection entry will be removed from the list and the connection deleted.
| All linked synchronizations must be removed from the connection before deletion. Otherwise, the deletion fails and the corresponding error message in a red frame is displayed instead: Failed to delete the connection. |
Testing a connection
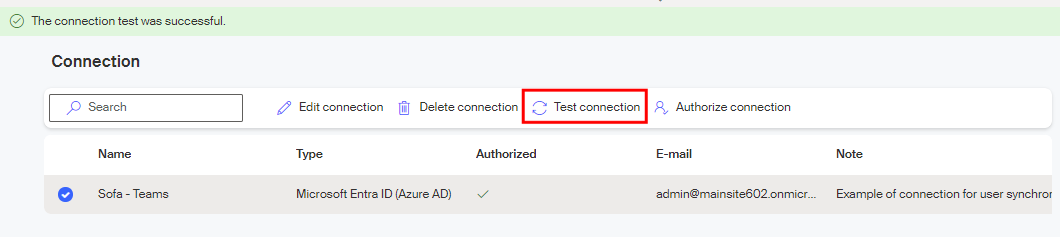
To check that an existing connection is set up correctly, click Test connection on the toolbar.
A successful test is announced by the message The connection test was successful in a green frame.
If the connection test fails, a message such as Failed to authorize the connection is displayed in the upper part of the window.

The reason for failure is included in the error message. One of the possible reasons for failure is that the user is not correctly logged in at the moment.
Authorizing a connection
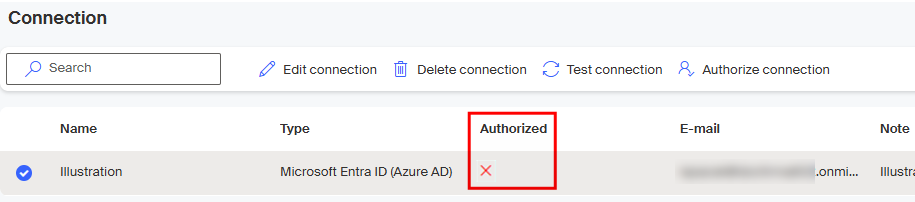
If the connection is not currently authorized, the Authorized column displays a red cross icon.
In that case you will need to authorize the connection manually. Select Authorize connection on the toolbar. The authorization process for the current user of the remote company is run again. A check of the user’s Microsoft account settings or login might be required. The result is displayed in an information strip in the upper part of the window.

User synchronization
When a connection is created and authorized, it can be used to synchronize the organization’s users through Entra ID (Azure AD) with Sofa.
Sofa allows setting up synchronization of users and groups from various sources. The synchronization service takes care of all operations related to synchronizing the identity data between the local environment and Microsoft Entra (in this case, Microsoft Entra ID).
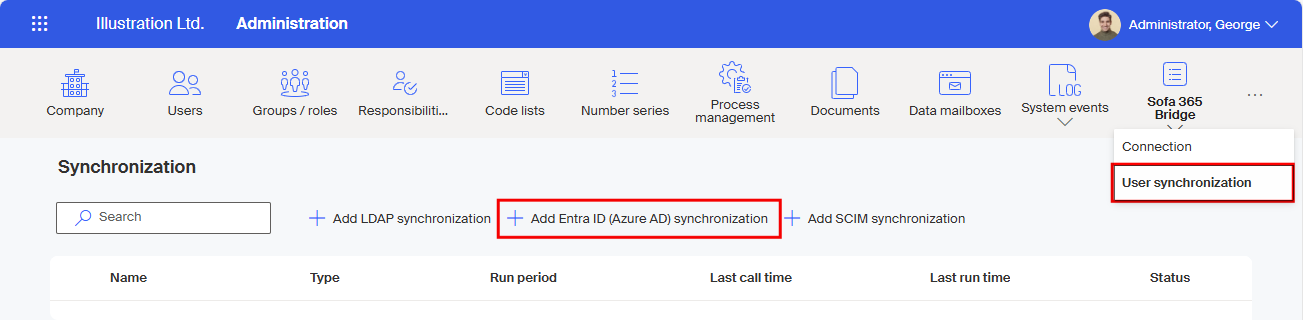
Synchronization settings are available from the Administration window by clicking the Sofa 365 Bridge button and selecting User synchronization.
The Synchronization window lists all existing synchronizations (if there are any).
Creating a new synchronization
To create a new synchronization, the Synchronization window provides the button + Add Entra ID (Azure AD) synchronization.
Select the button to open the New synchronization window, which is composed of several tabs. Select a tab title to switch between them.
The tabs also contain buttons in the lower part to move to the next or previous tab and a button to save the entered details.
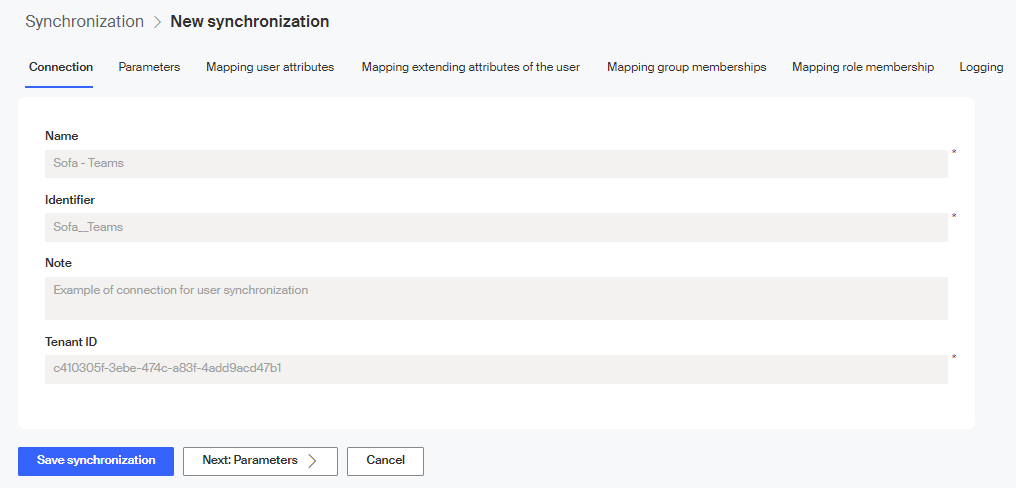
Connection overview
The Connection tab displays details from the settings from creating the connection (see chapter Creating a new connection). They are the connection name and identifier, a note and the tenant ID. Details on this tab are read-only, displayed for your reference – this connection will be used for the new synchronization.
| The Tenant ID term is explained in chapter Key concepts. |
| If the other tabs are not available, the connection is probably not authorized or tested (see chapter Editing the Microsoft Entra ID connection. |
Select Next: Parameters> to continue to the next tab.
Parameter settings
Use the Parameters tab to set up the synchronization parameters.
-
Enter a unique name for the synchronization in the Name field; this field is mandatory. The name will be used with the synchronization entry in the list of synchronizations. The name is only used internally in Sofa.
You can create more than one synchronization, but only one can be active at a time. -
The string entered in Identifier is automatically generated based on the Name, but you can edit it.
-
You can enter any text in the Description field to describe the purpose of the synchronization. This text is optional and intended for the administrator’s overview and information.
-
To synchronize users at all, they need to be added to a group (or more groups). In the field Remote groups whose members will be synchronized, select groups of users from the remote company in Microsoft Entra, whose members will be synchronized to Sofa as its users. Click the field to display the list of remote groups of the selected tenant. You can select more than one item from the list.
Members of subgroups will not be included. If a selected group contains groups, the members of the subgroups will not be automatically synchronized. To synchronize a subgroup, add it separately. -
Use the Run period section to set when to run the synchronization process. When setting up the run period, consider how often Microsoft Entra ID settings change and how fast the users need to be updated.
In Time, set the hour and minute when to run the synchronization, and check the boxes for the days of the week when to apply this setting. To set up a more complex synchronization schedule, click Add a row to insert another set of controls. -
If you keep the Enable synchronization box checked, the synchronization will run as scheduled. The schedule will be active as soon as the synchronization is saved.
-
Check Send an e-mail if synchronization fails to enable a notification e-mail if the scheduled synchronization fails. The reason for failure can be for example a connection error. The notification will be sent to Sofa users in Administrator and Subject manager roles, regardless whether the synchronization was run manually or automatically.
-
If Send e-mail to new users is checked, a welcome message will be sent to the e-mail address of users newly created by the synchronization.
-
If Send a link for setting the password to new users is checked, a link to their password will be sent to the e-mail address of users newly created by the synchronization. Only use this option if you want users to log in to Sofa using a name and a password. If you want users to only log in using SSO (Single Sign On), do not check this field. In general, we recommend not to check, which will allow combining local and Microsoft-Entra-based user authentication.
-
To remove already existing synchronized user accounts in Sofa when activating a new account, check Disable Sofa accounts that used to be synchronized. This only applies to synchronized accounts in Sofa; if a previously synchronized user from a group in Microsoft Entra is removed, the account will be automatically disabled. Manually created users are not disabled this way.
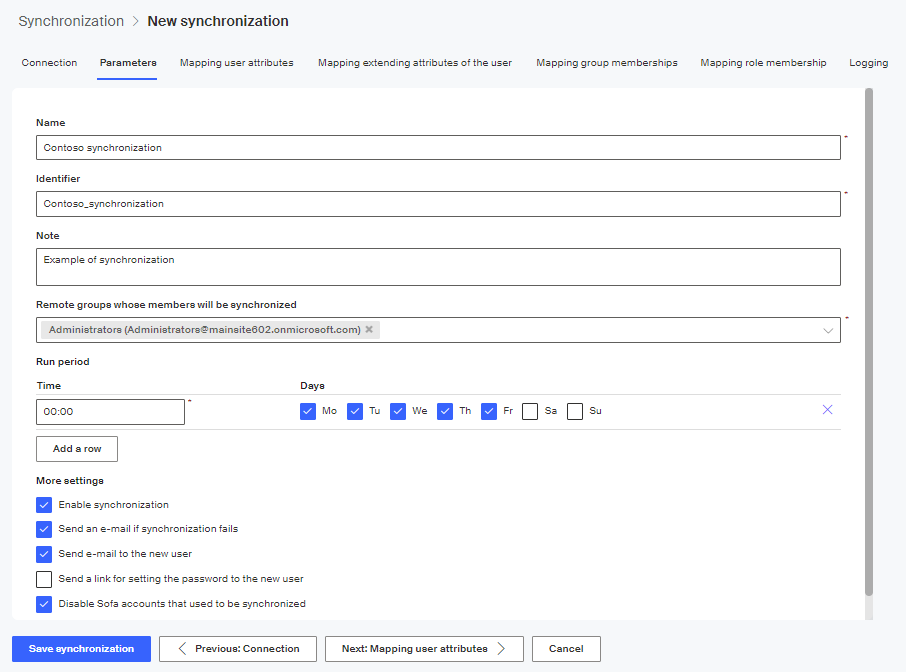
Select Next: Mapping user attributes> to continue to the next tab.
Setting up user attribute mapping
The tab Mapping user attributes is used to create a schema for mapping entries that describe a synchronized user with entries that describe the user in Sofa.
To create a user correctly, only the following need to be mapped:
-
User name – map to the Mail attribute.
-
Name – map to GivenName.
-
Surname – map to Surname.
To use SSO (Single Sign On), the following need to be mapped:
-
ADFS Ident – map to Id.
To use Signer with SSO login, the following needs to be mapped:
-
Fixed AD ID – map to OnPremisesImmutableId.
The other attributes do not need to be mapped to Sofa; you can map them as you see fit. These attributes can be used for example in user lists or in some processes.
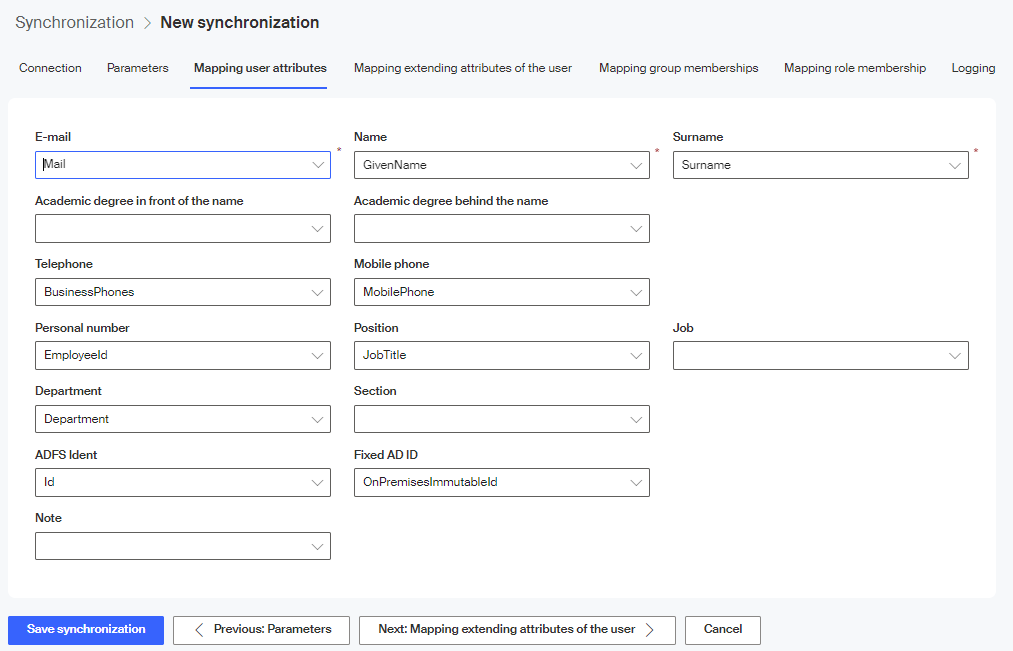
Select Next: Mapping extending attributes of the user> to continue to the next tab.
Setting up the mapping for extending user attributes
The Mapping extending attributes of the user tab can be used to map up to fifteen additional user-defined (extending) user attributes, which are not included on the previous tab.
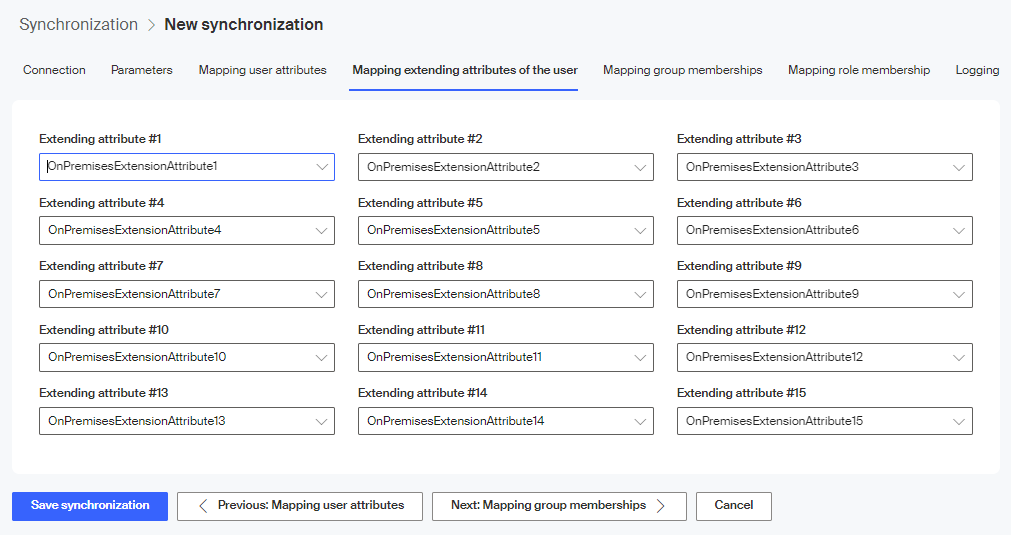
| All these attributes are optional. |
Select Next: Mapping group memberships> to continue to the next tab.
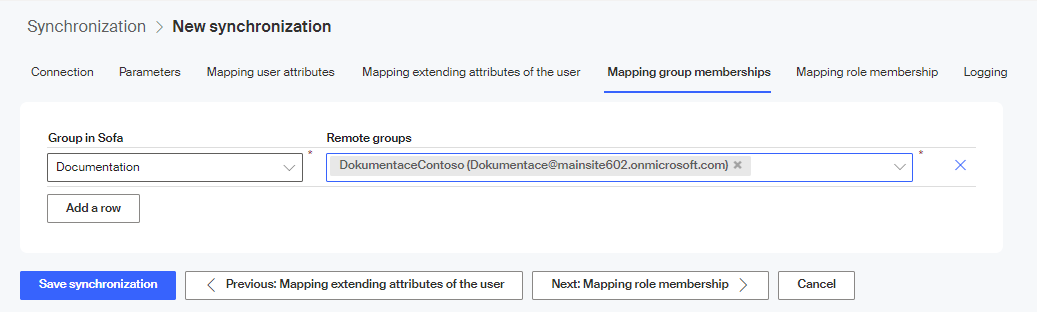
Setting up group membership mapping
The tab Mapping group memberships is used for mapping groups from the remote (external) company described in Microsoft Entra to groups in Sofa. Select the groups using the options Group in Sofa and Remote groups.
To map more than one group, click the button Add a row to open more option pairs.
This mapping is optional and can be used to distinguish process groups.
Select Next: Mapping role memberships> to continue to the next tab.
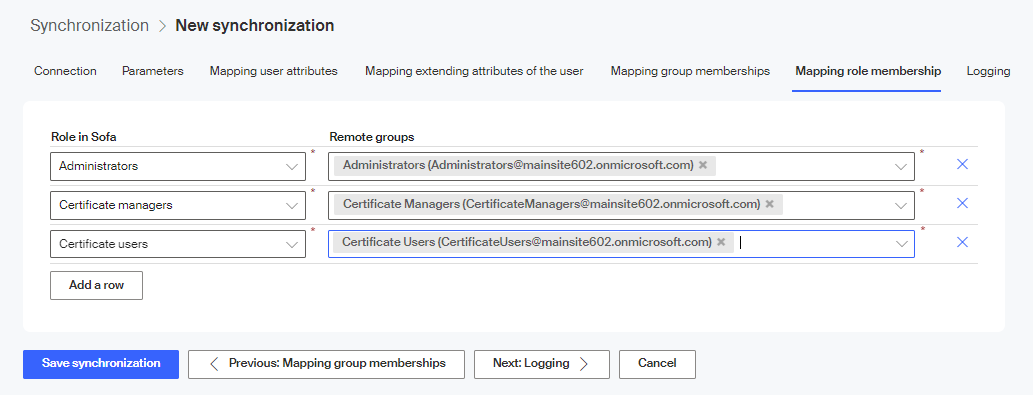
Setting up role membership mapping
The tab Mapping role membership is used to map roles in Sofa to users in remote (external) company groups.
Roles are important in Sofa for example when using or managing certificates. If synchronized users need to use certificates in Sofa, you need to create a suitable Microsoft Entra group, assign the users to it and map the group to a matching Sofa role (Certificate users). The same procedure can be applied for other roles, such as Certificate managers or Administrators.
Generally speaking, you can, but not need to, use the same group as when selecting the group to synchronize on the Parameters tab. You can also map more than one Microsoft Entra group to a single role.
Select the entries to map using the options Role in Sofa and Remote groups. To map more than one role, click the button Add a row to open more option pairs.
Roles that need to be filled:
-
Administrators.
-
Certificate managers.
-
Certificate users.
Mapping other roles is optional and you can choose to fill them or leave them empty based on Sofa features and settings.
Select Next: Logging> to continue to the next tab.
Logging level setting
The Logging tab is used to set up how much information is logged during synchronization. In Logging level, select one of the levels Debug (debugging data), Information and Warning.
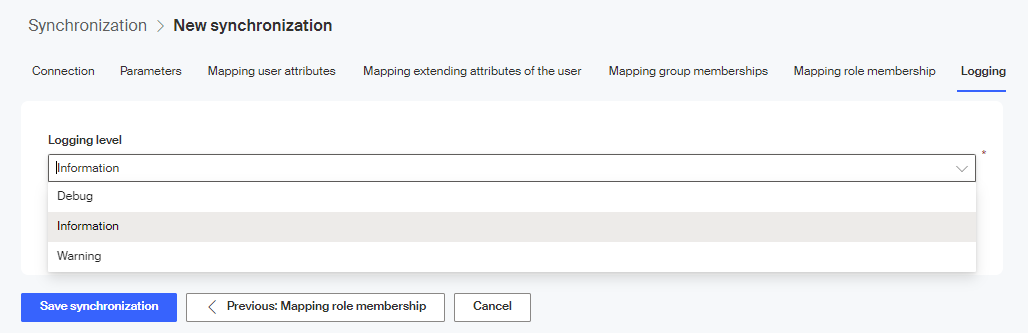
-
Warning is the lowest logging level – only warnings, errors and critical errors will be logged.
-
Information is the medium logging level – information, warnings, errors and critical errors will be logged.
-
Debug is the highest logging level – all previous messages are logged in addition to debugging information. It is used as a basis to solve issues.
Running the synchronization
Running the synchronization manually
We recommend testing the created synchronization by running it manually. Click Run synchronization on the toolbar.

Confirm the query in the Run synchronization window.
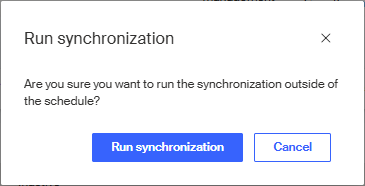
A green strip with the message The synchronization has been started is displayed.

The synchronization process itself takes a few moments. If you refresh the browser window after a while, you should see the date and time the synchronization was run in the Last run time column, along with the note manual, because the synchronization was run manually. The Status window should display Finished along with the number of synchronized users.
If the window says that the process is currently running and displays the number of already synchronized users, you will need to wait a little more for the synchronization to complete and refresh the window later.
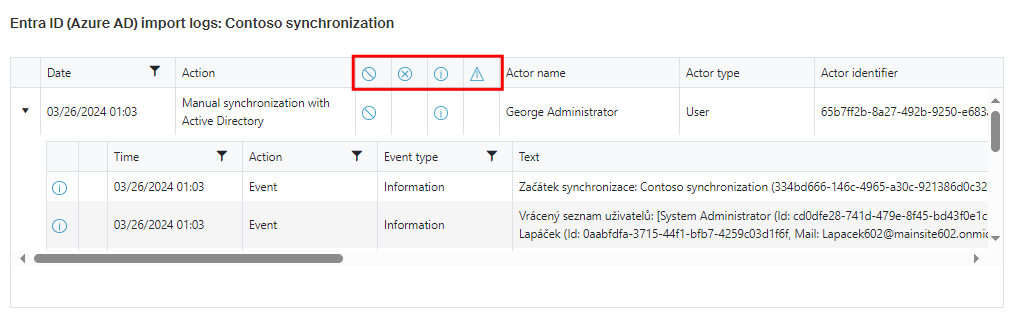
The synchronization result is also available in the log, which you can open with the toolbar button Display the logs.

Each logged operation is written to a separate row, starting with the date and time it was run.
|
If you have set up notifications on the Parameters tab (checked field Send an e-mail if synchronization fails), you will be notified by e-mail when any of the synchronization tasks fails. |
| A typical synchronization process failure is a situation when the synchronized users are in more than one company. Such duplication is not allowed. |
Running the synchronization automatically
The synchronization will be run automatically in the time interval you have set during synchronization parameter setup – see chapter Parameter settings.

A record of the synchronization run is available in the Synchronization window in column Last run time. THe column lists the date and time of the latest synchronization run and the note "automatically".
| When the synchronization is set up, the synchronized users can log in to Sofa using their Microsoft Entra account. |
Synchronization result
The synchronization result is an import of remote users' data to Sofa. You can tell at first glance that the synchronization was successful, if you open the Company window (by selecting Administration> Company). The value of the Number of users parameter has increased by the synchronized users.
The list of individual users is available in the Users window (Administration> Users).
Editing the synchronization settings
Select an entry in the list of synchronization settings to display a toolbar and use its buttons to edit the synchronization details.

-
Click Edit synchronization to open a window where you can edit the properties of the selected synchronization. The window consists of seven tabs, just like the New synchronization window. Use the tabs to edit or add the synchronization parameters.
-
You can click Delete synchronization to completely remove the whole synchronization setup. You will need to confirm the deletion in the following dialog with the query Are you sure you want to delete the synchronization?
-
Or you can click Disable synchronization to stop the selected synchronization from running temporarily, without deletion. After you confirm the query Are you sure you want to disable the synchronization?, the Run period column displays Inactive.
-
The button Disable synchronization changes to Enable synchronization for this entry. You can use it later to enable the synchronization again.