Signing documents with HR SignPoint
The HR SignPoint process is designed for an employee to sign personnel documents, have them confirmed by the employer and then store them in the DMS.
| The difference between the SignPoint and HR SignPoint processes is that documents signed with SignPoint are stored in DMS in the Signed files folder, while documents signed with HR SignPoint are stored in the HR documents folder. |
The process is primarily a tool for human resources (HR) staff who use it to sign any HR documents with an employee (an employment contract, compensation agreement, contract amendment, etc.). The difference from HR Document insertion is that HR SignPoint can be used to sign several documents (up to 20) together, on the same signature path.
The process author, in the HR role, selects the documents to sign (between 1 and 20), sets up the process parameters and specifies the signature path. The document(s) must be signed by at least one employer representative, they must be signed by the employee, and the process is completed by an employee in an HR manager role who archives the process.
The author can choose to include additional signers or approvers representing the employer (director, payroll accountant, etc.) in the signature path. The order in which they sign can be set by the process author.
| Keep in mind that in this process, only a single employee signs the document; the other signers (approvers) represent the employer. |
| The process author can use extended setting options to specify the signing method: Bank ID, SMS or a signature certificate, but can also leave the choice to the employee. |
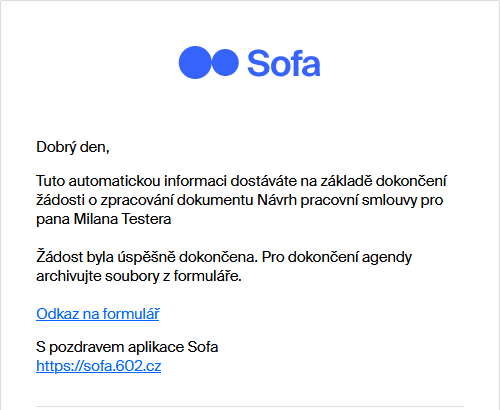
As the last step, an employee in the HR manager role archives the signed and approved documents. The documents are stored in the DMS in Sofa and, based on the process settings, also in the employee’s personal folder. The signed documents are always sent to the employee’s private (!) email address.
| The following description and illustration are based on the default configuration parameter settings. |
Running HR SignPoint
The HR manager (process author) opens the form from the view Processes – Submit using the large HR – SignPoint button.
You can also open the process from a specific document in Sofa DMS or from the 365 Bridge in Word, Excel or Outlook. After selecting a document, click Start a process on the toolbar (or run the same command from the menu opened by clicking the three-dot button). In the following window, click the large HR SignPoint button (see the image above).

You can also run HR – SignPoint from a Sofa app on your smartphone.
| This chapter describes using HR SignPoint in its basic (simplest) form, which will be its most common use. The process has a number of alternative settings and extension options. |
Process form
Any of the above described methods opens the form for the HR SignPoint process, where you need to specify who will be asked to sign which document, and how.
The form consists of several sections separated by horizontal lines. There is a switch on the left of most section titles, which you can use to either display or hide the section contents; when hidden, only the title is visible. The default display depends on Sofa installation settings. Visibility of individual sections can be adjusted.
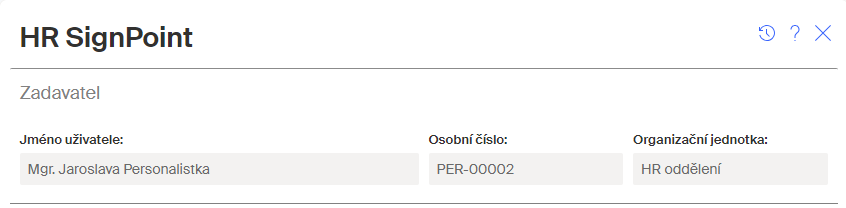
Process author
Documents specified in the form are then signed by users on the so-called signature path. We use the word participant for the users who are included in this signature path.
The author is the participant who fills in the form and creates the signature path. When the documents are signed (and approved), the process is finished (archived) by a participant in the HR manager role.
The Author section gives the details of the author (current Sofa user) – their name and surname, personal number and organizational unit. These details cannot be edited.
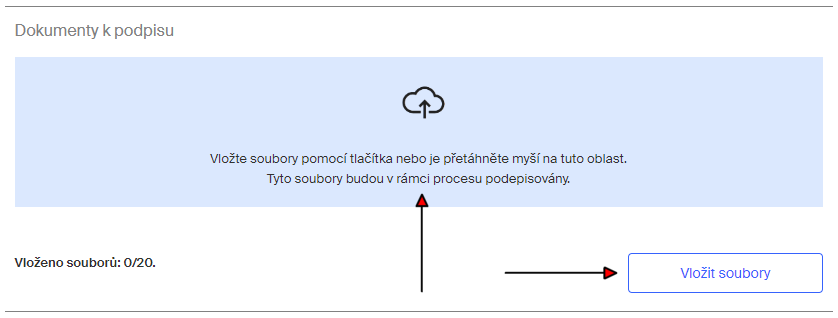
Signed documents
Using one of the following methods, insert the documents to sign in the form in the Documents to sign section:
-
With the Insert files button. The button opens the standard file selection dialog.
-
By dragging the file (or several files) item from another window of a file manager (File Explorer, Total Commander, etc.) to the highlighted area in the section.
-
In the Sofa document system, you can open the Start process command on the document and select HR SignPoint.
|
Only documents in the PDF format can be signed this way. You can choose to sign other file types (for example from Microsoft Office apps). HR SignPoint will try to convert them to PDF. If conversion is not supported for a file type, a message is displayed and the file cannot be placed in the form. When requesting a conversion, keep in mind that it might take longer – the time depends on the type and size of the document being converted. If the document fails to convert, an error message is displayed. Such a file will not be placed in the form. 
|
If the process has been run from the DMS on a specific file, the file is attached to the form automatically and you can see it immediately in the Documents to sign section. You can add more files here.
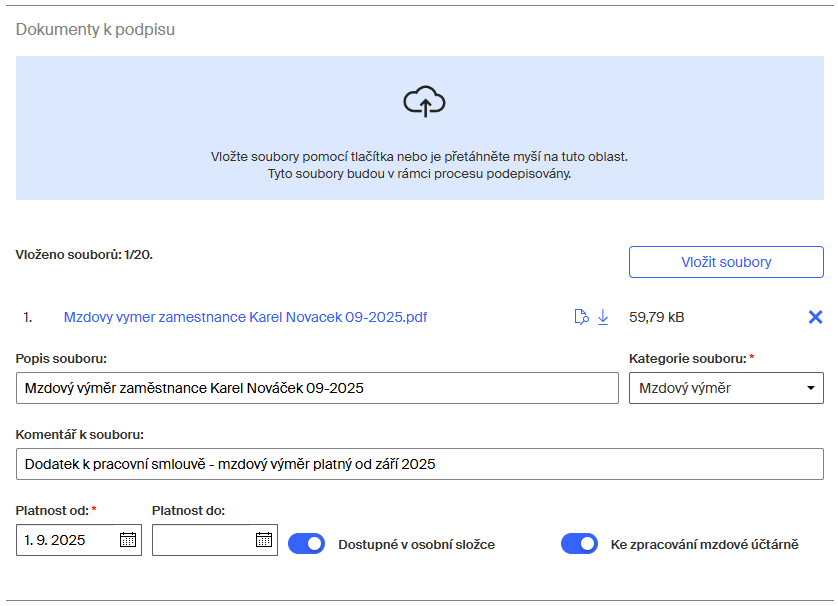
The form can contain up to twenty files – see the Inserted files indicator. The total file size is limited to roughly 105 MB.
| If the file is not in PDF format and will be converted first, keep in mind that the resulting file will have a different size from the original. |
You can add a short description of each file to be signed in the File description field. The file name of the attached document (without the extension) is used by default, but you can edit it to any text. The field is optional.
To better categorize the document, select one of the preset attributes in File category. The field is mandatory.
| The options are loaded from the sys_enum_hr_document_types list (HR – Document types). |
You can optionally add a note or comment in the File comment field.
A document validity needs to be set. The validity start date – Valid from – is mandatory. If no Valid until is set, the document validity will be unlimited.
If you enable the Available in the personal file switch, the signed document will be placed in the personal files of all participants when the process is finished.
If you enable To be processed by payroll, the metadata item Processed by payroll will be set to No. This metadata is used by the payroll accountant to filter out documents waiting to be processed. After processing, the payroll accountant changes this metadata to yes. If the switch stays off (greyed out), the not relevant value is written in the metadata.
More notes for working with documents:
-
Would you like to add another file? Repeat the above steps (using the Insert files button or drag and drop).
-
Do you need to check whether the attached document is the one you want to send out for signing? Load it in the preview window (with the
 button) or download it on your drive (with the
  button).
 -
Is it not the document you wanted? Delete it with the
 button and replace by another.
General details for all the documents
Enter the general information related to all the documents to sign in the Document details section.
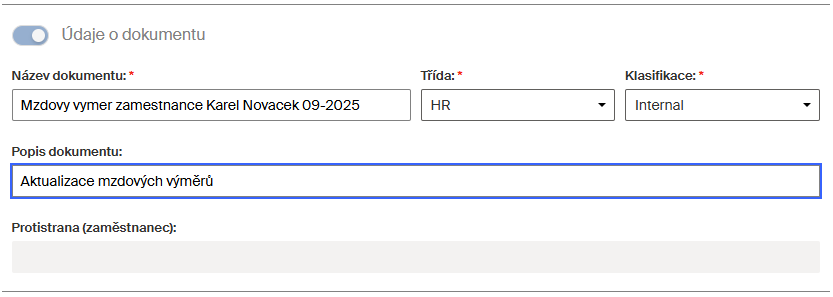
The Document name field is prefilled by the name of the first attached document without the extension. You can edit it to any text. The field is mandatory.
In Document description, enter the description (explanation, comment…) for this transaction. The field is optional.
Using the mandatory fields Class and Rank, enter the class and rank for the document; they will be used to create document metadata when saving them to the DMS.
The read-only field Counterparty (employee) is filled when the employee to sign the document is specified in the Approval and signing section. Then this field contains the employee’s name (and cannot be edited).
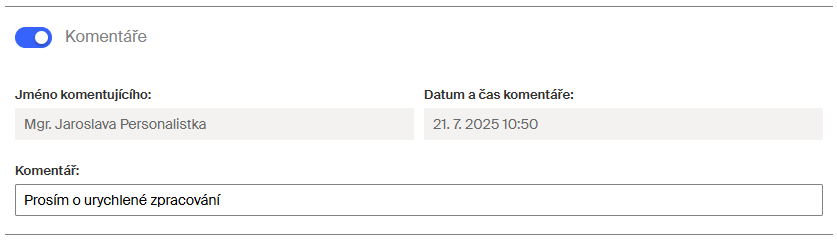
Comments
The Comments section of the form is typically displayed collapsed. After expanding it with the Comments switch, you can enter any text note in it, which will be accompanied by your name and the date and time of submitting.
Signature path
The signature path is the list of users who will sign and/or approve the document(s). Users on the signature path are called participants.
| To finish the process successfully, all signers must sign and all approvers must approve all the documents. |
Add the individual signing (approving) participants in the Approval and signing section.
We will describe how to create a signature path using an example in the next chapter.
| The example does not include the options of changing the order of signers and approvers. |
An example of using HR SignPoint
Let us show a complete example of the simplest use of the process including the signature path setup.
Based on the instructions in the previous chapters, the author fills out the form up to the Approval and signing section. Then continue as follows.
The first participant signs the documents on behalf of the employer
The first participant on our example signature path will be a signing employer representative.
The*1. participant – employer* section, in the User name field lists the process author – the HR worker. You can delete the name from the field, click in the field to open a list and select another participant, who will represent the employer on this signature path (for example the department manager, company director, etc.).
The participant role is set to Signer by default; you can change it to Approver (only approves and does not sign).
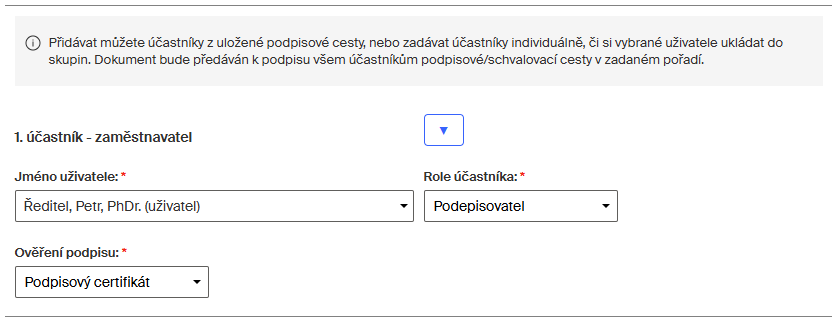
Then select in Signature validation, which signing method the employer representative will use – whether a signature certificate, SMS or Bank ID. If you select signing using SMS, enter the phone number where to send the verification message in the Telephone field.
| Some documents require that the employer signature meets at least the advanced signature level, and the recommended standard is a qualified signature. |
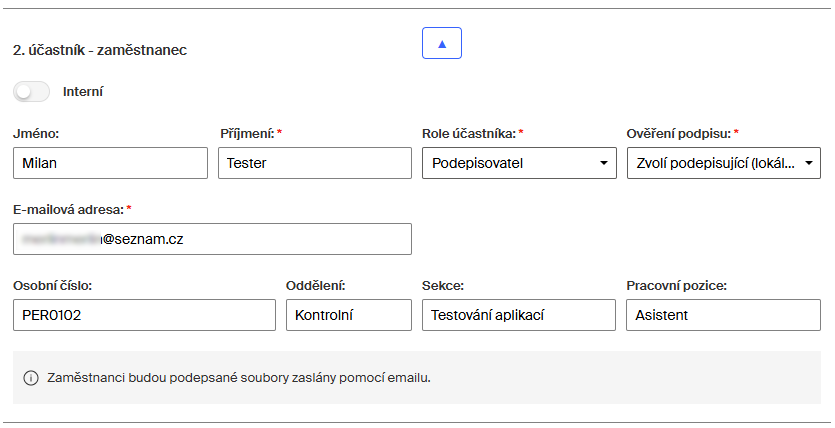
The second participant is the signing employee
The next section is 2. participant – employee. In this section, select the employee for whom this process is intended (for example who is asked to sign a new compensation agreement) and select their signing method.
The signing employee may be an internal user (is created by an administrator in the organization in Sofa) or external (outside the organization).
Steps for an internal employee
First, let us show how to enter the details of an internal employee.
|
For this process to run, the signing user must have consented to electronic communication. (An administrator can set this detail in the user editin window ( click the user name) by checking Consent to electronic communication). Otherwise a warning is displayed and the process cannot continue. 
|
In this example we presume that it is an internal participant, an employee of the organization – the Internal switch is enabled (not greyed out).
In User name, select the name of the employee.
In Participant role, you can select between the signer and approver role.
|
The role means the user’s role on the signing path, different from a role as in Sofa administration. The difference between approver and signer is that:
|
Let us assume that it is a compensation agreement that needs to be signed by a representative of the employer and by the employee.
Use the Signature validation field (only available for the Signer role; the Approve does not sign anything) to set the authentication method (a signature certificate, an SMS message to the employee’s phone or identification by their bank (BankID). If you set it to Guest select, the employee will be able to choose which authentication method they prefer.

The data in the following (grey) fields fills out automatically based on the employee’s stored data.
| Keep in mind that the documents must be sent to the employee’s personal account – that is why the address is explicitly labeled Private email. The same applies to the user’s data box, if it is specified – the Personal data box field displays the ID of the employee’s private data box, if they have one. |
If the selected method is SMS or Guest select, a Telephone field is added to the form with the private mobile phone number where messages for signature authentication will be sent. If there is no private telephone number specified in the user’s contact details, this signing method cannot be used.

If a new user is supposed to sign with a signature certificate but doesn’t have any yet, they can request it during the signing in the Signature properties settings. They will immediately receive a commercial signature certificate from the SignMaster CA authority and can continue with the process right away.

The third participant archives the process
The third signature path participant is an employer’s representative who archives the process when it’s finished.
The name is listed in User name in section 3. participant – HR manager. The participant must be assigned (within the process) the role of HR manager.
The process author is prefilled by default; you can delete the name and select another user from the list.
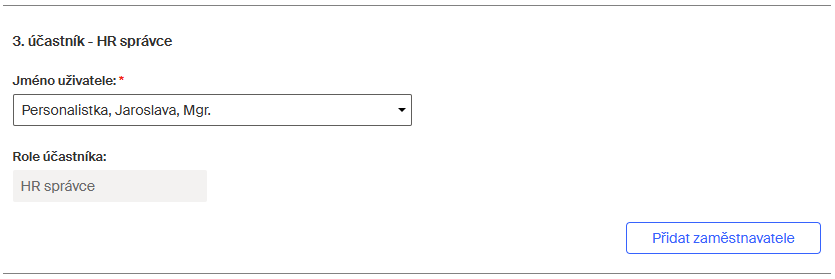
Click Add employer to insert more employer representatives to sign or approve. You can adjust their order on the signature path using the arrow buttons.
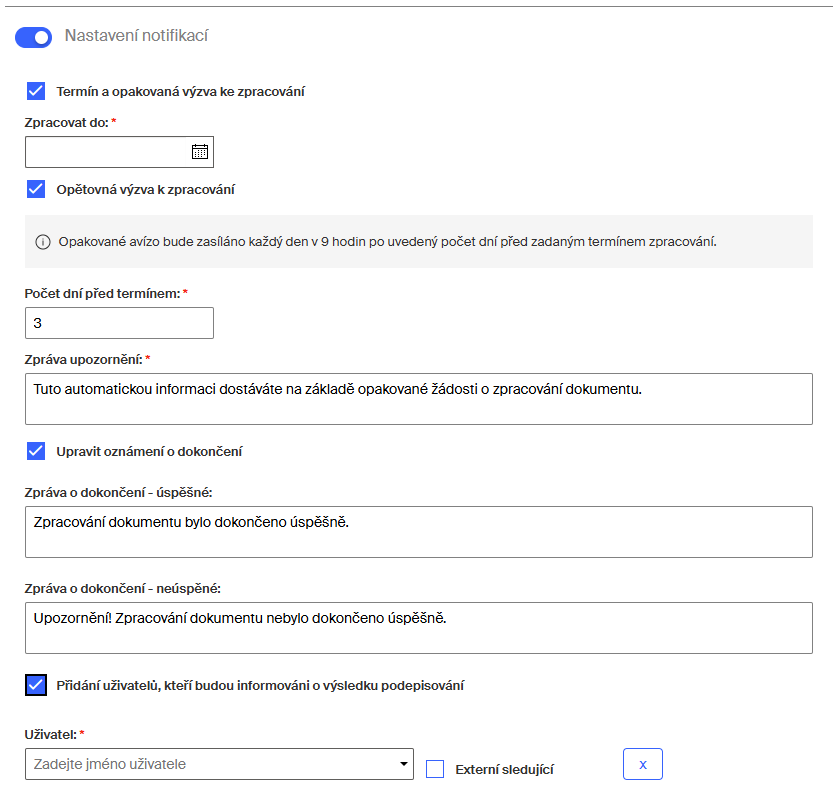
Notification settings
The last section of the form – Notification settings – contains three checkboxes with which you can adjust how to submit the form.

The parameters in this section are optional. The section is collapsed by default; use the switch next to the section name to expand it.
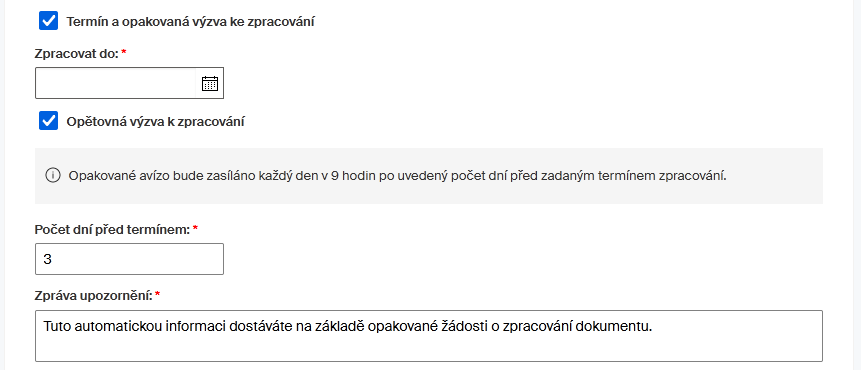
The processing deadline and repeated call to sign
Check Deadline and repeated call to process to enable the following two settings:
Specify the date until when the whole form workflow should complete. Set it in the Process before field.
Check Repeated call to process to specify what the form will do if the workflow does not complete by a specific time before the deadline. The signature path participants who have not signed the documents yet will be notified by email.
The repeated notification will be sent every day at 9 AM for the specified number of days before the document signature deadline. Set the number of days before deadline to send the notifications in the Number of days before deadline field.
You can edit the message body for the notification email in the Notification message field.
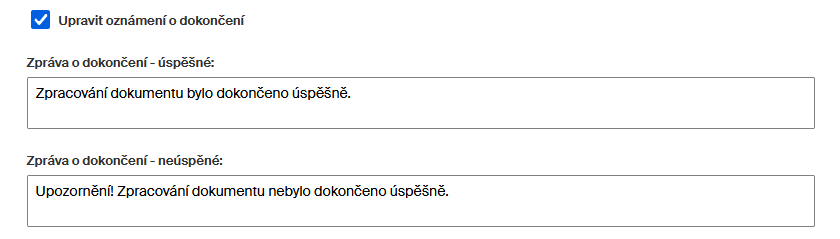
Editing the notifications on finishing the process
Check Edit the completion notification to edit the text that will be used as the notification email body:
-
In Message on completion – successful, enter the notification email text to send if the process ended by successfully signing the documents.
-
In Message on completion – unsuccessful, enter the notification email text to send if the process was unsuccessful.
Adding users to be informed about the signing progress
To send email notifications on the progress of signing to other users who are not the signature path participants, check Add users to inform about the signing progress.
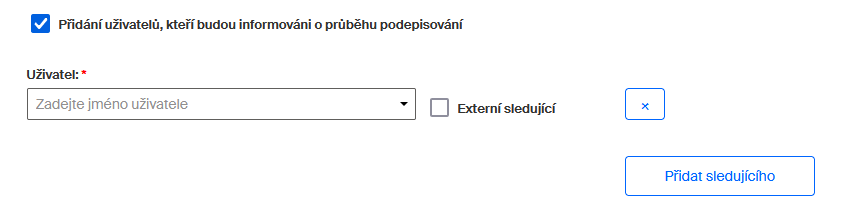
Select the users the same way as you selected the signature path participants; the options again include adding an external follower who will receive the information on process completion at a specified email address.
| These users only receive progress notifications, but not links to any documents! |
Process start
To start the process and send the form to the signature path, click Sign and start.

| Let us continue with the signature path set up in the previous chapters. |
The first participant – author (on the employer’s behalf)
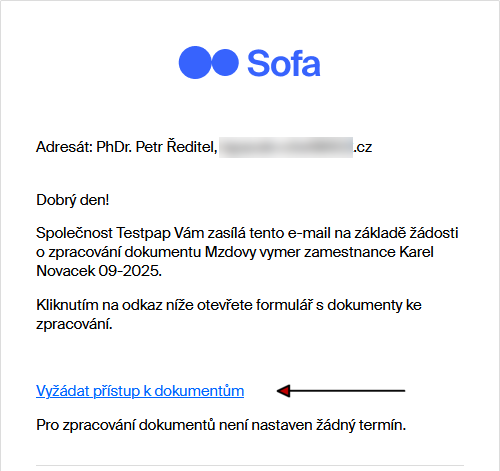
The first signer (the first signature path participant) here will be an employer’s representative. The representative receives an email notification of the signature. They can access the documents using a link in the notification or (if logged in to Sofa) from the Processes – To process view.
The signing itself proceeds in the same way as any other signing in v Sofa. If signing using a certificate is set, the signer selects the certificate from the list and verifies the transaction by entering its PIN.
Then the signer specifies where to place the signature in the documents, confirms the selection and the documents are signed. The first participant’s signature is now complete. The form display changes to "read only" and the first participant can close it.
The second participant – employee
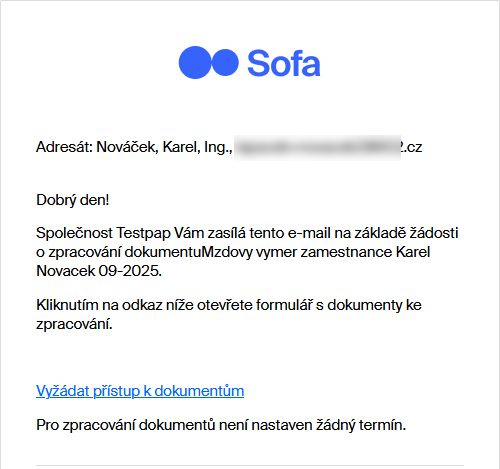
The next person on the signature path is the 2. participant – employee. The employee receives an email notification with a request to process the document. The notification includes a link (Request access to documents) to the document in Sofa. The employee can click the link to log in to Sofa and continue to the form with documents.
If the employee is logged in, they can find a link to the form in the Processes – To process view.

The form at the employee
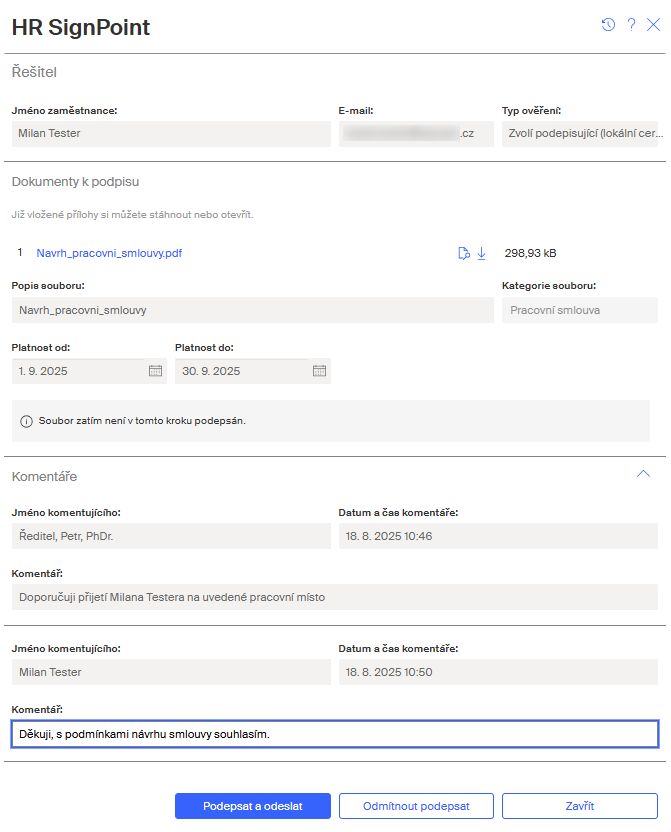
The signing employee can see three sections of the form:
-
Signer – the section contains read-only details on the signing employee, for reference.
-
Documents to sign – the section lists the files included in this process and their details. The files listed and their details cannot be changed. But the employee can preview the files or download them to their device.
-
Comments – the employee can enter any notes for the process in the Comments field. If they are going to reject the signature, a comment with an explanation is mandatory.
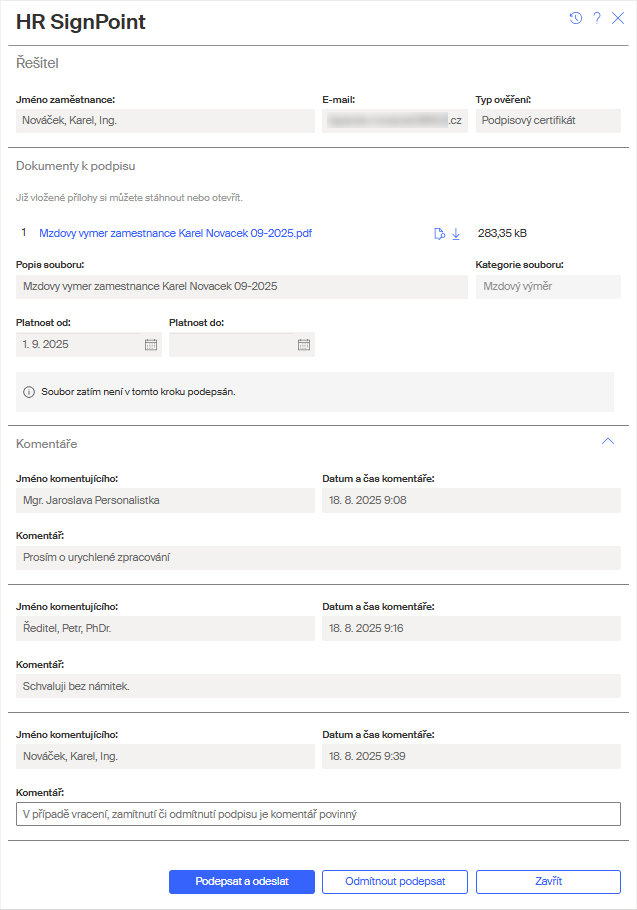
The employee agrees and sends the form to further workflow
If the employee decides that everything is in order and the documents can be signed, they can just click Sign and submit.
The standards steps for signing the individual documents follow.
The form display then changes to "read only" and a message about successful signing is displayed. The employee can close the form window.

Because the process has not completed yet, the employee can find its entry in the Processes – In process view. The Processing column here shows who is the next person to process the form.

The employee refuses to sign the documents
If the employee decides that they cannot sign the documents, they enter the reason in the comment field and click Reject signing. The process ends without any queries.
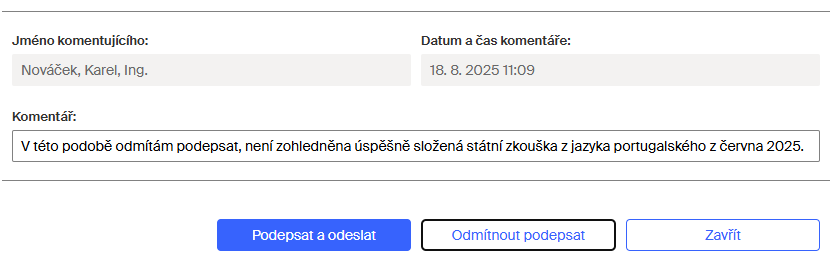
The process author receives an email notification on the signature rejection.

The author can see the process entry in the Processes – Closed or Processes – All views, with Rejected indicated in the Status column.

The last participant – the HR manager archiving the process
The signature path can continue with other signers or approvers on behalf of the employer. But the process always ends with a participant in the HR manager role, who archives the process.
The HR manager receives an email notification on successful completion of the signature cycle with a link to the process form.
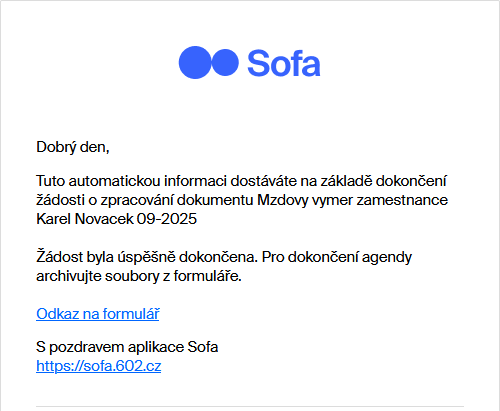
A link to the form is also available in the Processes – To process view.

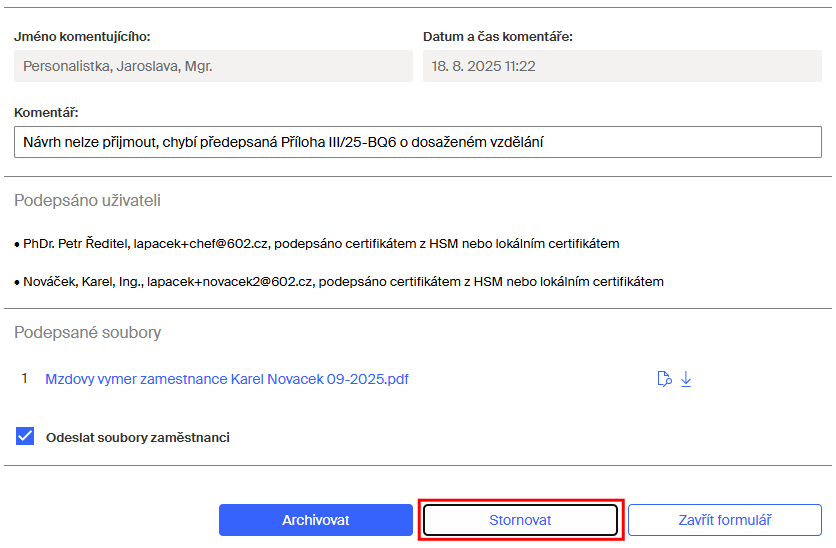
The HR manager can also add their comment to the form. A comment is mandatory if the HR manager is going to cancel the process.
The Signed by users section lists the users who signed the document(s) and the signing methods they used.
The next two sections contain links to documents. The first one lists the signed documents and the second one the signature clauses.

| The signature clauses are separate PDF files, also signed, that contain details on the signatures attached to the document. You can attach the clauses to the signed documents to help validate them. |
You can preview the individual documents here or download them on your computer drive.
| To ensure that the employee receives the signed documents on their private email account, keep the Send files to the employee field checked. Note that the size of the sent files should respect the limit of the employee’s mailbox size, if there is any. |
The HR manager finishes and archives the process
When the HR manager decides the process is in order and can be finished, they click Archive.
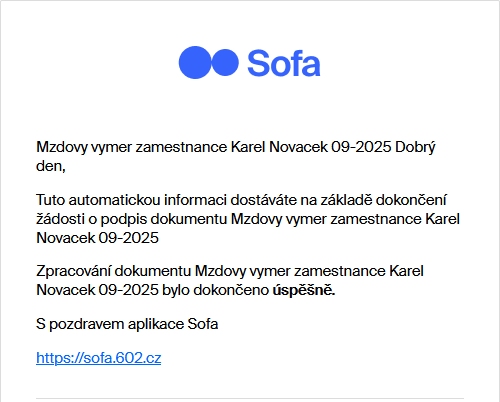
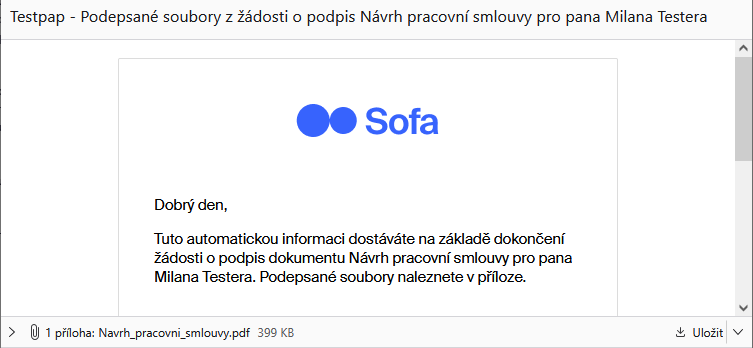
The employee receives an email notification on the completion of the process and the signed files.
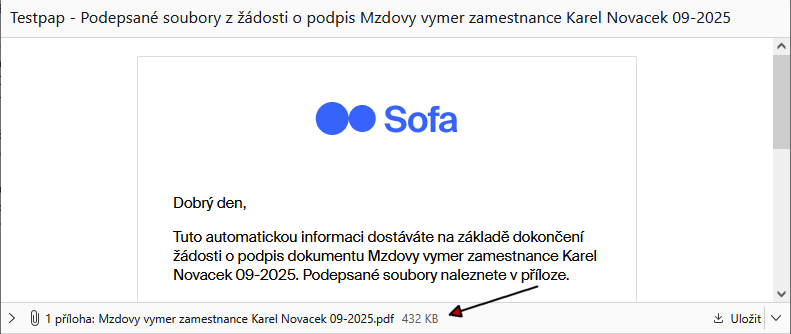
The signed file or files are attached to the email message and the employee can save them where they need.
The signed file is placed in the HR documents in the Sofa DMS system and employees in the HR role can find it there. The signature clauses for the signed documents are placed in the Signature clauses folder.
If set by the process author, the signed files are also placed in the employee’s Personal folder. The employee can find their signature clauses in the Signature clauses folder.
If the process author has also set the To be processed by payroll option, the Processed by payroll metadata item will be set to No. This metadata is used by the payroll accountant to filter out documents waiting to be processed. After processing, the payroll accountant changes this metadata to yes. If the switch stays off (greyed out), the not relevant value is written in the metadata.
| This metadata item is not displayed for the document in the Personal folder, but it is displayed for the document for example in the All files folder. |
The HR manager cancels the process
If the last signature path participant – HR manager – decides that the process cannot be archived, they need to cancel it.
-
First, enter a comment with the explanation in the Comments section. The comment is mandatory.
-
Then click Cancel.
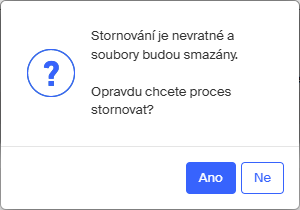
Then the HR manager needs to confirm that the cancellation is irreversible, all the files will be deleted and it will not be possible to download them from the forms.
The signature path participants receive an email notification about the cancellation and its reason.
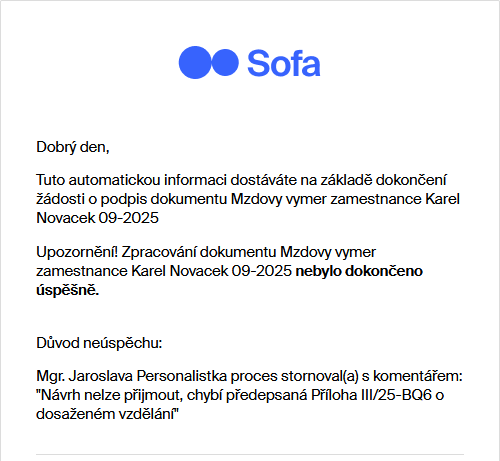
The process author can see the canceled process entry in the Processes – Closed and Processes – All with Canceled indicated in the Status column. The employee and other signature path participants can view it as well.

| The signed files from a canceled process will not be available to anyone! |
Other options
More signers or approvers on the signature path
Now we are leaving our example. The three signature path participant represented the basic participant configuration needed to run the process. You can add more participant to the signature path; they will all be considered to be the employer’s representatives.
Click Add participant to open another section (such as 3. participant – employer) and add another participant; based on the Participant role switch, they can be either a signer or an approver. For example, the company may have two executive directors who are both needed to sign the process, or an accountant needs to approve (just approve or add the data from the form to another system – not sign) a compensation agreement.
The previously last participant – the HR manager – now moves to the last position again (this role always needs to be the last on the signature path).

These participants can also either approve or reject the process.
Changing the order of the signature path participants
The Approval and signing section contains buttons to change the order of participants and to delete selected participants from the signature path.
| It is not possible to delete the signing employee and the last participant in the HR manager role. |

-
Click
 to remove the participant from the signature path. If it isn’t allowed to remove the participant, the button is not displayed.
 -
Click
 to move the participant one position up.
 -
Click
 to move the participant one position down.
| It is not possible to change the position of the last participant – HR manager. |
The signing employee is not an internal Sofa user
An employee who is not (yet) an internal Sofa user in the company can take part in the HR SignPoint process as well. If that is the case, switch the Internal option off.
Instead of selecting the employee from the list of internal Sofa users, the section displays the Name and surname field, where you enter the employee’s name and surname.
The Participant role still can be either Signer or Approver. An approver may be useful if a document needs to be evaluated by someone outside the organization.
Select the signing method in Signature verification.
In E-mail address, enter the email address for communication with the external user. The files will be delivered to the same address.
Filling in the Personal number, Department, Section and Job is optional.
Once it’s the external signer’s turn on the signature path, a notification is sent to their email address. The message includes a link to request access to the documents. The link generates a one-off access to the documents to sign.
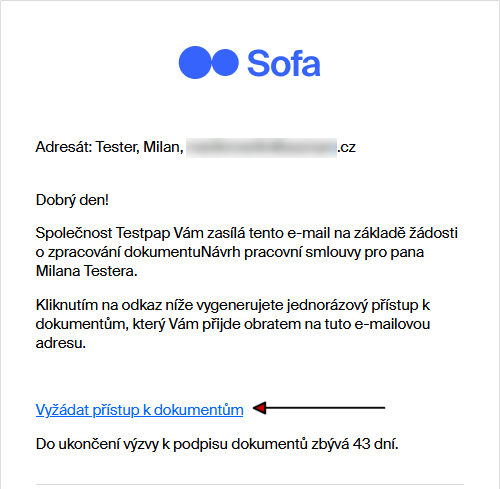
Clicking Request access to documents displays a dialog with a Verify button.
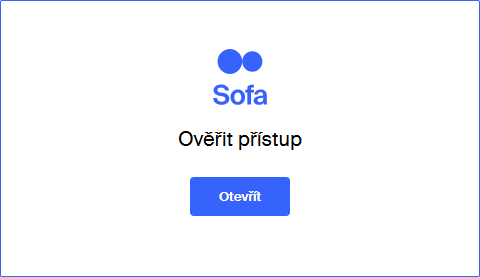
Click the button to open the HR SignPoint form where you can sign the document(s) (or reject the signature) the same way as an internal user can.
A message about the successful signature is displayed in the form. You can close the form now

The author receives an email notification about the process completion.
The external user receives a message about the request completion.
Configuration variables
| Variable name | Meaning | Default value | Data type |
|---|---|---|---|
configAddAuthor |
Enable automatically adding the author at the first place of the signature/approval path |
true |
BOOLEAN |
configAllowAttachments |
Enable adding more attachments that are not to be signed |
false |
BOOLEAN |
configAllowCustomNotifications |
Enable editing repeat notifications |
true |
BOOLEAN |
configAllowFixedPosition |
Enable automatic placement of the signature based on a placeholder in the document |
false |
BOOLEAN |
configAllowInternalAttachments |
Enable adding attachments only visible to internal users |
false |
BOOLEAN |
configAllowObservers |
Enable adding followers |
true |
BOOLEAN |
configAllowPathSaving |
Enable saving/loading the signature path |
false |
BOOLEAN |
configCertTypeFilter |
Enable certificate filtering based on the type |
false |
BOOLEAN |
configDeadlineTerminate |
Ending the process on processing deadline expiry |
true |
BOOLEAN |
configDefaultDatabox |
ID of the default data box for sending |
none |
STRING |
configDefaultNotificationSettings |
Automatically expand the notification setting section |
false |
BOOLEAN |
configDefaultOnComments |
Automatically expand the comment section |
false |
BOOLEAN |
configDefaultRepeatNotifications |
Automatically preset repeat notifications |
false |
BOOLEAN |
configDefaultShowDocumentInfo |
Automatically expand the common details section |
true |
BOOLEAN |
configDefaultShowPath |
Automatically expand the approval/signature path section |
true |
BOOLEAN |
configDefaultSignatureFixedPosition |
Automatically enable automatic placement of signature |
false |
BOOLEAN |
configExtendedAres |
Enable loading executive details from ARES |
false |
BOOLEAN |
configExtendedInternal |
Enable extended signature options for internal users |
false |
BOOLEAN |
configExtendedNotifications |
Extended notifications, send the information on participant completing their step |
false |
BOOLEAN |
configExtensionAttribute |
Extension attribute containing the employee’s personal email |
extensionAttribute1 |
STRING |
configFilterByCompany |
Enable filtering based on the selected organization |
false |
BOOLEAN |
configFindPrivateEmail |
Enable getting the employee’s personal email |
false |
BOOLEAN |
configHideCommentsForGuest |
External users never see the comments |
false |
BOOLEAN |
configChooseClass |
Enable class selection |
true |
BOOLEAN |
configChooseCompany |
Enable selecting the organization to display in the signature dialog |
false |
BOOLEAN |
configChooseRank |
Enable rank selection |
true |
BOOLEAN |
configListHideSystemGroupsRoles |
Hide system groups/roles in the list of internal users |
true |
BOOLEAN |
configListShowGroups |
Enable displaying groups in the list of internal users |
false |
BOOLEAN |
configListShowRoles |
Enable displaying roles in the list of internal users |
false |
BOOLEAN |
configShowAdditionalSetting |
Enable displaying other settings |
true |
BOOLEAN |
configShowComments |
Enable adding comments in individual steps |
true |
BOOLEAN |
configShowDocumentInfo |
Enable displaying document information |
true |
BOOLEAN |
configShowNotifications |
Enable displaying notification settings |
true |
BOOLEAN |
configShowPath |
Enable displaying the signature/approval path |
true |
BOOLEAN |
configSignatureHeight |
Default height of an automatically placed signature. To determine automatically based on the placeholder size, enter a zero. |
50 |
INTEGER |
configSignaturePlaceholder |
Placeholder for the signature location. An automatically incremented number is placed at the last position. |
SIGNPOSITION |
STRING |
configSignatureWidth |
The default size of the automatically placed signature. To determine automatically based on the placeholder size, enter a zero. |
150 |
INTEGER |
configUseDataBox |
Enable sending signed files via a data box |
false |
BOOLEAN |
debugMode |
Enable debug mode (use for testing purposes only!) |
false |
BOOLEAN |
default_class |
null |
class_public |
STRING |
vice_prac_pomeru |
null |
false |
BOOLEAN |