User management
One of the first Sofa setup tasks will be creating the user structure, which will correspond to the department structure of your company’s employees.
Start by creating the individual users, organize them in a hierarchical structure and then you can assign them to specific roles (accountant, director, administrator…) and groups (sales, administrators, directorate…).
Another way of "bringing users to Sofa" is by synchronizing users registered in the company in Microsoft Entra.
Only one user is present in Sofa when the company is created. This user has administrator permissions, and is authorized to create more users and set up all Sofa procedures and settings.
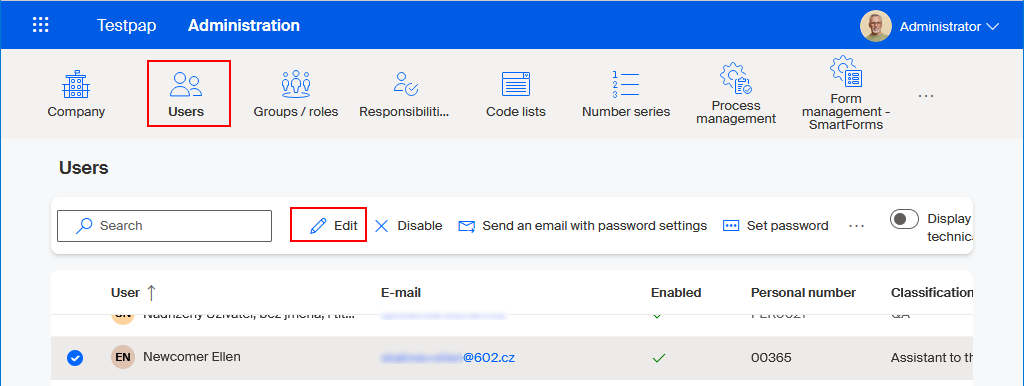
Opening the user management window
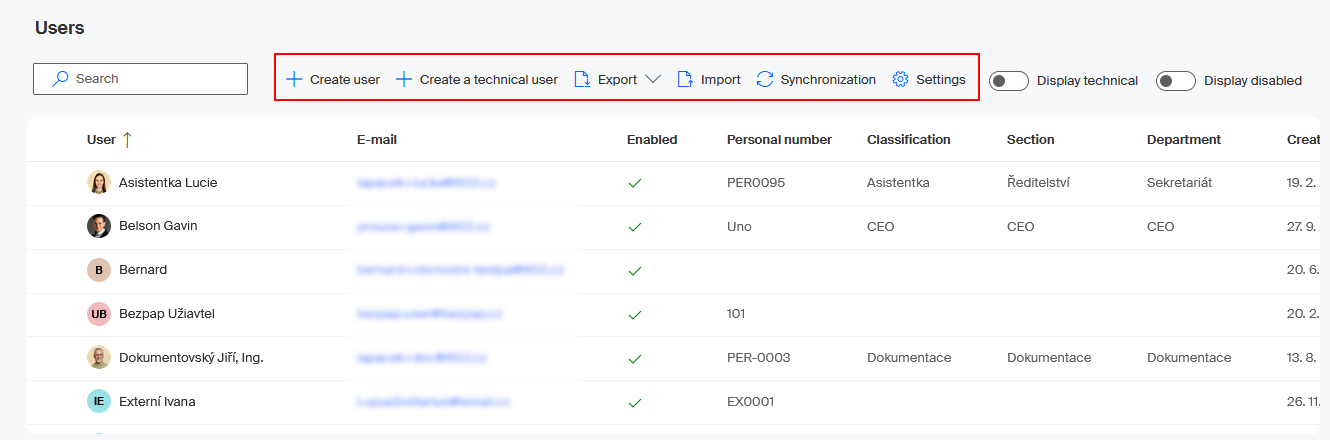
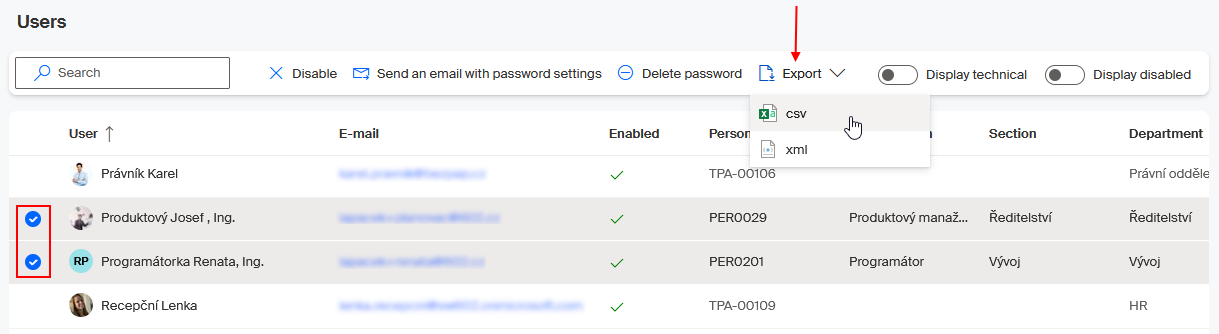
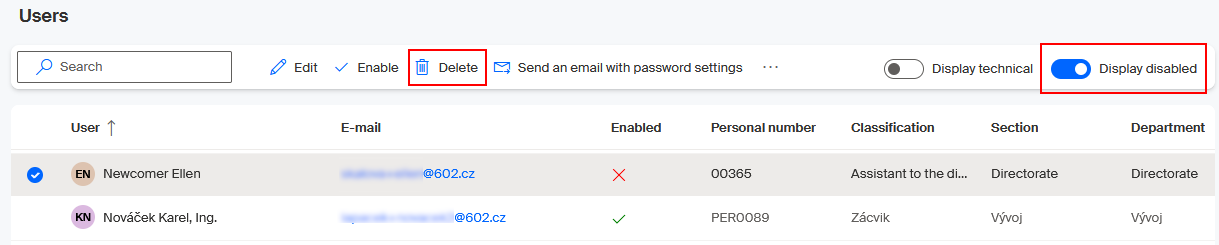
Select Administration, then Users, to open the window to manage users – the company employees.

The Users window displays a table with a list of Sofa users and controls to manage them.
When managing the list of users:
-
Check the box (or boxes) on the left to select users, then use a button on the toolbar to manipulate the selected users.
-
Click a column header to order the table by this column’s data – in ascending order; with another click, change the order to descending.
-
There is a Search field on the left above the table to look up users – this is useful when you have a large number of users in the list.
Controls on the upper right allow you to display users that are not visible by default: technical and disabled users.
The window includes a toolbar with the following operation categories:
-
Global operations – when no user is selected in the table below. Global operations are the following: create a user, create a technical user, export users (to CSV or XML), import users, Entra ID (formerly Azure Directory) synchronization and user management settings.
-
Context operations – when you have selected at least one user. The following context operations are available:
-
When only one user is selected – edit the user description and set up the password.
-
For several selected users – disable and re-enable, delete, export, delete password.

-
| If the number of displayed users and the total number of users don’t seem to match on the indicator below the table, it is because the switches on the upper right are set to hide technical and disabled users. |
Environment settings
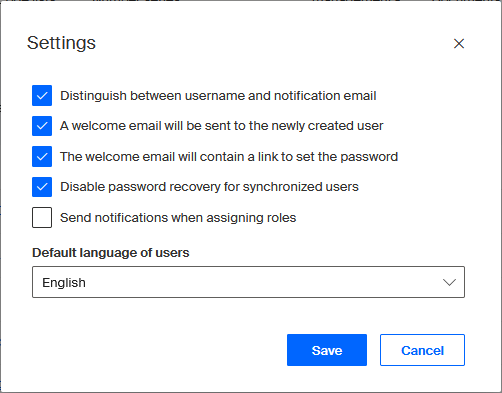
Before you start adding new users, it is recommended to check the general environment settings and adjust them as you need. Click Settings on the toolbar.

The Settings configuration dialog is displayed.
Distinguishing between username and email
The Distinguish between username and notification email field allows you to set whether users will be able to use one email address to log in to Sofa (as a username) and another email address to receive notification messages (with messages from the processes).
-
If the field is unchecked, the email address used for logging in (as a username) will be also used to receive notification messages, just as it has been used in previous Sofa versions (up to and including version 5.2).
-
Check the field to enter two email addresses: one as a username, the other to receive notification messages.
Welcome email with a password link
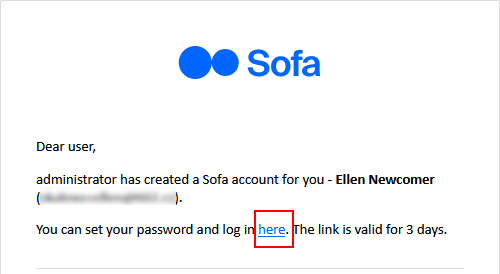
If you check A welcome email will be sent to the newly created user, an email message will be sent to each new user. The message will inform the user that they have been added to Sofa and how to get an access password.
If The welcome email will contain a link to set the password is checked, they will need to click the here link in the lower part of the welcome email.
A dialog opens where they can set up their own new Sofa password; enter it twice to prevent mistakes.
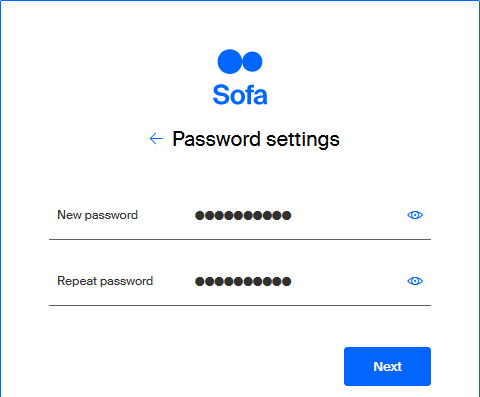
Notice the eye button on the right of the fields. Click it to display the password visibly.
A notification on setting up the password is then displayed and the login dialog to Sofa opens. Enter the email address included in the notification message in the Email address field. Select Next to open the dialog to enter the password you have just set up.
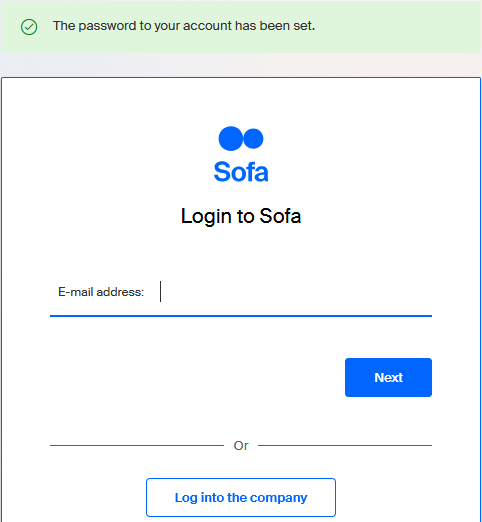
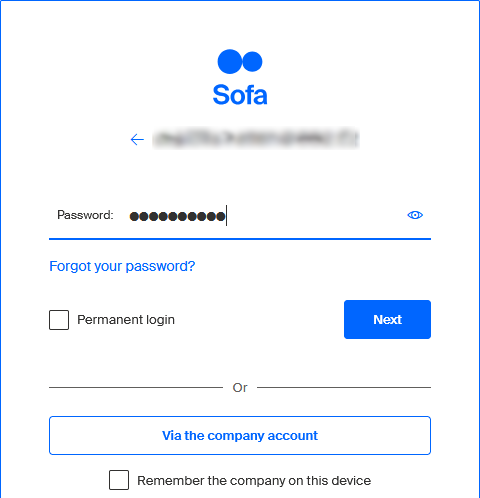
Then select Next again. The user is then logged in to Sofa and the application window opens to Dashboard.
If The welcome email will contain a link to set the password is unchecked, the administrator needs to create the password when creating a new user, on the fist tab of the New user dialog.
Welcome email without a password link
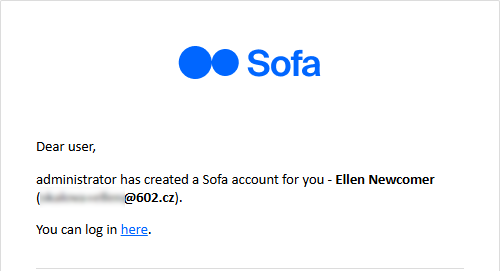
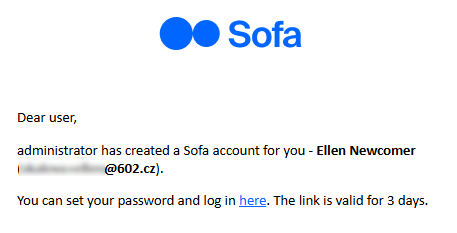
If a welcome email is sent and the password is set by the administrator, the welcome email includes a link to log in to Sofa (You can log in here).
You can see an example of the welcome email below. The user can click on the here link to open Sofa and log in using the password that the administrator has created and given them by other means.
Disabling password recovery for synchronized users
To prevent a password collision caused by a request to restore the password for users who have been added to Sofa by synchronization, the option to restore the passwords is disabled for these users by default. The field Disable password recovery for synchronized users is therefore checked in the configuration dialog.
This setting applies to the whole organization.
Notification messages on assigning to a group or role
Sending notification messages is only available if enabled by the administrator for the whole organization. To adjust the setting, go to Administration, then select Users and the Settings button on the toolbar. In Settings, check Send notifications when assigning roles and save the change.
Creating a new user account
To create a new user, go to the toolbar in the Users window and select +Create user.

The window New user with four tabs is displayed.
The mandatory fields are marked with a red asterisk. You can fill in the optional details anytime later (most details can be changed later too). Use the buttons Next and Previous to switch between the tabs.
Personal details
The Personal details tab stores details about the user as a person – the name including academic titles, telephone numbers both mobile and landline, the personal number in the organization and their Sofa display language, if it is different from the default.
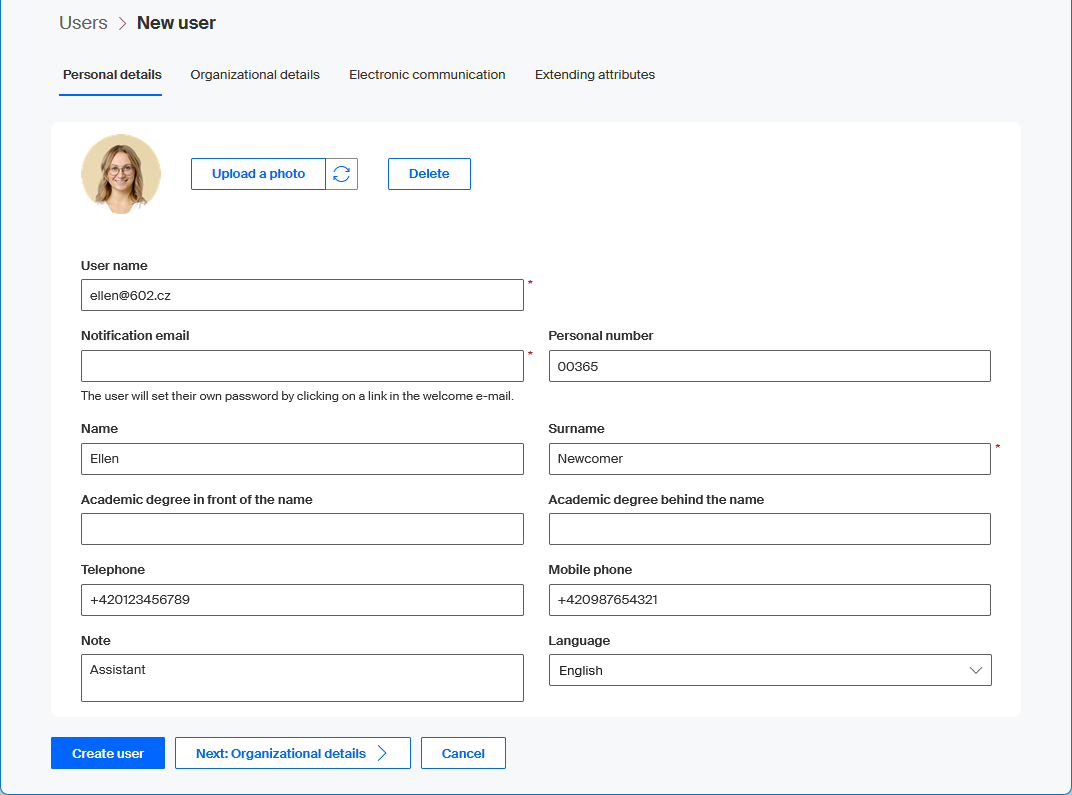
Depending on the configuration settings for the whole Sofa, enter the following details:
-
User name (user’s company email address, different from a private address).
-
Notification email (email address for sending notification mail, different from the address used as a username).
-
Password, entered twice (if not set by an administrator or by the user during first login).
You can also upload the user’s image here in one of image file formats. Click Upload photo in the upper left part of the window to open a dialog where you look up a file with the user’s image. The image will be then used instead of a neutral image in screens where users' details are handled (phone book, organizational structure and the Users window itself). The user’s image will be also displayed in the upper part of the header in the main Sofa window.
Select Next: Organizational details to continue to the next tab.
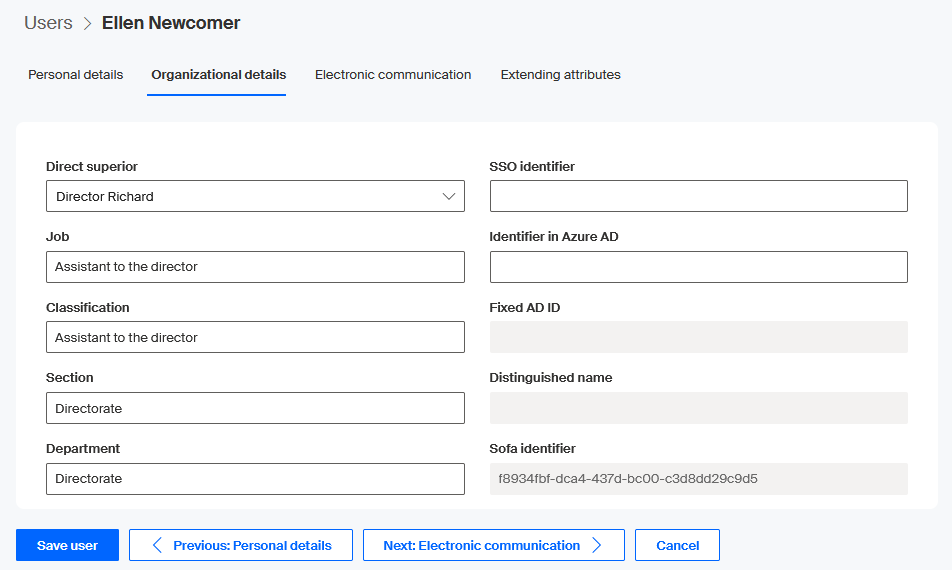
Organizational details
This tab is primarily used to set up the new user’s direct superior. Select them in the field Direct superior, which contains the list of all enabled company’s users in Sofa.
Use the four fields – Job, Role, Section and Department to place the employee in more specific categories within the company hierarchy.
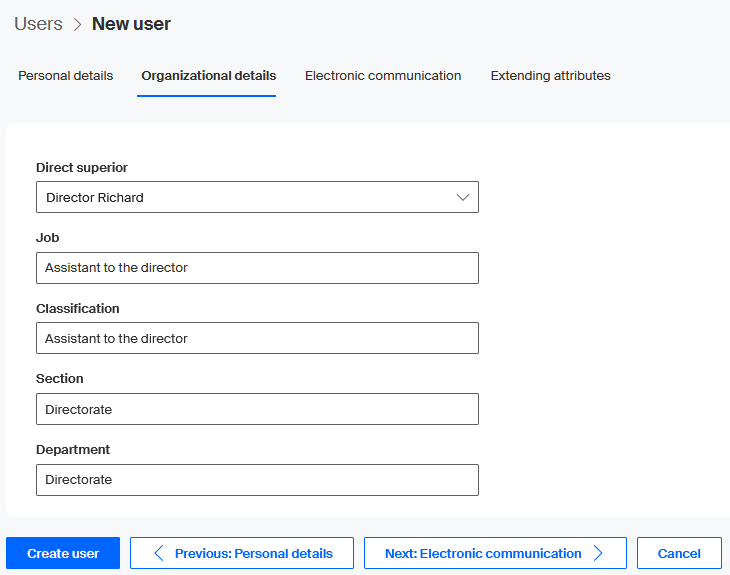
Select Next: Electronic communication to continue to the next tab.
Electronic communication
On the Electronic communication tab, you can give user’s consent with electronic communications, select the preferred method and enter the required contact details.
| By law, the contact details must be a personal telephone number, email account or data box! |
Without consenting to electronic communication by checking Consent to electronic communication, some processes cannot be used, especially those that directly require sending the document to the user’s private mailbox.
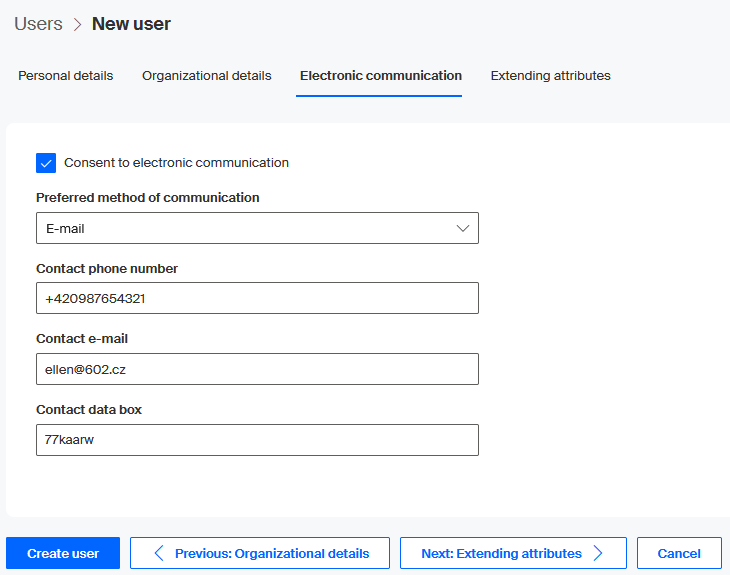
Select Next: Extending attributes to continue to the next tab.
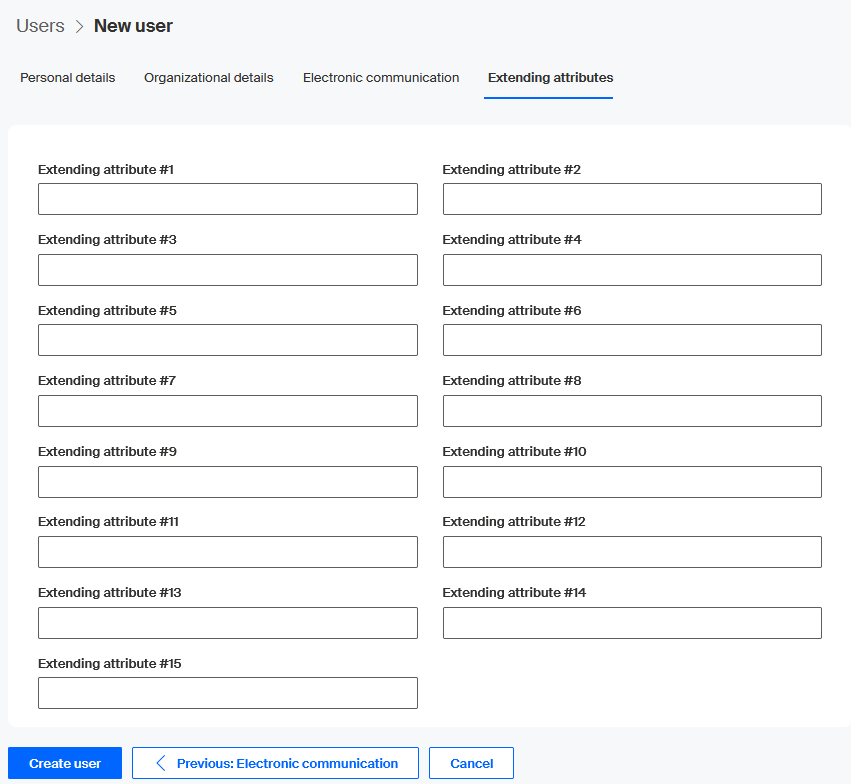
Extending attributes
The Extending attributes tab contains a group of fields that allow you to add fifteen additional data entries of string type to the user’s set of details. This data is primarily used for processes, which can save user-related data here and use it later as needed.
The contents can also be used during the synchronization process in Entra ID (Azure AD). In the synchronization setup, on the Setting up the mapping for extending user attributes tab, these items can be mapped to Extension attributes (OnPremisesExtensionAttribute).
Creating a user
When you have entered all the required details in the New user window, click Create user to enter the new user to Sofa. If one or more mandatory details are missing, they are framed in red with the message The value is mandatory.

If everything is in order, you return to the User window, the new user is added to the list of enabled users and the information strip displays the message "The user has been created*.
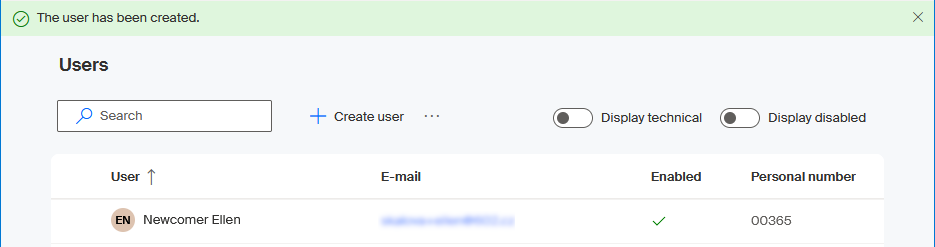
A welcome message is then sent (or not sent – based on the environment settings) to the new user.
Editing a user account
The accounts of all Sofa users can be edited in the Users window.
-
Look up a user entry and click it to select.
-
On the toolbar, click Edit.
-
A window opens, similar to the one for creating new users. It also consists of four tabs, and you can edit the details on them.
-
Click Save user to save the changes.
| To work with individual users later in the GraphQL query system, you will need their identifiers. The identifier is generated automatically and displayed in the Sofa identifier field on the lower right. |
| If the user has been created during synchronization, an additional detail is available in the field Identifier in Azure AD. |
| This method can also be used to edit a technical user’s account – see the next chapter. |
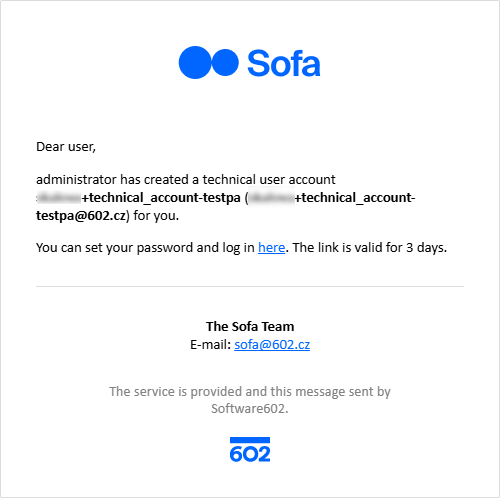
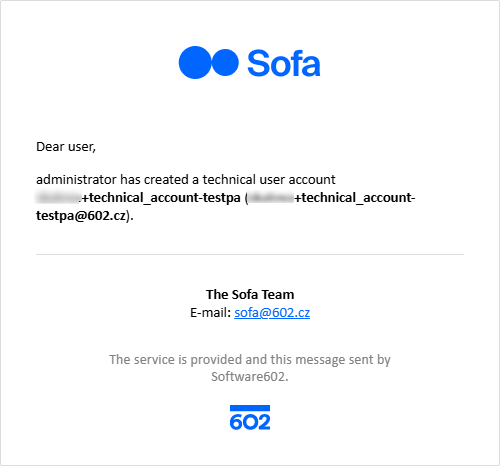
Creating a technical user account
A so-called technical user’s account is an account of a Software602 employee created in a customer’s organization. This method ensures that the account is personalized and the name clearly shows in which organization it has been created. There can be more than one technical user.
To create a new technical user account, go to the toolbar in the Users window and click +Create a technical user.

The window Create a technical user opens. Only a single entry can be specified here – the employee’s email address in the company. Enter it in the E-mail field.
| There can be more than one technical user. To make technical users visible in the Users window, enable their display using the Display technical switch. |
The technical users’s new email address is created from the entered address in the following way: characters before the @ sign in the entered address are followed by the "plus" sign, followed by the technical_account string, the "–" character and the first six characters from the company name. If there is an unallowed character in the organization name, it is not used. If needed, an index is added. The address is completed by the @ sign and the domain name.
Example: For a technical user with work address user@example.com in organization Documentation602, the generated username will be user+technical_account-docume@example.com.
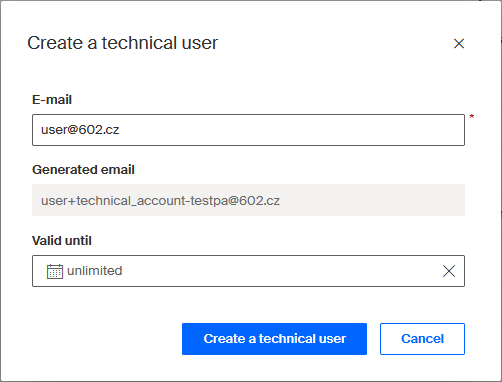
In Valid until, select the validity period for the technical user account. There are two options: unlimited, or valid until a specific date. Set the date using a calendar opened with the button at the right end of the field.
Click Create a technical user to create the account. The creation is confirmed by the message A technical user has been created in the information strip.

The future technical user and organization’s administrators receive an email notification about creating the account. The technical user will receive a link in the message to create a password.
Note that technical users are only visible when the Display technical switch is enabled. No name or organizational hierarchy placement are specified for these users.

Handling user passwords
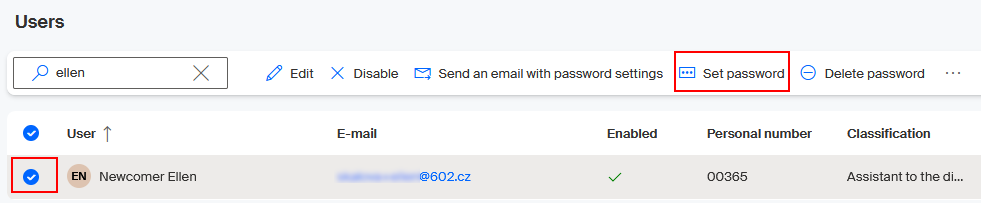
Setting a new password
This feature allows the administrator to change a users’s Sofa password – set up a new one.
-
Click to select the user.
-
On the toolbar, click Set password.
In the Set password dialog, enter the new password twice in the fields. Sofa checks that the password meets restrictions and that the two entries match.

Click Save to save the password. From now on, the user needs to use the new password on login.
The successful completion is announced to the administrator by the message User’s password has been set in a green information strip.
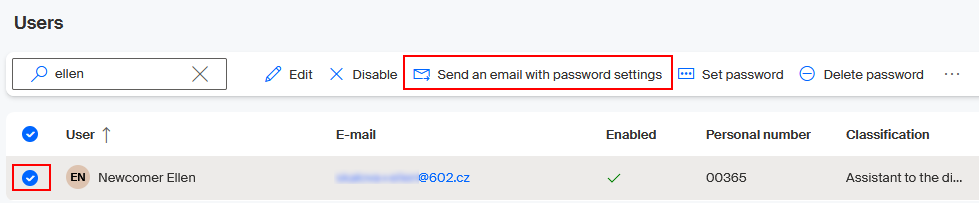
Sending a password-setting email
This feature allows the administrator to send a selected user a way to create a new Sofa password.
-
Click to select the user.
-
On the toolbar, click Send an email with password settings.
Read the information in the following dialog and click Send an email with password settings to confirm.
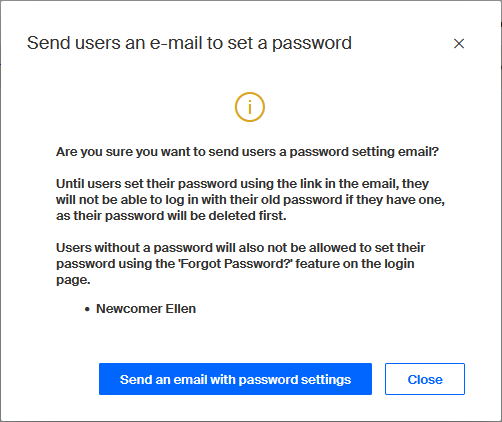
The following dialog display a confirmation of sending the email.

The user receives an email message with a prompt to change their password.
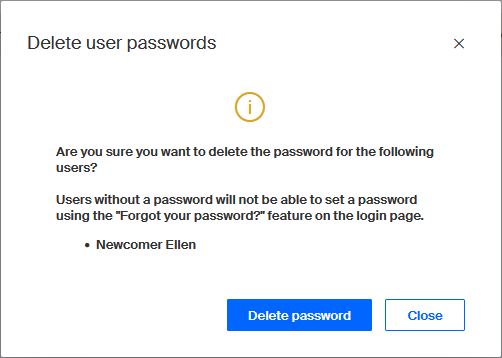
Deleting a password
This feature allows the administrator to delete a user’s password and essentially prevent them from accessing Sofa.
-
Click to select the user.
-
On the toolbar, click Delete password.
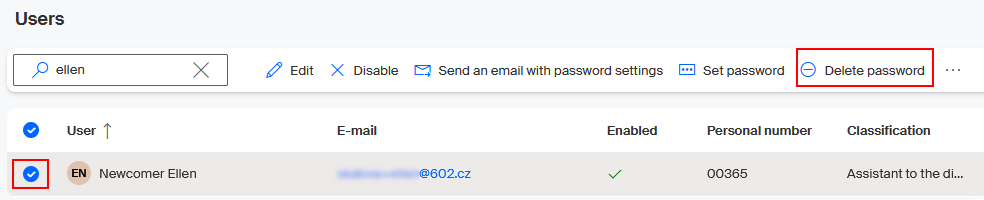
| Users without a password will not be able to set up a new password using the Forgot your password? feature in the login dialog. |
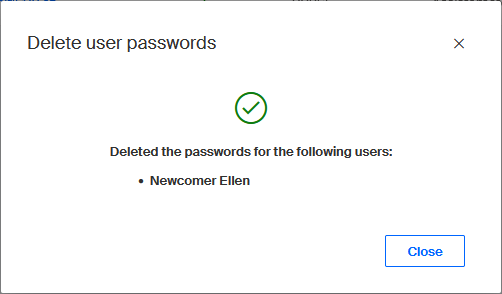
Successful password deletion is announced to the administrator by a message in the Delete user passwords dialog.
User export and import
User details can be exported from Sofa or imported to Sofa.
Export
You can export either the complete list of users or selected users only.
To export all user details to one file:
-
Do not select any users and click Export on the toolbar.
-
From the menu, select the file format to use for the export – CSV or XML.
-
In the following dialog, select saving (not displaying) the file
userExport.csv(oruserExport.xml).

The file with the exported details will be saved to the folder for downloaded files (typically Downloads).
| Only displayed users are exported. If the Display technical switch is not enabled, technical users will not be included in the export. If you narrow down the user list using search, only the details of matching users will be exported. |
To export the details of individual users:
-
Select the users to export.
-
On the toolbar, click Export and select the file format from the menu.
-
The next steps are identical with exporting all users.
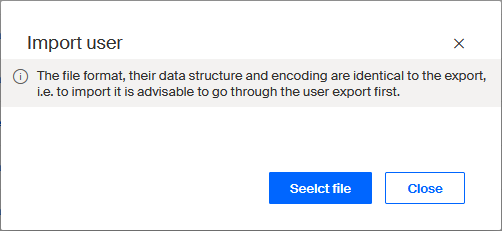
Import
User details can be also imported to Sofa from a suitably formatted file. Click the Import button on the toolbar to request an import. The button is only available if no users are selected.

The imported file must have a specific format. It must not contain a header and each row (corresponding to one user) must have the following format:
email;givenName;surname;preNominalLetters;postNominalLetters;telephoneNumber;mobileNumber;personalNumber;description;superiorUserName;orgJob;orgSection;orgDepartment;orgRole;syncIdent;immutableId;distinguishedName;ssoIdent;id;subordinateUsers;hasPassword;password;enabled;technicalUser
The character separating the individual list items may be either a semicolon or a colon. No user detail (including the password) may contain these separators. The file must be in UTF-8 encoding and may contain details of up to 50 users. To import more data, divide it into several files.
Because the import file format – the data structure and encoding – is identical to the data format used for exporting, it might be useful to export a part of the data first and study the format.
The following users will not be created during import:
-
Whose username is not a correct email address.
-
Whose username is identical with an existing user.
-
Whose username is present in the CSV file more than once. In such a case, only the first found user will be imported.
-
Whose password is shorter than 6 characters.
-
Whose surname is not specified.
-
Whose personal number is not specified.
-
Whose personal name is identical with that of an existing user.
-
Who have the username of their direct superior specified, but the user with the given username does not exist, or is listed in this file but will not be created, or setting them as the direct superior would create a loop in the user hierarchy.
Click Select file and the file selection dialog opens.
A list of users to be imported is displayed.
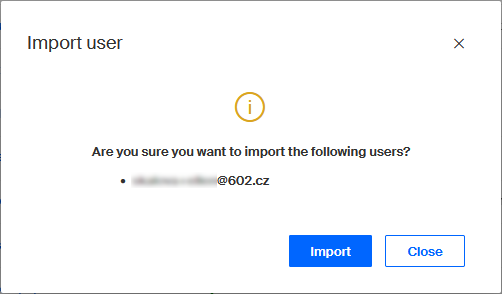
Click Import. Sofa then starts loading user data from the selected file. If the import is successful, a message is displayed, such as:
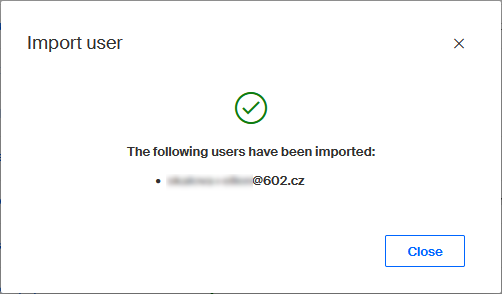
A welcome email will be sent to the newly created users.
Disabling and deleting a user
User status
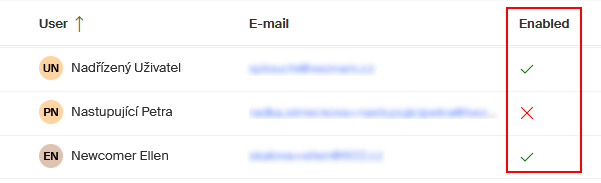
The user status is shown in the Enabled column. For a common user registered in Sofa, a green checkmark (Yes) is displayed here – this means that the user can use all application features as their permissions allow, and is also able to communicate with other users in both directions.
The user status can be found in the Users window in the user list, in the Status column.
Disabling a user
A user with administrator rights can disable any user (excluding themselves). A disabled user stays on the user list, their documents will stay in the system and assigned to them, but the user won’t be available to others (for example, it will not be possible to assign them a document for processing). Disabling is a reversible process – it can be canceled.
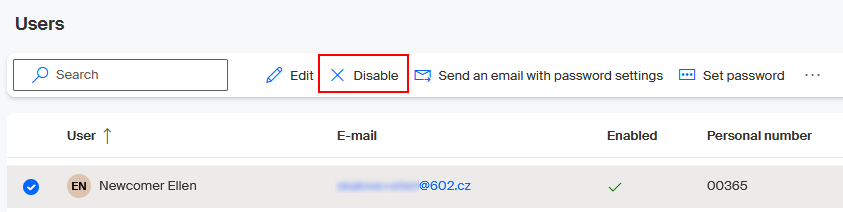
To disable a user, select their entry in the Users window (the round button before their name will be checked). You can select more than one user. Then click Disable on the toolbar.
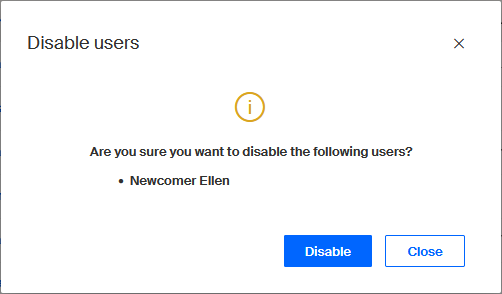
A confirmation dialog is displayed first. To confirm disabling, click Disable.
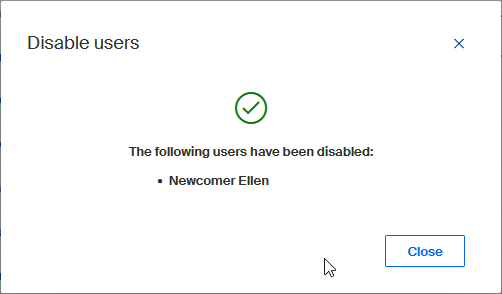
A list of users disabled in this operation is then displayed.
Disabled users are not displayed in the standard user list view.
Click to enable the Display disabled switch. The user list now displays disabled users in addition to enabled ones.
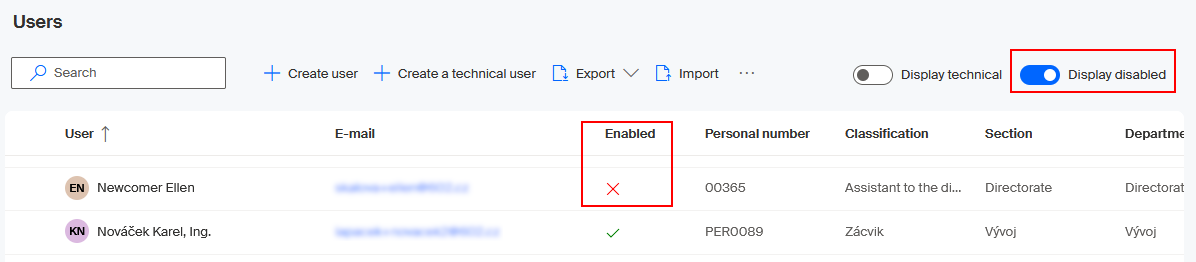
The green checkmark (Yes) in the Enabled column has changed to a red cross (No).
Enabling a disabled user
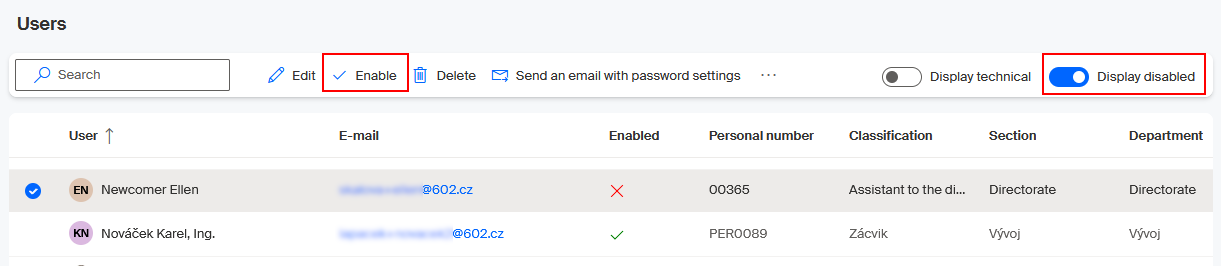
A disabled user can be later re-enabled – returned to full Sofa use. To enable a user again, do the following:
-
In the list in the Users window, select the user or users to enable.
-
On the toolbar, click Enable.
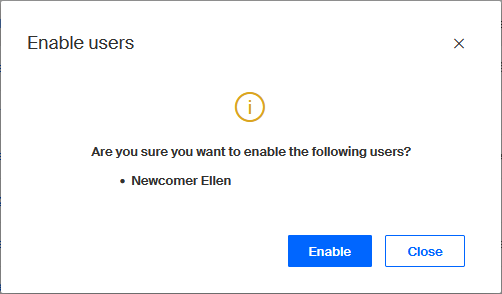
After confirming the Enable user dialog, the user is enabled again.
After enabling them successfully, the app displays a list of enabled users.
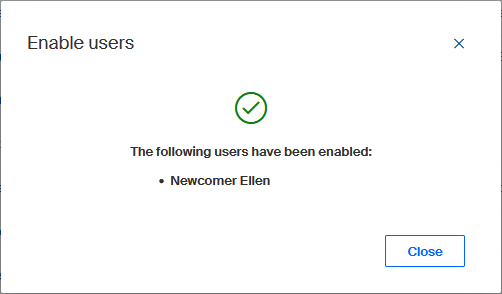
The indicator in the Enabled column changes from a red cross (No) to a green checkmark (Yes).
Deleting a user
Users can be deleted – removed from Sofa completely. After a user is deleted, it won’t be possible to log in using their login details, the user will not be displayed on the user list and will not be counted towards the maximum number of users in the organization. A deleted user cannot ask for any system settings, such as password recovery.
| This operation is irreversible. |
The following rules apply:
-
The user will be replaced with a selected user in the All users group.
-
The user does not have any subordinates.
-
The user did not take part in any filled-out processes.
-
The user does not have any documents.
-
The user is not in any responsibility.
The user to be deleted must be disabled first. To see their entry, enable the Display deactivated switch. The user list now displays disabled users in addition to enabled ones.
In the Users window, select the entry for the user to delete, and click Delete on the toolbar. You can also delete a group of selected users.
A successor needs to be set for the deleted user. Select the successor in the Delete user dialog, in the Successor field, which contains a list of enabled users of the organization.
In User documents, select, whether to delete the documents that belong to the deleted users, or assign them to the successor.
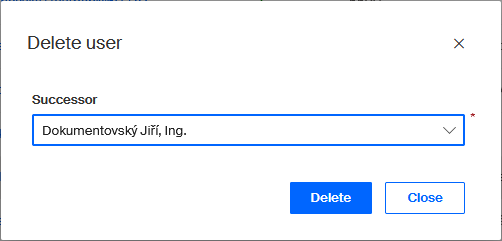
During deletion, the window displays the field When the user is deleted, their records will be transferred to the following user. Open it to display a list of Sofa users and select who will be the successor to the user being deleted.
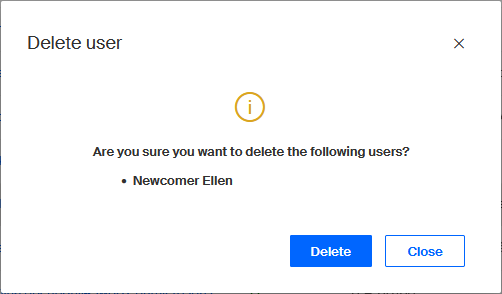
Confirm the deletion in the Delete user dialog by clicking Delete.
The last message confirms the deletion.
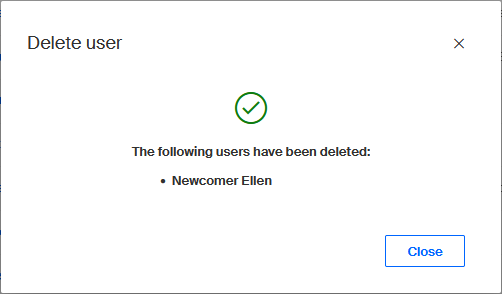
Now the removed user is not on the list of users anymore, not even with the Display disabled switch enabled.
User synchronization
If a connection of Microsoft Entra ID (formerly Azure AD) type has been created for the organization, use the Synchronization button on the toolbar to open the Synchronization window. Here you can check the synchronization and also run it manually (outside of the preset schedule).

For more details, see chapter Integration to Microsoft 365 – User synchronization.